–°–∫–∞—á–∞—Ç—å —Å —é—Ç—É–± etrailer | Curt Trailer Hitch Installation - 2013 BMW X5 –≤ —Ö–æ—Ä–æ—à–µ–º –∫–∞—á–µ—Å—Ç–≤–µ
etrailer | Curt Trailer Hitch Installation - 2013 BMW X5
4 –≥–æ–¥–∞ –Ω–∞–∑–∞–¥
–°–∫–∞—á–∞—Ç—å –±–µ—Å–ø–ª–∞—Ç–Ω–æ –∏ —Å–º–æ—Ç—Ä–µ—Ç—å —é—Ç—É–±-–≤–∏–¥–µ–æ –±–µ–∑ –±–ª–æ–∫–∏—Ä–æ–≤–æ–∫ etrailer | Curt Trailer Hitch Installation - 2013 BMW X5 –≤ –∫–∞—á–µ—Å—Ç–≤–µ 4–∫ (2–∫ / 1080p)
–£ –Ω–∞—Å –≤—ã –º–æ–∂–µ—Ç–µ –ø–æ—Å–º–æ—Ç—Ä–µ—Ç—å –±–µ—Å–ø–ª–∞—Ç–Ω–æ etrailer | Curt Trailer Hitch Installation - 2013 BMW X5 –∏–ª–∏ —Å–∫–∞—á–∞—Ç—å –≤ –º–∞–∫—Å–∏–º–∞–ª—å–Ω–æ–º –¥–æ—Å—Ç—É–ø–Ω–æ–º –∫–∞—á–µ—Å—Ç–≤–µ, –∫–æ—Ç–æ—Ä–æ–µ –±—ã–ª–æ –∑–∞–≥—Ä—É–∂–µ–Ω–æ –Ω–∞ —é—Ç—É–±. –î–ª—è —Å–∫–∞—á–∏–≤–∞–Ω–∏—è –≤—ã–±–µ—Ä–∏—Ç–µ –≤–∞—Ä–∏–∞–Ω—Ç –∏–∑ —Ñ–æ—Ä–º—ã –Ω–∏–∂–µ:
–ó–∞–≥—Ä—É–∑–∏—Ç—å –º—É–∑—ã–∫—É / —Ä–∏–Ω–≥—Ç–æ–Ω etrailer | Curt Trailer Hitch Installation - 2013 BMW X5 –≤ —Ñ–æ—Ä–º–∞—Ç–µ MP3:
–ï—Å–ª–∏ –∫–Ω–æ–ø–∫–∏ —Å–∫–∞—á–∏–≤–∞–Ω–∏—è –Ω–µ
–∑–∞–≥—Ä—É–∑–∏–ª–∏—Å—å
–ù–ê–ñ–ú–ò–¢–ï –ó–î–ï–°–¨ –∏–ª–∏ –æ–±–Ω–æ–≤–∏—Ç–µ —Å—Ç—Ä–∞–Ω–∏—Ü—É
–ï—Å–ª–∏ –≤–æ–∑–Ω–∏–∫–∞—é—Ç –ø—Ä–æ–±–ª–µ–º—ã —Å–æ —Å–∫–∞—á–∏–≤–∞–Ω–∏–µ–º, –ø–æ–∂–∞–ª—É–π—Å—Ç–∞ –Ω–∞–ø–∏—à–∏—Ç–µ –≤ –ø–æ–¥–¥–µ—Ä–∂–∫—É –ø–æ –∞–¥—Ä–µ—Å—É –≤–Ω–∏–∑—É
—Å—Ç—Ä–∞–Ω–∏—Ü—ã.
–°–ø–∞—Å–∏–±–æ –∑–∞ –∏—Å–ø–æ–ª—å–∑–æ–≤–∞–Ω–∏–µ —Å–µ—Ä–≤–∏—Å–∞ savevideohd.ru
etrailer | Curt Trailer Hitch Installation - 2013 BMW X5
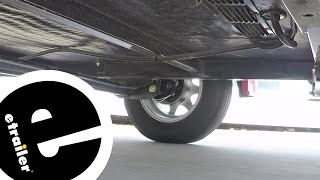
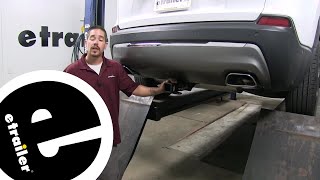
Click for more info and reviews of this CURT Trailer Hitch: https://www.etrailer.com/Trailer-Hitc... https://www.etrailer.com Don‚Äôt forget to subscribe! ¬Ý¬Ý¬Ý/¬Ýetrailertv¬Ý¬Ý Full transcript: https://www.etrailer.com/tv-install-c... Shane: Hey guys, Shane here with etrailer.com. Today, I'm going to walk through how to install the CURT class three trailer hitch receiver on your 2013 BMW X5.Looking for a hitch for this vehicle, in my opinion, you're going to want one that is going to maintain a nice clean look on the vehicle. You can see how the CURT hitch fits on there. It's nice and flush with the edge of the bumper. The receiver or the cross tube is completely hidden behind our bumper fascia. So, we're not really seeing much, again, maintaining the nice clean look of the BMW itself.This hitch is going to be a steel construction, black powder coat finish. It's really going to help resist any rust or corrosion. Adding a hitch like this to your BMW is going to allow you to do a lot of different things. Maybe you're carrying bikes and you don't want to load them in the vehicle. Maybe you want to put a cargo carrier on, to get some of your cargo from inside the vehicle, put it on the cargo carrier so you can make more room for your passengers and make your ride much more comfortable. Maybe you're pulling a small trailer. This hitch is going to allow you to do all of that.This is going to be a class three hitch, two inch by two inch receiver tube opening, reinforced collar to give us a little extra stability there. Hitch pin hole is going to be five eighths inch in diameter. It's going to take a standard five eighths hitch pin. Hitch pin and clip does not come with this hitch, however you can find them here ar etrailer.com. We're going to have rolled steel style safety chain loops. It's going to accept many different size safety chain hooks. Can you see there, we've got plenty of room.Now, I'm going to give you a few measurements to help you when deciding on any of your hitch mounted accessories you may need, such as a bike rack, a ball mount or cargo carrier. From the center of our hitch pin hole to the outermost part of our bumper, it's going to be about four inches. This number is important for any of your bike racks or cargo carriers that may fold up against your vehicle. You want to make sure they're not going to make contact. From the ground to the top, innermost part of our receiver tube is going to be about 13 and a half inches. Keep that number in mind for any of those hitch mount accessories that may require a little bit more ground clearance. As far as our weight capacities go, we're going to have a 600 pound max tongue weight, which is a downward pressure on the inside of the receiver tube.So when you're loading the cargo carriers, bike racks, you want to make sure you're not exceeding that downward pressure. 6,000 pounds gross towing weight, which is going to be how much it can pull. It's going to be the trailer, plus the load included. You can use weight distribution with this hitch, however, the weights are going to say the same.Now that we've gone over some of the features, let's walk you through how to get it installed. Start our installation inside the rear cargo area of our vehicle. On both sides, we need to remove this panel.We're going to pull up this foam pad on the passenger side. Driver's side it doesn't cover. We're going to unplug our taillight. Down on the bottom there's going to be a little tab. Push up on it, pull out. We're going to take an eight millimeter socket. We're going to remove this nut, this nut and this nut.We'll slide our tail lights out, set them aside in a safe place. We're going to take a strap, we're going to hook it right up here. And then right on my tailgate.In each wheel-well you need to take a small drill bit, we're going to drill out the center of the bottom two rivets. Then we're going to need to pop this panel loose all the way up to about here. If you find you're having trouble and it's not popping loose, what you can do is there's a push pin fastener here and there's one in here, you take those two off, you can pull your wheel well liner out, reach in behind and you can push the little tab to release it.Take an eight millimeter socket. We're going to remove this bolt right here. Then we need to remove our reflectors. Sometimes you can reach up behind, there's little clips. You can take a trim panel tool like this, get it in from that side. We'll release them and then slide it out. You want to make sure you're not prying from this side, because you can see right here, it hooks into the fascia. You try prying from this side, it's going to break that tab off. Take an eight millimeter socket, remove the bolt underneath the reflector.Now what I like to do before I go down to the bottom of the fascia and remove
Comments