Скачать с ютуб Building R2-D2 - Part 5: Body Assembly including dome drive. в хорошем качестве
Building R2-D2 - Part 5: Body Assembly including dome drive.
2 года назад
Скачать бесплатно и смотреть ютуб-видео без блокировок Building R2-D2 - Part 5: Body Assembly including dome drive. в качестве 4к (2к / 1080p)
У нас вы можете посмотреть бесплатно Building R2-D2 - Part 5: Body Assembly including dome drive. или скачать в максимальном доступном качестве, которое было загружено на ютуб. Для скачивания выберите вариант из формы ниже:
Загрузить музыку / рингтон Building R2-D2 - Part 5: Body Assembly including dome drive. в формате MP3:
Если кнопки скачивания не
загрузились
НАЖМИТЕ ЗДЕСЬ или обновите страницу
Если возникают проблемы со скачиванием, пожалуйста напишите в поддержку по адресу внизу
страницы.
Спасибо за использование сервиса savevideohd.ru
Building R2-D2 - Part 5: Body Assembly including dome drive.
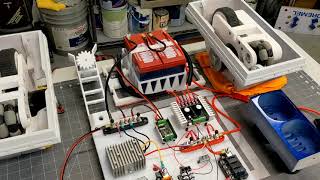
Welcome to Part 5 of my Building R2-D2 series. Today we are building the main body, fitting the utility arms and getting the dome drive working. I'll give a few tips along the way that will hopefully save you from making some of the mistakes I've made (so far). I'm using the Mr. Baddeley MK 3 cut version files for the body. My little Sovol SV01 with a build plate size of 280x240 was just large enough for some of these larger body files which are the biggest in this entire project. A few used up the full diagonal space on the build plate and almost all the gantry height of this printer. (300mm). Video Chapters: 0:00 Intro 0:19 Printed R2-D2 main body parts overview 2:47 Gluing the body together 5:15 Sanding R2's body 5:50 MK 3 threaded body rods 8:38 R2D2 body greebles overview 9:57 Fitting the utility arms 13:53 Fitting upper ring & drive motor 16:59 Fitting dome ring gear & lazy susan 19:09 Dome drive working 21:50 Conclusion Links: 37mm 24Vdc 300 RPM high torque motor I used for the dome drive: https://amzn.to/3A2O6fo SyRen 10A dome motor controller I'm using: https://amzn.to/3FAVKPk 2A 12 Conductor Slip Ring: https://amzn.to/3fwAY8P Crepe Natural Rubber sandpaper cleaning block: https://amzn.to/3tBRcG2 3D Printer used in this R2-D2 build - Sovol SV01: https://amzn.to/3dk9C4U Making R2-D2 Video Series: - Introduction to a DIY R2-D2 Build: • R2-D2 Build Your Own - Getting starte... - Part 1 Making the dome: • Make Your Own R2-D2 - Part 1. Dome pr... - Part 2 Painting the dome: • Painting R2-D2 - Dome Colors, Priming... - Part 3 Dome lights & holoprojectors: • R2-D2 Dome Lights - Teeces Kit, Diffu... - Part 4 Dome Completion: • Making R2-D2 Part 4 - Final Dome Asse... - Part 5 Mark 3 Body Assembly: • Building R2-D2 - Part 5: Body Assembl... - Part 6 R2 Sound System Basics: • R2-D2 Sound System - Easy RC control ... - Part 7 R2 Electronic Basics: • The Basics of R2-D2 Electronics for t... - Part 8 R2 Legs & Foot Drives: • Building R2-D2 Part 8 - First Steps! ... - Part 9 Painting R2-D2: • Painting R2-D2 - Plus More Finishing ... - Part 10 Installing Electronics: • R2-D2 Build Part 10 - Electronics Ins... - Conclusion to a DIY R2-D2 Build: • Making R2-D2 - Finishing Up The R2 Bu... Astromech R2 Builders Club Forum: https://astromech.net/ Mr. Baddeley's Patreon Page (source for Astromech Droid 3D print files, instructions & more): / mrbaddeley Hardware needed for the Baddeley MK3 3D printed R2 body (will obviously vary slightly feature & mounting methods dependent): - 4x 5/32nd rod (threaded on ends) or (M4 threaded rod) 500mm long - 4x 5/32nd rod (threaded on ends) or (M4 threaded rod) 370mm long - 2.5mm steel or brass rod for making the door hinge pins (I just used some plain smooth finishing nails of the correct diameter I had in my nail bin) - M2 (2.2mm) self tapping counter sunk screws (for doors/hinges). I used assorted set - lengths from 5mm to 8mm) - 12x M6x35mm button head hex bolts for skirt - 12x M6 hex nuts - 12x M6 washers - 4x M4x30 button head hex bolts - 8x M4x12 button head hex bolts - 20x M4x10 button head hex bolts - 30x M4 square nuts - 10x M4 hex nuts - 3x M4 x30 counter sunk hex bolts for lazy suzan to dome fitment - 6x M4x15 hex bolts for attaching lazy suzan to body ring - 4x 606 ball bearings for utility arms (your call if want to use RS/sealed, or ZZ cover types) - 2x 5mmx5mm magnets for doors if you want magnetic door catch (instructions call for one 5mm and one 3mm. I found the 3mm magnet too weak so used both 5mm (drilled 3mm door magnet hole out larger). - magnets of your choice (if any) to secure dome to lazy susan. DISCLAIMER: Links included in this description might be affiliate links. If you purchase a product or service with the links that I provide I may receive a small commission. There is no additional charge to you! Thank you for supporting RC Helicopter Fun.com & my channel which helps me keep creating content & fun projects like this. Please consider giving a thumbs up & subscribe if you enjoy the content - thank you & thanks for watching :)
Comments