Скачать с ютуб Airbrushing Basics 101- Rosie's Dessert Spot в хорошем качестве
Airbrushing Basics 101- Rosie's Dessert Spot
8 лет назад
Скачать бесплатно и смотреть ютуб-видео без блокировок Airbrushing Basics 101- Rosie's Dessert Spot в качестве 4к (2к / 1080p)
У нас вы можете посмотреть бесплатно Airbrushing Basics 101- Rosie's Dessert Spot или скачать в максимальном доступном качестве, которое было загружено на ютуб. Для скачивания выберите вариант из формы ниже:
Загрузить музыку / рингтон Airbrushing Basics 101- Rosie's Dessert Spot в формате MP3:
Если кнопки скачивания не
загрузились
НАЖМИТЕ ЗДЕСЬ или обновите страницу
Если возникают проблемы со скачиванием, пожалуйста напишите в поддержку по адресу внизу
страницы.
Спасибо за использование сервиса savevideohd.ru
Airbrushing Basics 101- Rosie's Dessert Spot
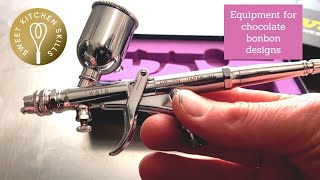
In this tutorial I demonstrate the basic techniques of how to use an airbrush for covering an object, stenciling, shading and building colour. For more dessert inspiration and for tutorial sneak peeks, visit: / rosiesdessertspot / rosiesdessertspot / rosiesds http://www.rosiesdessertspot.com I use the Iwata Studio Series airbrush and the Americolour airbrush colours (which now seem to be called Amerimist airbrush colours). Dual action airbrushes are said to be the superior to single action airbrushes. I personally believe the same, after working for a year with a single action airbrush (The Dinkydoodle) which was great for stencil work and covering large areas of colour. After trying out the Iwata dual action airbrush, I can definitely sense the difference when I go to cover an area (the brush works much faster to cover an area and gives the user sooo much more control over the amount of ink that comes through). On a dual action airbrush, as long as you don't press down on the trigger, no ink will come out. This is another added dimension of control, along with being able to adjust the air pressure (although I believe a few single action airbrushes also allow you to do this). Dual action airbrushes, because of the added control, allow you to create finer detailed work, for example drawing fine lines and writing with the airbrush. I personally have zero skill in that area at the moment, but I still find the dual action to be more versatile that the single action (or Dinkydoodle at least). General rules: - closer you work to a subject, the darker the colour of shading will be and the tighter the range of coverage will be. - The further you work from your object, the more space is covered in colour. - The further the pull the trigger, the greater the amount of ink will be pushed through and the coverage you will get. - Working in circular motions helps you to achieve even coverage (that is, after building the colour with circular motions, the ink begins to appear even on the surface and blotches of colour will dissapear. Back and forth movements should only be made if you are able to work on and off your object. If covering a cake on a turntable, you can use the turntable to do all the work while you hold your airbrush still. If you travel side to side with your cake on a turn table, this will likely lead of areas of the cake having more colour and other areas having less colour. - build colour slowly and in layers to for 1) more control over the strength of the colour 2) to give the ink a chance to dry / allow the coloured area to dry faster. Thanks guys for watching! I hope I have answered most of your questions and given you enough knowledge and confidence at this point to start playing around with your new toys! ;) It gets easier and easier as you use it. I would looove to see airbrushed creations so don't hesitate to send me some images ! Catch you guys next time! :) for business enquiries, please contact: [email protected] Daily Beetle by Kevin MacLeod is licensed under a Creative Commons Attribution licence (https://creativecommons.org/licenses/...) Source: http://incompetech.com/music/royalty-... Artist: http://incompetech.com/
Comments