Скачать с ютуб etrailer | B and W Gooseneck Trailer Hitch Installation - 2014 Chevrolet Silverado 2500 в хорошем качестве
etrailer | B and W Gooseneck Trailer Hitch Installation - 2014 Chevrolet Silverado 2500
10 лет назад
Скачать бесплатно и смотреть ютуб-видео без блокировок etrailer | B and W Gooseneck Trailer Hitch Installation - 2014 Chevrolet Silverado 2500 в качестве 4к (2к / 1080p)
У нас вы можете посмотреть бесплатно etrailer | B and W Gooseneck Trailer Hitch Installation - 2014 Chevrolet Silverado 2500 или скачать в максимальном доступном качестве, которое было загружено на ютуб. Для скачивания выберите вариант из формы ниже:
Загрузить музыку / рингтон etrailer | B and W Gooseneck Trailer Hitch Installation - 2014 Chevrolet Silverado 2500 в формате MP3:
Если кнопки скачивания не
загрузились
НАЖМИТЕ ЗДЕСЬ или обновите страницу
Если возникают проблемы со скачиванием, пожалуйста напишите в поддержку по адресу внизу
страницы.
Спасибо за использование сервиса savevideohd.ru
etrailer | B and W Gooseneck Trailer Hitch Installation - 2014 Chevrolet Silverado 2500
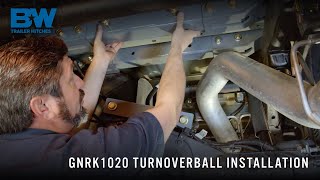
Click for more info and reviews of this B and W Gooseneck Hitch: https://www.etrailer.com/Gooseneck-Hi... https://www.etrailer.com Don’t forget to subscribe! / etrailertv Full transcript: https://www.etrailer.com/tv-install-b... Today on our 2014 Chevrolet Silverado 2500 we'll be installing the B and W turnover ball under bed goose neck trailer hitch, part number BWGNRK1012. Now we'll begin first by lowering down the spare tire and sitting it out of the way for now. Next, we'll go ahead and remove each of the rear wheels and sit those aside for now as well. Next we're going to go ahead and remove the fender liners. To do this we'll need to remove four screws and three push fasteners. Now we'll go ahead and repeat the same process on the driver's side. Next we'll go ahead and secure the exhaust using a safety strap. Once our safety strap's in place we're going to go ahead and use a little spray lubricant and a large pry bar to remove a few exhaust hangers in order to allow us to lower the exhaust down out of the way. Now we're going to go ahead and loosen up these four nuts right here on the exhaust. By doing this it'll allow the exhaust to pivot downward enough and give us a little more working room here at the back end. Now that we have the four nuts loosened up, but not removed from the stud, we'll come back to the rear of our vehicle and we'll loosen up our safety strap a little bit. Next we're going to go ahead and mark out the heat shield using our paint marker the areas that we're going to need to trim out. Now in order to trim out our section of heat shield we'll be using a cut off wheel and a pair of tin snips. Next we're going to go ahead inside the bed of the vehicle we'll measure from the rear portion of the bed up to the appropriate measurement, depending on if you have a long or short bed. We'll go ahead and mark the appropriate location in the bed as well as centering it between each of the two wheel wells. Next we'll go ahead and take our pilot bit and drill through the center mark we just made on our bed. We'll go ahead and switch over to our 4 inch hole saw and we're going to be using this piece of plywood to help keep the bits centered. That way if the bit would jump it wouldn't scratch the bed. Now we'll go ahead and drill out our 4 inch hole in the bed of our vehicle. We want to go ahead and remove the four bolts over here on the passenger side that hold the bed in place. Now we're going to need to come over here on the passenger sides fender well. We're going to need to cut a small amount out of the lip right here in order to slide one of the cross members in place. We're going to go ahead and take out this single piece of sheet metal right here. That will allow us to slide our cross member into position and then turn it up. Now we'll go ahead and take the front cross member, which is the L shaped piece, we'll go ahead and slide it in from the passenger side using the notch that we just trimmed out. As you slide it into position you will need to gentle lift up on the passenger side of the bed to give yourself just enough clearance to slide the front cross member in place. Now we'll take the rear cross member, which is the solid bar, and you'll notice how the holes are offset to one side just a little bit. When the bar is in position you want to make sure that the holes are closer to the frame rail than the bed. We'll go ahead and slide our bar into position sideways. Once the bar is into position we'll go ahead, again, gently lift up on that side of the bed allowing us to flip the bar into the correct position. Now that that's done we can go ahead and put our four bolts to hold the bed to the frame back in on the passenger side. We'll need to put our 1/2 inch by 1 1/2 inch long bolt into the second hole over on the front cross member. We'll secure the bolt in place by sliding the rubber o-ring on making sure that it's firmly against the cross member. Now we're going to go ahead and use the support device here to help hold up the center section of the goose neck from underneath. It has a bracket that comes down. It'll go through the goose neck portion and then we'll put a bolt to hold it in place. This will allow us to bolt everything else together and not have to support the center section of the goose neck. Now that we have our center section supported we'll go ahead and show you the hardware that we're going to be using to connect the front cross member to the center section. We'll be using a 1/2 inch by 1 1/2 inch long bolt, 1/2 inch lock washer, and a 1/2 inch hex nut. Now we'll go ahead and install the hardware loosely. Now we'll go ahead and attach the front cross rail to the center section. Now the location all the way over on the drivers side we've already installed the bolt with the rubber o-ring secure it in place. All we have to do
Comments