Скачать с ютуб How to Clean the Headlight Projectors on a Volvo C30 S40 V50 C70 в хорошем качестве
How to Clean the Headlight Projectors on a Volvo C30 S40 V50 C70
5 лет назад
Скачать бесплатно и смотреть ютуб-видео без блокировок How to Clean the Headlight Projectors on a Volvo C30 S40 V50 C70 в качестве 4к (2к / 1080p)
У нас вы можете посмотреть бесплатно How to Clean the Headlight Projectors on a Volvo C30 S40 V50 C70 или скачать в максимальном доступном качестве, которое было загружено на ютуб. Для скачивания выберите вариант из формы ниже:
Загрузить музыку / рингтон How to Clean the Headlight Projectors on a Volvo C30 S40 V50 C70 в формате MP3:
Если кнопки скачивания не
загрузились
НАЖМИТЕ ЗДЕСЬ или обновите страницу
Если возникают проблемы со скачиванием, пожалуйста напишите в поддержку по адресу внизу
страницы.
Спасибо за использование сервиса savevideohd.ru
How to Clean the Headlight Projectors on a Volvo C30 S40 V50 C70
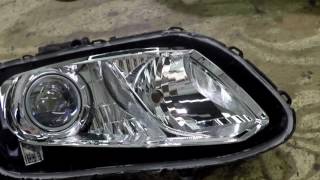
How to clean the low beam projector lights on a Volvo C30. The same or similar procedure should also apply to the S40, V50, and C70 models as well. This is a known problem on these cars unfortunately, over times the low beam performance can worsen and this is typically cause by a couple different issues. Once being a dirty project and the other having the reflector fail. #volvo #volvoc30 #headlights Website: http://4diyers.com Patreon: / 4diyers Facebook: / 4diyers Google Plus: https://plus.google.com/+4DIYers Twitter: / 4diyers Instagram: / 4diyers Tumblr: / 4diyers Pintrest: / 4diyers First you’ll need to remove the headlights, you’ll need to access the rear of the headlights so open the hood. Next there is a metal retaining bar, pull this straight up and remove. Push the headlight out to the side of the vehicle to disconnect the alignment dowel. And disconnect the electrical plug. Remove the access hatch on the rear of the headlight. Remove the bulb which simply twists and then pull it straight out. Spread the tangs on the rear and disconnect the plug. Considering it’s cold out, plastic tends to be brittle so be extra careful if you’re dealing with the same weather conditions. Inside the light there will be 4 T25 torx screws which need to be removed which holds in the project assembly. This can be done without completely disassembling the headlight. I did use a screwdriver which can have the tips changed, but I found the profile was too large around the headlight adjuster mechanism so a lower profile torx driver is recommended. A magnetic tip would make this much easier if you have one, but it can be done without it, just don’t allow the screws to fall inside the assembly. Now remove the projector, a little manoeuvring is needed around the adjustor, wiring and plastic casing. And finally the projector assembly for the low beam is out. Right away I can see the projector isn’t clear, the glass is somewhat foggy. Using a glass cleaner and a microfiber cloth is really all that’s needed. Spray the cleaner onto the cloth and then clean both the inside and outside portion of the projector lens. I wouldn’t recommend spraying the cleaner on the lens as it may get onto the reflector. These chrome coated reflectors tend to be quite delicate and can damage easily. When the projector is clean, with a damp area on the microfiber cloth, gently wipe the chrome. My chrome reflector is a little hazy in some spots, but it did seem to clean up a bit. If the chrome is deteriorated, you’ll most likely need to replace the reflector. You maybe able to get away with aluminum tape or a chrome type of heat paint, but the light output most likely won’t be as good as a new reflector. Unfortunately I’m not sure if Volvo offers just the projector assembly, but if they don’t there might be aftermarket options available. You’ll need to flip the light assembly over and bang out any debris which seems to come from the screws that holes the projector assembly in place. Reinstall the projector and snug up the screws. The screws only go into a plastic assembly, there’s not need to over tighten them and make sure the wires inside aren’t pinched either. Reinstall the bulb and plug. And finally reinstall the rear access cap. Moving onto the next light doing the same procedure. And now reinstall the headlights back into the car. The lights will sit flush with the body, ensure those alignment dowels on the side are locked into the grommets, then reinstall the metal retaining bar. Check the headlights so they’re functioning correctly. Thank you to all those who watch my videos and support my content. Don't forget to subscribe to my channel for future tutorial videos and like my video if you found it helpful. New videos are always being uploaded every week! © 4DIYers 2013 All Rights Reserved No part of this video or any of its contents may be reproduced, copied, modified or adapted, without the prior written consent of the author.
Comments