Скачать с ютуб How To Install A Pazon Ignition For Triumph Motorcycles в хорошем качестве
How To Install A Pazon Ignition For Triumph Motorcycles
7 лет назад
Скачать бесплатно и смотреть ютуб-видео без блокировок How To Install A Pazon Ignition For Triumph Motorcycles в качестве 4к (2к / 1080p)
У нас вы можете посмотреть бесплатно How To Install A Pazon Ignition For Triumph Motorcycles или скачать в максимальном доступном качестве, которое было загружено на ютуб. Для скачивания выберите вариант из формы ниже:
Загрузить музыку / рингтон How To Install A Pazon Ignition For Triumph Motorcycles в формате MP3:
Если кнопки скачивания не
загрузились
НАЖМИТЕ ЗДЕСЬ или обновите страницу
Если возникают проблемы со скачиванием, пожалуйста напишите в поддержку по адресу внизу
страницы.
Спасибо за использование сервиса savevideohd.ru
How To Install A Pazon Ignition For Triumph Motorcycles
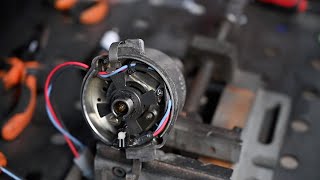
http://www.lowbrowcustoms.com/pazon-e... Todd walks you through the installation process of a Pazon Ignition system on a Triumph 650 custom chopper. From instillation, to timing this tech tip will answer all your questions and get rid of any self doubts on installing a Pazon on your latest Triumph bike project. 01:17 - What's in the Box? 03:05 - Download Instructions and Lowbrow Customs Wiring Diagram. 05:00 - Intro to electric wiring. Explaining the different systems. 06:24 - Removing timing cover. 07:12 - Removing points and advance unit. 08:14 - Difference in points and advance units. 09:30 - Remove advance unit with British Standard tool - http://www.lowbrowcustoms.com/timing-... 10:37 - Coil locations. Remove Gas tank if on. 12:00 - Intro to the coils and how they work with the Pazon correctly. 14:45 - Finding a good location and mounting the Pazon box. 17:53 - Start Terminating wires, Determining which wires go where and how you want to attach to the bike. 18:05 - Two wires that go to the pick up. 25:24 - Terminate the remaining wires to the coils and a good ground. 26:31 - Explanation of a good ground. 27:37 - Connector talk and how to remove that "CRAPPY" Blue piece of plastic. 28:42 - Cutting wires, crimp connector, shrink wrap, good crimp and terminating wires to coils. 34:08 - Hooking up a jumper wire between the two coils. 35:20 - Make wire that goes to ignition switch to coil and run any remaining light wires to make remaining harness 37:16 - Adding an in line fuse holder from battery to key switch. 38:02 - Deluxe Key Switch labels and what the letters mean and how it works - http://www.lowbrowcustoms.com/3-posit... 40:50 - Terminating ground wires and Ignition coil / light wires 42:06 - Installing the rotor and the trigger late. 44:54 - Make sure the rotor's taper will not come into contact with the pin at the end of the cam shaft. How to measure or avoid. 46:26 - Rotating the engine to get the cam in the correct position to install the rotor. 47:27 - Jack the bike up, Rotate the motor to find Top Dead center. 49:49 - What the slots look like on the fly wheel for Top Dead Center. 50:26 - Having a certain primary cover can help measure 38 degrees from top dead center. 52:40 - How to use a Primary cover to measure 38 Degrees from top dead center. 54:12 - How to use a degree wheel to measure 38 degrees from top dead center. 56:02 - Review and Installing the magnet rotor. 57:14 - Explanation of the where to line up the red dot from the magnet to the trigger plate. 57:42 - Install trigger plate 101:15 - Tighten the magnet rotor 102:16 - Terminate final two wires to trigger plate 107:56 - Explanation of Strobe timing and timing the bike. Reference Guide: Lowbrow Customs Wiring Diagram: http://www.lowbrowcustoms.com/amfiler... Pazon Instructions manual: http://www.lowbrowcustoms.com/amfiler... Music by: "What" "A Message" "Sometimes" "Dorey Honey" Composed by: Jahzzar
Comments