Скачать с ютуб etrailer | Installation: Solera RV Slide-Out Awning on a 2021 Grand Design Reflection Fifth Wheel в хорошем качестве
etrailer | Installation: Solera RV Slide-Out Awning on a 2021 Grand Design Reflection Fifth Wheel
2 года назад
Скачать бесплатно и смотреть ютуб-видео без блокировок etrailer | Installation: Solera RV Slide-Out Awning on a 2021 Grand Design Reflection Fifth Wheel в качестве 4к (2к / 1080p)
У нас вы можете посмотреть бесплатно etrailer | Installation: Solera RV Slide-Out Awning on a 2021 Grand Design Reflection Fifth Wheel или скачать в максимальном доступном качестве, которое было загружено на ютуб. Для скачивания выберите вариант из формы ниже:
Загрузить музыку / рингтон etrailer | Installation: Solera RV Slide-Out Awning on a 2021 Grand Design Reflection Fifth Wheel в формате MP3:
Если кнопки скачивания не
загрузились
НАЖМИТЕ ЗДЕСЬ или обновите страницу
Если возникают проблемы со скачиванием, пожалуйста напишите в поддержку по адресу внизу
страницы.
Спасибо за использование сервиса savevideohd.ru
etrailer | Installation: Solera RV Slide-Out Awning on a 2021 Grand Design Reflection Fifth Wheel
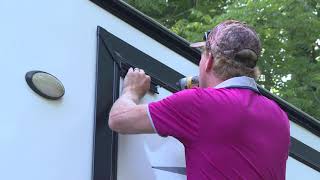
Click for more info and reviews of this Lippert RV Awnings: https://www.etrailer.com/RV-Awnings/L... Check out some similar RV Awnings options: https://www.etrailer.com/dept-pg-RV_A... Search for other popular Grand Design Reflection Fifth Wheel parts and accessories: https://www.etrailer.com/vehicle/2021... https://www.etrailer.com Don’t forget to subscribe! / etrailertv Full transcript: https://www.etrailer.com/tv-install-s... Hey guys, Kevin here with etrailer. And today I'm gonna be showing you how to install the Solera slide out awning. Here on our 2021 Green Design Reflection fifth wheel. So if you're like me and you hate having to get up on a ladder to clean off your slide out after you're done with your camping trip, the Solera slide out awnings are gonna be the thing for you. These are gonna help deflect all the debris the leaves, any acorns, anything else that might fall off of a tree when you're out camping in the wilderness or even at a campsite by deflecting it right off the top which is also gonna help keep the inside of your camper clean. This is because your wiper seals do a pretty good job. At sliding off all the stuff that sits on top of your slide out, but they don't get everything. So that's where this is gonna come in and it's gonna prevent any of that getting in there. Another great thing about our slide out awning here is that it's gonna collect the mold and the moisture up on top. Which is gonna prevent that mold and mildew sitting on top of your slide out and then coming inside of your camper. Like I said, the slide out seals aren't gonna get everything off of there. Another thing that it's gonna do is help reflect the sun which is also gonna keep it off of the roof of your slide out. Which is then gonna keep your camper a whole lot cooler and not make your air conditioner work as hard. As far as installation difficulty goes, this is fairly simple. It's really just kind of trying to balance the size of the slide out roller itself which can be quite difficult depending on the size of your slide out. So you may want to get an extra pair of hands, maybe two people, definitely help you out. Holding it up and really getting it into place. Other than that, you can easily do this at home. So we looked out, we already have an extrusion rail added onto our RV here, but we do have these gutter spouts here that we're gonna have to trim back a little bit 'cause we're not gonna be able to get our fabric in through our extrusion rail. And this would sit here and just kind of rub on the fabric and end up ripping it up. So I'm gonna go ahead and I'm gonna cut it just along where the extrusion rail is. Then come right up right here. Then I might go ahead and just kind of clean that up. You can just take a utility knife and just kind of score the plastic here. The next thing we're gonna do is take some needle nose pliers and we're gonna pull up on our extrusion rail just to make it a little bit easier to slide in our bead. So bend that up and then the bottom portion down a bit. That way, when it's time to slide it in, we don't have to worry. It'll go right in. So in your kit there's gonna be two brackets. There's gonna be your inner bracket and your outer bracket. Your inner bracket will get screwed onto your actual slide out. We're gonna go ahead and run some Butyl tape across these screw holes right here. That's gonna give us a nice water tight seal so that we don't have to worry about water leaking in through our screws. Put that down on there, nice and tight. We're gonna do this for both brackets. You have to score it a couple times to really get through it There you go. Now that we have it on there, we can go ahead and take our flat-headed screws. They're gonna come with a square bit. And these are what we're gonna put into our actual bracket here, just because we have to slide on this bracket over it. So if we use the round headed screws that come with it these wouldn't actually be able to slide together 'cause this is gonna stick up too much. So we'll go ahead, grab five of our screws and get up next to our slide out. When you're looking at your bracket it's gonna have this little lip hanging off the top of it, that is gonna need to face up 'cause that's gonna keep us from digging too far up into our flange, to where we can't get our outer bracket on. The next thing we're gonna do let's pull off our backing from our Butyl tape. We're gonna try and get this up in the corner as much as we can. I'm gonna try and keep this rounded edge a little bit away from our very corner edge here, just so I don't have to fight it when I'm trying to put that on. Then I'm gonna press that in. I wanna make sure that we're up and over as much as we can besides just clearing that. Then we can go ahe
Comments