Скачать с ютуб Re-farkling My New BMW R1250GS Adventure в хорошем качестве
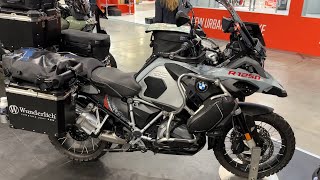
Re-farkling My New BMW R1250GS Adventure
3 года назад
Скачать бесплатно и смотреть ютуб-видео без блокировок Re-farkling My New BMW R1250GS Adventure в качестве 4к (2к / 1080p)
У нас вы можете посмотреть бесплатно Re-farkling My New BMW R1250GS Adventure или скачать в максимальном доступном качестве, которое было загружено на ютуб. Для скачивания выберите вариант из формы ниже:
Загрузить музыку / рингтон Re-farkling My New BMW R1250GS Adventure в формате MP3:
Если кнопки скачивания не
загрузились
НАЖМИТЕ ЗДЕСЬ или обновите страницу
Если возникают проблемы со скачиванием, пожалуйста напишите в поддержку по адресу внизу
страницы.
Спасибо за использование сервиса savevideohd.ru
Re-farkling My New BMW R1250GS Adventure
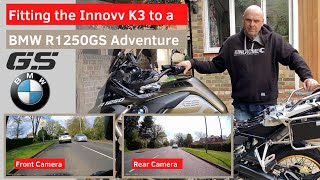
Hello again As many of you know I have switched my November 2018 R1250GS for a new 2020 R1250 GS Adventure. Many of my videos showed me fitting accessories to my old bike, so this one shows me re-fitted the Farkles! (or at least most of them and some new ones!) I am grateful to Steve Abel of A Bike Think, who provided some of the Denali Parts fitted (disclaimer in video). His site and YouTube Channel links are below and if you need any Denali items I'm sure Steve will be able to help. A Bike Thing Web Site: https://www.abikething.com/ A Bike Thing YouTube: / @abikething I also have the LED Headlight Protector off Ebay and here is the link: https://www.ebay.co.uk/itm/BMW-R1250G... I fitted the B6 Brake lights after this video as it took some time to decide where to put them but I'm really happy with the outcome. Details Below: Buy a pack of 16mm pipe clips off EBay .These have rubber sleeves so will not damage the pannier racks. Buy a 300x100mm of 3mm aluminium plate off eBay and ask him to cut it in half (50mm) and the width of your number plate (I think mine was 272mm). Buy a pack of 6 x 12mm stainless steel screws (with hex heads) and the same 6mm nyloc nuts. You will also need a pack of 6mm stainless steel COUNTERSUNK bolts. IMPORTANT: This is all aluminium or stainless so totally rust free. Method: Fit the pipe clips round the pannier stay, then hold the aluminium plate against it and mark for the holes. Drill the aluminium plate with 6mm drill. You will now have to drill GENTLY the aluminium plate NOT ALL THE WAY THROUGH, with a 12mm drill to produce the countersink for the screws. Drill number plate near base either side and lightly bolt the aluminium plate to the pipe clips using the countersunk screws and mark the aluminium plate through the holes in the number plate. Remove the aluminium plate and drill the holes marked with a 6mm drill. Now, using the plates that come with each B6 mark the 3mm holes to secure the units. These are going to be slightly bigger (say 3.5mm) as you will secure them with the bolts and buts provided by Denali. (I also used the rubber seal that you would use for a surface mount, but that's optional). Drill these holes (4), then measure a point in the middle of each light and mark this on the aluminium plate. Drill this to 10-12mm to allow the wire to pass through. Fit all the parts and secure the wires to the INSIDE of the pannier racks and each change in direction or at corners. You will need to use small zip-ties as f not it is difficult to fit the panniers as they rely on an interference fit to stop rattling and movement so there is little space. Certainly be sure the 'clasp' of the zip-tie is on the rear out the way. Hope that all works for you Nick Below are various links to kit I use or items referenced in this video. These are amazon.co.uk (United Kingdom) links and clicking through and purchasing does earn me a small commission and costs you nothing extra. I'd be really grateful if you are buying any of these if you used the links and help support the channel. Thank you Nick Accessories on (or used for) My R1250GS Motorcycle Dryer Bruhl MD1400 1400W Motorcycle Dryer - https://amzn.to/33NGA79 Horn Denali Soundbomb Horn - https://amzn.to/2qUA4Ni Battery Charger (Dual Standard Connect and Canbus - Fits Din Socket to charge) Optimate 4 - BMW Canbus Edition - https://amzn.to/2phUAXN Din/USB Twin Outlet Adapter Optimate Dual USB Charger - 3300mA DIN Plug - https://amzn.to/2CJEl99 Tank Bag Givi ST602 Sport Tanklock Bag - https://amzn.to/2CGK13G Tanklock Ring for above (R1200/1250GS) - https://amzn.to/2QmYXvR Protection ACF50 Rust Protector (with buddy bottle, aerosols are poor) - https://amzn.to/2NKL5tJ Clothing I wear Crash Helmet Shoei Neotec II - https://amzn.to/2rKw8zk Waterproof Jacket (Over Rukka Textile) Tucano Urbano Nano Rain Jackket - https://amzn.to/2NNCnLe Waterproof Trousers (Over Rukka Textile) Tucano Urbano Nano Rain Trousers - https://amzn.to/33ZCed6 Equipment I use to film videos Main Helmet Camera Go Pro Hero 7 Black - https://amzn.to/2CKUmvo Mirror Mounted (rear-facing) Camera SJ Cam SJ4000 - https://amzn.to/377slwc Fixed Front and Rear Cameras (supplementary footage) Innovv K2 Dual Camera Kit - https://amzn.to/2CJAngU Adapter needed to add supplimentary mics to GoPro Hero 5/6/7/8 GoPro Microphone Adapter - https://amzn.to/378aSU8 Case for mounting GoPro and Mic Adapter Ulanzi Multi-purpose GoPro Case - https://amzn.to/32JIkgA BOTH MICS below have leads for Mobile Phone (to use GoPro Adapter with these you need a TRS to TRRS Adapter) Rode Phone Accessory (TRS to TRRS Adapter) - https://amzn.to/2CHKJh1 Helmet Microphone (needs GoPro Adapter) and Tie-pin mic Indoors Aufgeld Lavalier Microphone - https://amzn.to/375WVpX Indoor Microphone (GoPro and Phone Cameras) Rode Micro Compact - https://amzn.to/2KlXUZn
Comments