Скачать с ютуб SupaPeg 180 Degree Free Standing Awning for Vehicles and Camping! в хорошем качестве
SupaPeg 180 Degree Free Standing Awning for Vehicles and Camping!
1 год назад
Скачать бесплатно и смотреть ютуб-видео без блокировок SupaPeg 180 Degree Free Standing Awning for Vehicles and Camping! в качестве 4к (2к / 1080p)
У нас вы можете посмотреть бесплатно SupaPeg 180 Degree Free Standing Awning for Vehicles and Camping! или скачать в максимальном доступном качестве, которое было загружено на ютуб. Для скачивания выберите вариант из формы ниже:
Загрузить музыку / рингтон SupaPeg 180 Degree Free Standing Awning for Vehicles and Camping! в формате MP3:
Если кнопки скачивания не
загрузились
НАЖМИТЕ ЗДЕСЬ или обновите страницу
Если возникают проблемы со скачиванием, пожалуйста напишите в поддержку по адресу внизу
страницы.
Спасибо за использование сервиса savevideohd.ru
SupaPeg 180 Degree Free Standing Awning for Vehicles and Camping!
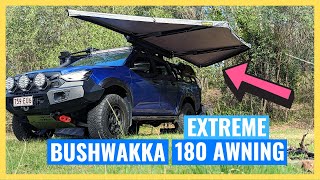
Check out the new SupaPeg Outbound Shield 180 degree awning on my Chopped 200 Series Landcruiser. This is very easy to setup and pack up, and gives me HEAPS of shade over the kitchen of my canopy. It also takes walls so I can close it in to keep rain, dew, wind, dust, and more out! In this video I setup and packup the awning, and share why its useful for camping and touring, and some other handy tips! Awning on SupaPeg's website here: https://www.suparvaustralia.com.au/pr... Kaon mounting brackets I used here: https://www.kaon.com.au/universal-270... Location Topic 00:00 Introduction 00:38 Grab out the tensioning ropes 01:03 Unzip the Bag and flip the bag out of the way 01:29 Undo the velcro straps 01:43 Walk the rear arms out 01:53 Attach the tie down rope 02:15 Walk the forward arms out 02:29 Attach tie down strap 02:51 Large shaded area for the canopy 03:06 Setup spreader bar 03:28 Setup curved spreader bar for water run off 04:06 Options for heavy weather 04:32 Discuss the optional wall kits 04:41 Simple Setup Done 04:51 Opening up the canopy under the awning 05:04 Kaon Mounting Brackets 05:58 Showing the heavy weather pole setup 07:08 Packing the awning away 07:12 Pack away the heavy weather poles 07:22 Close the canopy 07:27 Take the curved spreader bar out 07:54 Remove the centre spreader bar 08:06 Tip on whether to do front or back first! 08:29 Put front away first 09:26 Then put the rear arms away 09:53 Tip: flick the velcro straps over before pushing the arms in tight 10:06 Fasten the arms in place using the first velcro strap 10:24 Roll the canvas up 10:33 Close second velcro strap 10:39 Tip: Offset the velcro when you close it 10:46 Close third and final velcro 10:56 Pull the bag over and zip it closed 11:39 Conclusion
Comments