Скачать с ютуб How to Make an LED Neon Sign In Personalized Handwriting в хорошем качестве
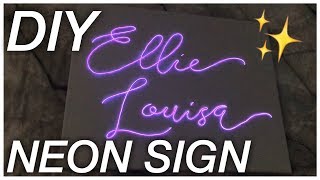
How to Make an LED Neon Sign In Personalized Handwriting
2 года назад
Скачать бесплатно и смотреть ютуб-видео без блокировок How to Make an LED Neon Sign In Personalized Handwriting в качестве 4к (2к / 1080p)
У нас вы можете посмотреть бесплатно How to Make an LED Neon Sign In Personalized Handwriting или скачать в максимальном доступном качестве, которое было загружено на ютуб. Для скачивания выберите вариант из формы ниже:
Загрузить музыку / рингтон How to Make an LED Neon Sign In Personalized Handwriting в формате MP3:
Если кнопки скачивания не
загрузились
НАЖМИТЕ ЗДЕСЬ или обновите страницу
Если возникают проблемы со скачиванием, пожалуйста напишите в поддержку по адресу внизу
страницы.
Спасибо за использование сервиса savevideohd.ru
How to Make an LED Neon Sign In Personalized Handwriting
Watch as I take some LED strip lights and transform them into a dimmable "neon" sign! This particular sign was made in a future bride's handwriting to put behind the head table on her big day. Use these tips and tricks to make your very own custom LED Neon sign! To see more custom and different style LED signs, follow me on Instagram: / nealfermann #neonsign #neon #ledneon #led #howto #makersofyoutube Music: www.bensound.com . LED Neon and Backlit Sign Material List: Acrylic link: https://amzn.to/3r5FfGy I have also used thin aluminum diamond plate sheet to attach LED’s to. Gives the sign an industrial look. That’s also available in many sizes at Lowe’s or Home Depot, and your local fab shop as well. LINK: https://amzn.to/3x5kuOW LED Neon: I mostly use 8x16mm 12V Neon Flex made by Topatom Neon from The Vasten Store on Amazon. It diffuses the light better than thin 6x12mm neon flex, and is easy to work with. LINK: https://amzn.to/3vgRNwf For thinner neon(6x12mm), I’ve used Lamomo neon flex. Again, I’ve found the 8x16mm neon listed above has better light quality and durability than 6x12mm. But, if you need thin neon for a certain project, here it is. LINK: https://amzn.to/3KdlqEX Clips for LED Neon: These clips I use for curves in signs. The link is for 8x16mm neon only, but they do make the same clips for 6x12mm. LINK: https://amzn.to/3JbPgbA Clips for LED Neon (Cont.): For straight lines and hard corners, I use these clips. Again, the link is for 8x16mm. LINK: https://amzn.to/3x7oj6n Screws for mounting clips: LINK: https://amzn.to/3IRjodI Back Lighting Adhesive LED’s: LINK: https://amzn.to/38A1sGx Wire for soldering lights: 24 Gauge wire seems to work best. The silicone coating makes it much more flexible than pvc coated wire. LINK:https://amzn.to/3J8YPI5 Solder: Thin solder will melt quicker and make attaching the wires easy. LINK: https://amzn.to/3JeDGMy Heat Shrink: Heat shrink is used when connecting the wires on the back of the sign. Makes for a strong dependable connection. I use clear for the back of the sign, and black for the power chord. LINK: https://amzn.to/3uQ5fGQ Dimmer Switch: LINK: https://amzn.to/3jqEhk9 Power Adapter: LINK: https://amzn.to/3DM5bwc Wire to Extend Power Adapter Chord: The length of the power adapter chord makes it difficult to power the sign from a low outlet. I use this wire to extend it. LINK: https://amzn.to/3M1agUj TOOLS Jig Saw Blade: To cut the glass, I use a jigsaw. The blades are important; too many teeth won’t cut as quickly, and a dull blade with melt the glass as it cuts. This is the blade I’ve found to be best. LINK: https://amzn.to/3DLivR6 T Shank Jig Saw: LINK:https://amzn.to/3j6zOmi Flap Disc: To clean up the edges after a cut, I use a 120 grit flap disc on a grinder. You could also use files and sandpaper, if you don’t have a grinder. Be careful not to scratch the surface of the glass. LINK: https://amzn.to/3JefaLN Grinder: LINK: https://amzn.to/3udv1WL Drill bits: This is the size drill bit I use to pre-drill the glass for the screws. 3/32 LINK: https://amzn.to/3JcsSyA For Mounting holes, and holes to run the wires behind the sign, I use several sizes of drill bits. I’ve found a step bit works best and covers everything. LINK:https://amzn.to/3ubDA4b Drill: LINK: https://amzn.to/3JeNxSJ Phillips Bits for Mounting Screws: LINK: https://amzn.to/3uanvLZ Soldering Iron: LINK:https://amzn.to/3j76A6H Wire Strippers: LINK: https://amzn.to/3uWUaE5 Utility Knife: LINK: https://amzn.to/37k96UP Heat Gun: A lighter will work, but you will risk burning the heat shrink. Heat gun is very helpful. LINK: https://amzn.to/3Kqxhze Projector: Having a projector makes sizing the sign super easy. You can also draw out your sign on paper and use that to trace over. Or have an office store print you out a picture to trace. LINK: https://amzn.to/3JeNYwl Hose Cutters: The hose cutters make cutting the neon very quick, easy, and accurate. The utility knife will cut the neon just fine if you just want to start with it. You can always add the hose cutters later. LINK: https://amzn.to/35OaMpa Additional Plugs: The LED’s come with one female plug, and the power adapter comes with one male plug. Here are more if you need them. LINK: https://amzn.to/3j776Sb
Comments