–°–∫–∞—á–∞—Ç—å —Å —é—Ç—É–± etrailer | Set up: Curt Trailer Hitch Receiver on a 2012 BMW X6 –≤ —Ö–æ—Ä–æ—à–µ–º –∫–∞—á–µ—Å—Ç–≤–µ
etrailer | Set up: Curt Trailer Hitch Receiver on a 2012 BMW X6
5 –ª–µ—Ç –Ω–∞–∑–∞–¥
–°–∫–∞—á–∞—Ç—å –±–µ—Å–ø–ª–∞—Ç–Ω–æ –∏ —Å–º–æ—Ç—Ä–µ—Ç—å —é—Ç—É–±-–≤–∏–¥–µ–æ –±–µ–∑ –±–ª–æ–∫–∏—Ä–æ–≤–æ–∫ etrailer | Set up: Curt Trailer Hitch Receiver on a 2012 BMW X6 –≤ –∫–∞—á–µ—Å—Ç–≤–µ 4–∫ (2–∫ / 1080p)
–£ –Ω–∞—Å –≤—ã –º–æ–∂–µ—Ç–µ –ø–æ—Å–º–æ—Ç—Ä–µ—Ç—å –±–µ—Å–ø–ª–∞—Ç–Ω–æ etrailer | Set up: Curt Trailer Hitch Receiver on a 2012 BMW X6 –∏–ª–∏ —Å–∫–∞—á–∞—Ç—å –≤ –º–∞–∫—Å–∏–º–∞–ª—å–Ω–æ–º –¥–æ—Å—Ç—É–ø–Ω–æ–º –∫–∞—á–µ—Å—Ç–≤–µ, –∫–æ—Ç–æ—Ä–æ–µ –±—ã–ª–æ –∑–∞–≥—Ä—É–∂–µ–Ω–æ –Ω–∞ —é—Ç—É–±. –î–ª—è —Å–∫–∞—á–∏–≤–∞–Ω–∏—è –≤—ã–±–µ—Ä–∏—Ç–µ –≤–∞—Ä–∏–∞–Ω—Ç –∏–∑ —Ñ–æ—Ä–º—ã –Ω–∏–∂–µ:
–ó–∞–≥—Ä—É–∑–∏—Ç—å –º—É–∑—ã–∫—É / —Ä–∏–Ω–≥—Ç–æ–Ω etrailer | Set up: Curt Trailer Hitch Receiver on a 2012 BMW X6 –≤ —Ñ–æ—Ä–º–∞—Ç–µ MP3:
–ï—Å–ª–∏ –∫–Ω–æ–ø–∫–∏ —Å–∫–∞—á–∏–≤–∞–Ω–∏—è –Ω–µ
–∑–∞–≥—Ä—É–∑–∏–ª–∏—Å—å
–ù–ê–ñ–ú–ò–¢–ï –ó–î–ï–°–¨ –∏–ª–∏ –æ–±–Ω–æ–≤–∏—Ç–µ —Å—Ç—Ä–∞–Ω–∏—Ü—É
–ï—Å–ª–∏ –≤–æ–∑–Ω–∏–∫–∞—é—Ç –ø—Ä–æ–±–ª–µ–º—ã —Å–æ —Å–∫–∞—á–∏–≤–∞–Ω–∏–µ–º, –ø–æ–∂–∞–ª—É–π—Å—Ç–∞ –Ω–∞–ø–∏—à–∏—Ç–µ –≤ –ø–æ–¥–¥–µ—Ä–∂–∫—É –ø–æ –∞–¥—Ä–µ—Å—É –≤–Ω–∏–∑—É
—Å—Ç—Ä–∞–Ω–∏—Ü—ã.
–°–ø–∞—Å–∏–±–æ –∑–∞ –∏—Å–ø–æ–ª—å–∑–æ–≤–∞–Ω–∏–µ —Å–µ—Ä–≤–∏—Å–∞ savevideohd.ru
etrailer | Set up: Curt Trailer Hitch Receiver on a 2012 BMW X6
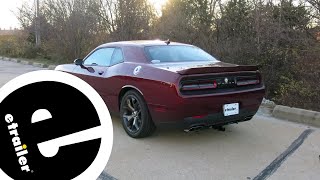
Click for more info and reviews of this CURT Trailer Hitch: https://www.etrailer.com/Trailer-Hitc... https://www.etrailer.com Don‚Äôt forget to subscribe! ¬Ý¬Ý¬Ý/¬Ýetrailertv¬Ý¬Ý Full transcript: https://www.etrailer.com/tv-install-t... Today, on our 2012 BMW X6 we're going to be taking a look at and showing you how to install the class three two inch Curt trailer hitch receiver. Now this is what our hitch looks like installed. As you can tell, it's pretty much hidden and the only thing you can see is the receiver tube opening. Now it does sit pretty far back, which is going to keep it even more hidden. However, it does offer adequate clearance for any bike racks or hitch mounted accessories you might have. Now don't be intimidated that you have to remove the rear fascia to get this hitch installed. As long as you take your time, you'll be just fine. Now once it's removed, it's really, really easy. Just take your hitch, slide it over your four studs on each side and tighten down your hardware. This is a class three hitch, so it's going to utilize a two inch by two inch opening.It's also gonna to have a standard size five eights inch pin hole, but keep in mind that's the pin and clip does not come included. If you need to pick one up, you can see etrader.com. It also has a loop style safety chain opening, which does offer a pretty good amount of space to utilize just about any size safety chain hook. That does have a gloss black finish, which is not only gonna look good, it's going to help keep it protected from any corrosion or rust from the elements.Now this hitch does have a 600 pound maximum tongue weight, which is the amount of downward pressure on the receiver tube, it has a 6,000 pound gross trailer weight. So what that means is the amount of weight pulling on the receiver tube. So that's a amount your trailer weighs plus anything you might have on it.Now it isn't rated to be used with a weight distribution system. It is always a good idea to check with your vehicle's owner's manual to make sure your vehicle can pull that amount of weight.And now I've got some measurements for you to help you in deciding on accessories. From the ground to the top, inside edge of the receiver tube measures about 15 and a half inches. This is important when deciding if you need a drop, rise or rise shank on your accessory and from the center of the hitch pin hole to the edge of the rear bumper it measures about five and a half inches. This is important when determining if any of your folding accessories can be placed in the upright storage position without contacting the bumper. Now that we've gone over some of the features, let's show you how to get it installed. We're going to begin our installation by removing this cover with three screws. Just set this off to the side for now. All right, there is going to be multiple eight millimeter screws just like this. That we're going to remove throughout the bottom of the bumper.All right, now we can go ahead and disconnect this plug. This is on the passenger side of the vehicle. To do that there is two push pins on each side. Just squeeze it tight with your thumb and pointer finger and disconnect it like that. Behind the back tire and the wheel well we're going to find one eight millimeter screw and go ahead and remove that. We're going to have a few plastic rivets which is holding this wheel well trim piece on. We're going to have to remove those. That way we can pull this trim piece out to get to a fastener behind it. So to do that we're just simply going to drill the center out and then with a trim panel removal tool will come in here, pull them out the rest of the way.Now we're going to do that exact same process to the other side All right, so now with all the hardware out of this wheel well trim, we need to separate it from the rear bumper. Now we're going to do that by carefully and patiently pulling it towards us. There's a handful of clips in here that need to get separated, so I like to do is start from the bottom and pull outward. Might have to jiggle it a little bit. Just be really patient. You don't want to break any of these clips. These are the clips and they get pushed into slots here in the bumper, so we just need to get it in far enough down to expose this bolt and to be separated from this bumper. Now that this is done on both sides we're going to use an eight millimeter to remove this bolt, and do the exact same thing to the other side.All right, next we're going to go ahead and remove the tail lights. That way we can get more access to the clips that are holding the bumper on and just make life a little bit easier. The first, there's two push pins right here. If we need to pop those out, that way this panel can move and allow us to pull the tail light out. Now you can go underneath and pry out that way. However, I found it's a little bit easier with a small flat head. Can a
Comments