Скачать с ютуб Samsung Galaxy A53 5G – Screen replacement [repair guide + reassembly] в хорошем качестве
Samsung Galaxy A53 5G – Screen replacement [repair guide + reassembly]
2 года назад
Скачать бесплатно и смотреть ютуб-видео без блокировок Samsung Galaxy A53 5G – Screen replacement [repair guide + reassembly] в качестве 4к (2к / 1080p)
У нас вы можете посмотреть бесплатно Samsung Galaxy A53 5G – Screen replacement [repair guide + reassembly] или скачать в максимальном доступном качестве, которое было загружено на ютуб. Для скачивания выберите вариант из формы ниже:
Загрузить музыку / рингтон Samsung Galaxy A53 5G – Screen replacement [repair guide + reassembly] в формате MP3:
Если кнопки скачивания не
загрузились
НАЖМИТЕ ЗДЕСЬ или обновите страницу
Если возникают проблемы со скачиванием, пожалуйста напишите в поддержку по адресу внизу
страницы.
Спасибо за использование сервиса savevideohd.ru
Samsung Galaxy A53 5G – Screen replacement [repair guide + reassembly]
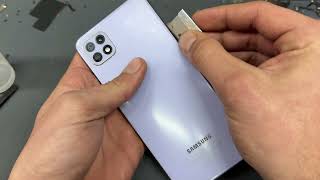
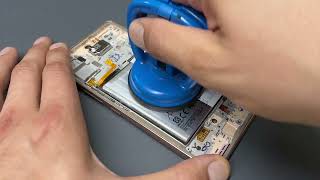
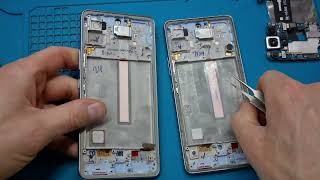
The screen of your Samsung Galaxy A53 5G is broken? In this video we're going to show you how to replace it on your own. [Discover our German channel: / idoceurope ] 📱 Find an original replacement screen for your A53 5G in our online store: https://idoc.eu/yt-en/57903 🔧 Our Samsung tool kit contains all tools you need for your repair: https://idoc.eu/yt-en/55970 Don't want an entire set? Our recommended tools are: - Phillips PH00 screwdriver - https://idoc.eu/yt-en/11543 - iFlex & iPlastix opening set - https://idoc.eu/yt-en/57396 - pick set - https://idoc.eu/yt-en/56852 - spudger - https://idoc.eu/yt-en/11270 - battery spudger - https://idoc.eu/yt-en/11290 - suction cup - https://idoc.eu/yt-en/1347 - iSclack evo - https://idoc.eu/yt-en/55673 - ESD tweezers - https://idoc.eu/yt-en/1346 - ESD spudger - https://idoc.eu/yt-en/1340 - magnetic pad - https://idoc.eu/yt-en/11118 - heat gun - http://amzn.to/2nMBZPP * ✔️ To make sure your repair was successfull we recommend that you test your smartphone BEFORE and AFTER the repair. Our checklist can help you: https://www.idoc.eu/blog/wp-content/u... Table of contents: 00:00 - Intro 01:12 - Switching off your Galaxy A53 5G 01:23 - Removing the back cover 03:12 - Removing the board cover 03:48 - Disconnecting the battery 04:00 - Removing the speaker 04:20 - Separating the connecting cable 04:38 - Removing the battery 05:35 - Removing the front camera 05:51 - Separating the antenna cables 06:20 - Removing the motherboard 06:38 - Removing the vibration motor 06:55 - Detaching the screen cable 07:17 - Removing the SIM tray 07:30 - Removing the USB board 07:58 - Removing the fingerprint sensor 08:30 - Preparing the new screen 08:42 - Inserting the fingerprint sensor 08:50 - Inserting the USB board 09:22 - Inserting the SIM tray 09:32 - Attaching the screen cable 09:42 - Inserting the vibration motor 09:48 - Inserting the motherboard 10:05 - Inserting the antenna cables 10:35 - Inserting the front camera 10:45 - Inserting the battery 10:54 - Attaching the connecting cable 11:11 - Inserting the speaker 11:36 - Connecting the battery 11:45 - Installing the board cover 12:07 - Testing the new screen 12:44 - Attaching the new adhesive frame 13:23 - Installing the back cover #samsung #galaxy #galaxya535g #screenreplacement #smartphonerepair #idoceurope __________________________________________________________________ iDoc Europe is your smartphone repair expert. In addition to selling first class tools and high quality spare parts, we produce detailed photo and video tutorials. Thanks for stopping by! If you liked this video, leave us a 👍 and subscribe to our channel. Interested in our German videos? Check out our channel: www.idoc.eu/youtube You can also find us on Instagram and Facebook. Follow us to never miss any new content! / idoceurope / idoceurope Our camera: http://amzn.to/2rVJWXn * Lens for close-ups: http://amzn.to/2FzTQjd * Lighting: http://amzn.to/2GCshaD * (Links marked with * are affiliate links)
Comments
![Samsung Galaxy A53 5G – Battery replacement [repair guide + reassembly]](https://i.ytimg.com/vi/mAmnOr1GhTU/mqdefault.jpg)
![Samsung Galaxy A23 5G – Screen replacement [repair guide + reassembly]](https://i.ytimg.com/vi/_GvOdRj2Hj4/mqdefault.jpg)

![Samsung Galaxy A51 – Battery replacement [repair guide + reassembly]](https://i.ytimg.com/vi/RHJtC6EJ1JY/mqdefault.jpg)


![Samsung Galaxy A52– Screen replacement [including reassembly]](https://i.ytimg.com/vi/MLpm-FbbCbU/mqdefault.jpg)