Скачать с ютуб Load 35mm film into Instamatic cameras with FAKMATIC в хорошем качестве
Load 35mm film into Instamatic cameras with FAKMATIC
5 лет назад
Скачать бесплатно и смотреть ютуб-видео без блокировок Load 35mm film into Instamatic cameras with FAKMATIC в качестве 4к (2к / 1080p)
У нас вы можете посмотреть бесплатно Load 35mm film into Instamatic cameras with FAKMATIC или скачать в максимальном доступном качестве, которое было загружено на ютуб. Для скачивания выберите вариант из формы ниже:
Загрузить музыку / рингтон Load 35mm film into Instamatic cameras with FAKMATIC в формате MP3:
Если кнопки скачивания не
загрузились
НАЖМИТЕ ЗДЕСЬ или обновите страницу
Если возникают проблемы со скачиванием, пожалуйста напишите в поддержку по адресу внизу
страницы.
Спасибо за использование сервиса savevideohd.ru
Load 35mm film into Instamatic cameras with FAKMATIC
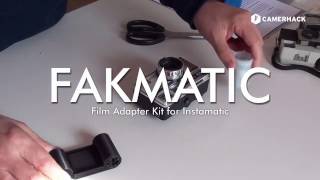
With FAKMATIC it's possible to shoot 35mm film with Instamatic cameras. In this video I show the three phases of the process: 1) loading the camera, 2) shooting photos, 3) respooling the film into the canister for later processing. FAKMATIC is a rechargeable cartridge that replaces 126 film cartridges which are almost impossible to find, often undevelopable, and always expensive. The FAKMATIC adapter kit is available at https://www.camerhack.it RECOMMENDATIONS: Tape the back transparent window with a black tape to prevent light from going into the camera: the FAKMATIC cartridge can be prone to light leaks even if doesn't have an inspection window. It is also recommended to load the cartridge with a 24 exposures film because a longer film would hardly fit into the cartridge and may cause some issues while winding the film. LOADING THE FILM: The cartridge is made of three parts: the shell, the lid, the take-up spool. 1. Take a 35mm film, cut it straight at the end, and tape it to the take-up spool. Keep the spool's interlocking end upwards. 2. TURN OFF THE LIGHT: from now on you must work in total dark. 3. Pull the film out of the canister until the end and cut it, but leave 2-3 inches of film attached to the canister. 4. Roll up the film and make a very compact reel, it must be as thin as possible. Insert that reel into the smaller space, and the spool in the larger space. Be careful when inserting the film in the central part: the slot around the framing area is very narrow. 5. Put on the lid and be sure that it's well closed. (If you feel a gap with your fingers along the lid's border and the cassette doesn't close firmly it means that the film is not well inserted!) 6. Even if the cartridge is closed, it still has light leaks. Load it into the camera and close its back. TURN ON THE LIGHT. SHOOTING, WINDING, FRAME NUMBERING: Now the fun part. Instamatic cameras were made to be easy, very simple, often without any settings. The most fancy of them only had a basic aperture ring on the lens and sometimes a flash plug for flashcubes. You just point, shoot, crank. BUT, the old 126 film had strange perforations on the top side, with one registration hole per image. They were not made for film advancement when winding, but for stopping the film in the correct position after winding: a needle entering into the frames's hole blocked the film and armed the shutter. 135 film have completely different perforations, so the the needle will stop the film before it reaches the right position for the next photo. To avoid overlapping exposures, you have to take a dark exposure after every proper photo. So the right shooting process is: 1) Take your photo and advance the film, 2) Cover the lens with your hand and take a dark exposure, advance the film. Continue with one good and one dark until the end of the film. RESPOOLING: When the film is finished you need to respool it into the leftover 135 film canister. The next operation must be done in total dark: your exposed film will be out of the cartridge for some moments. To make this operation easier, we left a couple of inches of film attached to the original 35mm cassette: you will attach the exposed film to that tail of film and then spool it back into the canister. Relax, it's not going to be easy the first time. 1. Prepare a strip of adhesive tape. 2. Open the FAKMATIC cartridge and take the film out (it's all rolled around the take-up spool). 3. Tape the end of the exposed film to the other film that comes out of the canister. Be sure it's firmly attached and the two parts are aligned as straight as possible. 4. Start slowly and make sure that the adhesive tape part enters nicely into the canister. Help it go smooth by gently pushing it with your fingers. Keep on spooling until all of the film is into the canister. YOU'RE DONE! TURN ON THE LIGHT AND SMILE. Take the film to the lab for development. Remeber to explain that it's not a normal 35mm film. You may prefer not to have them cut it in short strips. Also, tell the lab people that part of the exposure is in the sprocket holes zones, in case you want them to scan or print it for you.
Comments