Скачать с ютуб ROOF TRUSSES IN REVIT (How to Model Gable roof trusses in Revit) в хорошем качестве
ROOF TRUSSES IN REVIT (How to Model Gable roof trusses in Revit)
1 год назад
Скачать бесплатно и смотреть ютуб-видео без блокировок ROOF TRUSSES IN REVIT (How to Model Gable roof trusses in Revit) в качестве 4к (2к / 1080p)
У нас вы можете посмотреть бесплатно ROOF TRUSSES IN REVIT (How to Model Gable roof trusses in Revit) или скачать в максимальном доступном качестве, которое было загружено на ютуб. Для скачивания выберите вариант из формы ниже:
Загрузить музыку / рингтон ROOF TRUSSES IN REVIT (How to Model Gable roof trusses in Revit) в формате MP3:
Если кнопки скачивания не
загрузились
НАЖМИТЕ ЗДЕСЬ или обновите страницу
Если возникают проблемы со скачиванием, пожалуйста напишите в поддержку по адресу внизу
страницы.
Спасибо за использование сервиса savevideohd.ru
ROOF TRUSSES IN REVIT (How to Model Gable roof trusses in Revit)
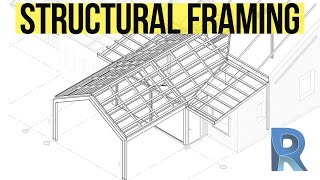
Instead of using detail lines to draw your roof members in every single section view, you can actually model them. That way, you get to cut as many sections as you want, easily adjust and schedule them (if you can schedule an information, it means you can do design computations with it and also export it). Revit is all about building information, doing this will enable you access to additional information about your roof members, this information can come in handy during construction, calculation of quantities and even for representation purposes. In this video, I will not only show you how you can model roof trusses, but I will also introduce you to the parts, then you will learn how to edit them, change the structural framing types using the type editor, adjust the Webs and the cords, change the structural framing type using the type selector, adjust the position of the Cords, array the structural members and final you will learn how to model the purlin using the beam system. So, if these things are things you’d like to learn kindly click on the link to watch. LINKS Dimension Lumber - https://drive.google.com/file/d/1Iwf2... Pratt Flat Truss - https://drive.google.com/file/d/11nbt... Timber - https://drive.google.com/file/d/1WE4a... Chapters 00:00 – Introduction 00:55 – most important step of creating roof trusses in Revit 02:30 – Modelling the Roof Trusses 05:25 – Four (4) major parts of a Truss 06:12 – Start & End level offset 06:46 – Changing the structural framing 08:15 – adjusting the webs (change reference) 11:50 – Adjusting the Cords (start and end extension) 16:10 – Changing the frame type using the Type selector 16:55 – Adjusting the position of the cord (using Z -Justification) 20:00 – Arraying the structural members 21:15 – Modelling the purlin (using the beam system) 27:31 - Outro
Comments