Скачать с ютуб CHANGE A RIDE ON CAR BATTERY - How To Change A Battery On Your Kids Electric Ride On в хорошем качестве
CHANGE A RIDE ON CAR BATTERY - How To Change A Battery On Your Kids Electric Ride On
4 года назад
Скачать бесплатно и смотреть ютуб-видео без блокировок CHANGE A RIDE ON CAR BATTERY - How To Change A Battery On Your Kids Electric Ride On в качестве 4к (2к / 1080p)
У нас вы можете посмотреть бесплатно CHANGE A RIDE ON CAR BATTERY - How To Change A Battery On Your Kids Electric Ride On или скачать в максимальном доступном качестве, которое было загружено на ютуб. Для скачивания выберите вариант из формы ниже:
Загрузить музыку / рингтон CHANGE A RIDE ON CAR BATTERY - How To Change A Battery On Your Kids Electric Ride On в формате MP3:
Если кнопки скачивания не
загрузились
НАЖМИТЕ ЗДЕСЬ или обновите страницу
Если возникают проблемы со скачиванием, пожалуйста напишите в поддержку по адресу внизу
страницы.
Спасибо за использование сервиса savevideohd.ru
CHANGE A RIDE ON CAR BATTERY - How To Change A Battery On Your Kids Electric Ride On
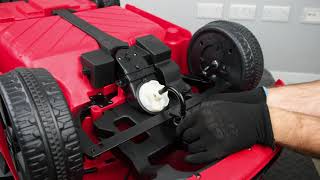
In this video, we show you how to change a battery on your kids electric ride on. Please feel free to leave a comment below this video if this video hasn't helped or didn't sort out your problem. RESOURCES & LINKS: ____________________________________________ Check Out Our Other Popular "How To" Ride On Car Videos - https://bit.ly/RiiRooHowToYTPlaylist Check Out Our Main Pair Your Remote Videos - • How To Pair Your Ride On Car Parental... Our ride on cars - https://riiroo.com/collections/ride-o... Our ride on motorbikes - https://riiroo.com/collections/electr... Our ride on scooters - https://riiroo.com/collections/riiroo... ____________________________________________ Today we're going to show you how to change a battery in your ride-on car. Over time, the battery in your car or motorbike will eventually deplete as the components within the battery come to the end of their working life. However, the life of the battery can be prolonged by practicing good maintenance and looking after the battery. We have a separate video on how to maintain your battery on our channel and can be found on the link at the top of this video. The information on how to replace the battery does apply to six, 12, and 24-volt models. However, the location of the battery may differ from car to car. Disclaimer, batteries can be dangerous if they're not handled correctly and could potentially cause injury. Do not attempt this replacement if you do not have a basic understanding of the dangers of batteries. Do not bring any metals that could potentially contact either terminal on the battery as this could potentially cause the battery to explode. The information in this video is solely for educational purposes only and we do not want this information nor the consequence should something go wrong during the procedure. Step one, locate the battery. Start off by finding where the battery in the car or motorbike is located. The majority of the ride-ons, house their batteries under the seat. However, in other models, this may be located either in the boot or bonnet. Step two, remove the bracket. Remove the battery bracket from the car. The bracket holds the battery in place whilst the car is in use. This can be removed by undoing the Phillips head screws. Once these are undone, remove the bracket from the car, keep it safe as you will need to replace this once the new battery is fitted. Step three, remove the terminal glue. The battery terminals have a small blob of glue on them. The glue stops the terminals from coming loose and snapping in transit. This can be removed by simply scraping it off with a sharp, non-conductive implement. Do not use any metal on, or near the battery. If you're having issues with removing the glue, use a heat gun or hair dryer to soften the glue. Once this has been removed, you can discard this as this will not need to be reapplied. Step four, remove the battery. We suggest before removing the battery to take a photo of the existing wiring so that this can be easily replicated once the battery has been removed. Remove the two terminals on the battery and remove the battery from its compartment. Step five, replace the battery. Place the new battery back into its compartment. Connect the terminals and plugs as they were before. This is always black to black and red to red. You can test the battery once it has been connected by attempting to switch the car on. If the car powers up and is reading the correct voltage on the media player, the battery replacement was successful. Replace the bracket using the screws that were previously removed in step two. Replace either the seat if the battery is located there or simply close the boot or bonnet. And that's it, you have successfully replaced the battery in your ride-on. ► If you need help choosing a ride-on toy for a present, then check us out @ https://riiroo.com/ ►Subscribe: http://bit.ly/RiiRooSubscribe to see more videos on our ride-on toys. ►Find us on Facebook: / riirooltd #howtochangearideoncarbattery #changingarideoncarbattery #changeabatteryonarideoncar
Comments