Скачать с ютуб Cement + Peat Moss + Sand - The Great Outdoors в хорошем качестве
Cement + Peat Moss + Sand - The Great Outdoors
4 года назад
Скачать бесплатно и смотреть ютуб-видео без блокировок Cement + Peat Moss + Sand - The Great Outdoors в качестве 4к (2к / 1080p)
У нас вы можете посмотреть бесплатно Cement + Peat Moss + Sand - The Great Outdoors или скачать в максимальном доступном качестве, которое было загружено на ютуб. Для скачивания выберите вариант из формы ниже:
Загрузить музыку / рингтон Cement + Peat Moss + Sand - The Great Outdoors в формате MP3:
Если кнопки скачивания не
загрузились
НАЖМИТЕ ЗДЕСЬ или обновите страницу
Если возникают проблемы со скачиванием, пожалуйста напишите в поддержку по адресу внизу
страницы.
Спасибо за использование сервиса savevideohd.ru
Cement + Peat Moss + Sand - The Great Outdoors
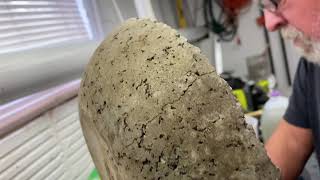
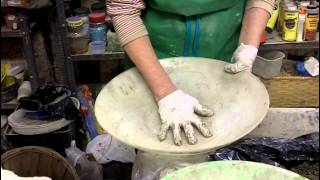
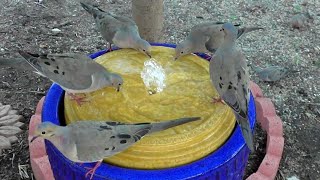
Tufa is a lightweight, tough, inexpensive material that can be formed into and endless variety of garden containers. You can choose the size, shape and even the color of your container- your only limitation is your own imagination. The finished result will be a useful “stone-looking” creation that will add your individual touch to the great outdoors. Materials Needed: - peat moss - Portland cement - builder’s sand or vermiculite - water - plastic trash bags - disposable vinyl or latex gloves - cardboard box, trashcan lid, or other object to make your form - concrete coloring (if desired) - small piece of a dowel rod - pebbles, rocks, shells or Tools Needed: - wheel barrow or other container for mixing - spade or shovel - small garden trowel - wire brush STEPS TO CREATE A TUFA PLANTER Step1 Build your form(s). Many different items can be used to build your forms. Cardboard boxes can be used to create square or rectangular planters and a trashcan lid can form an in-ground birdbath. Use your imagination. However, be sure you cover any item you choose with a plastic trash bag. This will make removing the form easier and protect the item from the tufa mix. Step2 Mix your tufa mix. The amount of tufa mix you need, will vary with the size of container you are building. The recipe is simple: 1 part portland cement, 1 part builder’s sand or vermiculite, and 2 parts peat moss. Be sure when you are mixing, to add water a little at a time. Stir the mixture until you reach the consistency of a “lumpy paste.” Next, put on some disposable gloves and “knead” the mixture, like you would knead bread. Step3 Place the mix in/on the form(s). After your mixture reaches the right consistency, place it in or on your form. Remember, if you are using a box you will place the mixture over the form, but if you are using something like a trashcan lid you will place the mixture inside the form. Be sure to cover the surface with a 2-inch layer of mix. If you want to smooth the surface, dampen your glove and smooth it with your hand. If you are building a planter, push a small section of dowel rod through the tufa mix, until it hits the form. This will provide a drain hole. Step4 Decorate your container. While the mixture is still moist, you can press decorations into the wet tufa. Sea shells, polished stones, gravel, pieces of tile, etc. can all add an individual touch to your tufa project. Step5 Let your container dry. Place your wet mold in a cool, shaded area for about 5-6 days until the tufa is hard. After removing your container from the mold, you can add a rustic look by rubbing the surface with a wire brush. MORE FROM YOUR NEW HOUSE Featured videos: • YNH Featured Videos Great DIY Projects from Your New House: • DIY - Do It Yourself with Your New House Quick Tips - easy tips to make your projects (and life) better: • Quick Tips - Great, yet simple ideas ... Gardening and Landscaping: • Gardening and Landscaping Adventures in Homebuilding - Home info with a smile: • Adventures in Homebuilding Choosing and Using Tools with Carmen Ciricillo: • Choosing and Using Tools with Carmen Factory Tours and Product Testing: • Did You Know?
Comments