–°–∫–∞—á–∞—Ç—å —Å —é—Ç—É–± Installation Guide for the Yakima RidgeLine Roof Rack for Flush Rails on a 2021 Nissan Rogue –≤ —Ö–æ—Ä–æ—à–µ–º –∫–∞—á–µ—Å—Ç–≤–µ
Installation Guide for the Yakima RidgeLine Roof Rack for Flush Rails on a 2021 Nissan Rogue
1 –≥–æ–¥ –Ω–∞–∑–∞–¥
2 Bars
50 Inch Bar Space
Aero Bars
Black
Crossbars
Installation Guide for the Yakima RidgeLine Roof Rack for Flush Rails on a 2021 Nissan Rogue
Installation of the Yakima JetStream Roof Rack on a 2021 Nissan Rogue
Overhang
Roof Rack
Silver
Yakima
[NLA]Fit Roof Rack Kit With Y00145 | Y00425 | Y44UR
[NLA]Fit Roof Rack Kit With Y00145 | Y00428 | Y44UR
–°–∫–∞—á–∞—Ç—å –±–µ—Å–ø–ª–∞—Ç–Ω–æ –∏ —Å–º–æ—Ç—Ä–µ—Ç—å —é—Ç—É–±-–≤–∏–¥–µ–æ –±–µ–∑ –±–ª–æ–∫–∏—Ä–æ–≤–æ–∫ Installation Guide for the Yakima RidgeLine Roof Rack for Flush Rails on a 2021 Nissan Rogue –≤ –∫–∞—á–µ—Å—Ç–≤–µ 4–∫ (2–∫ / 1080p)
–£ –Ω–∞—Å –≤—ã –º–æ–∂–µ—Ç–µ –ø–æ—Å–º–æ—Ç—Ä–µ—Ç—å –±–µ—Å–ø–ª–∞—Ç–Ω–æ Installation Guide for the Yakima RidgeLine Roof Rack for Flush Rails on a 2021 Nissan Rogue –∏–ª–∏ —Å–∫–∞—á–∞—Ç—å –≤ –º–∞–∫—Å–∏–º–∞–ª—å–Ω–æ–º –¥–æ—Å—Ç—É–ø–Ω–æ–º –∫–∞—á–µ—Å—Ç–≤–µ, –∫–æ—Ç–æ—Ä–æ–µ –±—ã–ª–æ –∑–∞–≥—Ä—É–∂–µ–Ω–æ –Ω–∞ —é—Ç—É–±. –î–ª—è —Å–∫–∞—á–∏–≤–∞–Ω–∏—è –≤—ã–±–µ—Ä–∏—Ç–µ –≤–∞—Ä–∏–∞–Ω—Ç –∏–∑ —Ñ–æ—Ä–º—ã –Ω–∏–∂–µ:
–ó–∞–≥—Ä—É–∑–∏—Ç—å –º—É–∑—ã–∫—É / —Ä–∏–Ω–≥—Ç–æ–Ω Installation Guide for the Yakima RidgeLine Roof Rack for Flush Rails on a 2021 Nissan Rogue –≤ —Ñ–æ—Ä–º–∞—Ç–µ MP3:
–ï—Å–ª–∏ –∫–Ω–æ–ø–∫–∏ —Å–∫–∞—á–∏–≤–∞–Ω–∏—è –Ω–µ
–∑–∞–≥—Ä—É–∑–∏–ª–∏—Å—å
–ù–ê–ñ–ú–ò–¢–ï –ó–î–ï–°–¨ –∏–ª–∏ –æ–±–Ω–æ–≤–∏—Ç–µ —Å—Ç—Ä–∞–Ω–∏—Ü—É
–ï—Å–ª–∏ –≤–æ–∑–Ω–∏–∫–∞—é—Ç –ø—Ä–æ–±–ª–µ–º—ã —Å–æ —Å–∫–∞—á–∏–≤–∞–Ω–∏–µ–º, –ø–æ–∂–∞–ª—É–π—Å—Ç–∞ –Ω–∞–ø–∏—à–∏—Ç–µ –≤ –ø–æ–¥–¥–µ—Ä–∂–∫—É –ø–æ –∞–¥—Ä–µ—Å—É –≤–Ω–∏–∑—É
—Å—Ç—Ä–∞–Ω–∏—Ü—ã.
–°–ø–∞—Å–∏–±–æ –∑–∞ –∏—Å–ø–æ–ª—å–∑–æ–≤–∞–Ω–∏–µ —Å–µ—Ä–≤–∏—Å–∞ savevideohd.ru
Installation Guide for the Yakima RidgeLine Roof Rack for Flush Rails on a 2021 Nissan Rogue
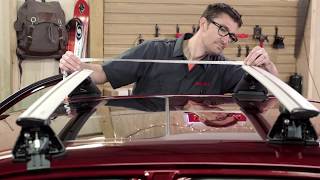
Click for more info and reviews of this Yakima Roof Rack: https://www.etrailer.com/Roof-Rack/Ya... https://www.etrailer.com Don‚Äôt forget to subscribe! ¬Ý¬Ý¬Ý/¬Ýetrailertv¬Ý¬Ý Full transcript: https://www.etrailer.com/tv-install-y... Hey everyone, it's Evangeline here at etrailer and today we have the Yakima Roof Rack system which we'll take a look at on our 2021 Nissan Rogue. If you wanna carry around fun accessories like kayaks or ladders, or maybe you want a roof-mounted bike rack or extra cargo space in the form of a roof box, what you first need is a roof rack system. So this is the system from Yakima, which is ideal for if you want a premium roof rack that is strong, it's sturdy but it also gives you extra long crossbars spread. Compared to other brands, this gives you a wider platform with your crossbar staying further apart so you can carry those longer items like kayaks, ladders or even Christmas trees if you want. For your Rogue's roof, you wanna make sure there's enough clearance underneath for clamps or U-bolts and wing nuts. Here from our roof to bottom of the crossbar I have it at three inches of clearance and then the height addage to the top of our roof at the top of the crossbar is gonna be four inches of height. That's where your cargo sits. So if you have skis with extra tall bindings, you make sure there's enough clearance there. If not, you then start looking at accessories that give you more height. This is a pretty average height for roof clearances, will fit most things. I really like how the jet stream crossbars are sleek but also sturdy looking. So you have this black finish. You can also get a Yakima crossbar in silver. They're gonna work the exact same way. They just have a different look to match your car. Now these crossbars also have T track channels on top so you have clamps that go around or you could get clamps that fit into a T track system, that way you can maximize the length and you can store things all the way over here. The install is going to be involved, but that is what you're gonna, okay. So it definitely depends on if you want something that's easy to install, but you get less crossbar spread and functionality. Or if you want something that does take more time but you get a longer crossbar spread. So if you are using this frequently and keeping this on your roof, awesome, you'll only have to do it once. If you have to take this on and off your roof, I do recommend something easier to use, but first let's take a look at that install process so that you can exactly see what you're in for. So installing the Yakima roof rack might look confusing at first because there's a bunch of different hooks, a bunch of different pads and towers and crossbars but I'm gonna guide you through that process. The first thing we're going to do is set up the tower and the crossbar. First, you're going to install these spaces and the block on your crossbar, so this fits into your tower. And in order to secure this metal piece you first need to open the door on this back. So pull that open and that gives you access to this bolt underneath the tower. So turn this with the included tool. So just slightly thread onto that plate. So now that's secure and ready to slide. This plate fits into the track underneath your crossbar. So as long as it's loosely installed you'll be able to slide it through. Do that for all four towers. There are numbers on your crossbar and that will help you figure out where to put your tower. So we're gonna line ours up with 38 and an eighth, which will be right there. And then we're gonna tighten it down. Before tightening down, make sure that you have the crossbar facing the right wave. So at the center of the crossbar make sure the arrow's facing away from you. This is important because then you can angle your tower for a different pitch so where it's angled towards you, centered or away from you. So we need to push us to pitch eighth where the bolt is on the notch, furthest away from you. Holding the tower to the distance set as well as the pitch set, we're then going to tighten down with our tool. Next, you're gonna get your pads. So these already have the plates on them and they just clip into your tower. Make sure that arrow is facing out. To adjust for the next setting, which is the toe, you're gonna rotate those pads on the tower and that moves the toe back and forth. We're going to set this to number two, which is the center and then we're going to tighten that down. It's ideal to use the Yakima tool so pretty much all the bolts are tightening down because this has a torque setting. Once you reach the proper tension it will click all right there and prevent you from tightening it down too much. So with all the pads on the towers, the next step then is to put the crossbar on the roof. But where do you put
Comments