Скачать с ютуб Replace the Display Panel Assembly | HP 15-f000 Notebook PC series | HP в хорошем качестве
Replace the Display Panel Assembly | HP 15-f000 Notebook PC series | HP
4 года назад
Скачать бесплатно и смотреть ютуб-видео без блокировок Replace the Display Panel Assembly | HP 15-f000 Notebook PC series | HP в качестве 4к (2к / 1080p)
У нас вы можете посмотреть бесплатно Replace the Display Panel Assembly | HP 15-f000 Notebook PC series | HP или скачать в максимальном доступном качестве, которое было загружено на ютуб. Для скачивания выберите вариант из формы ниже:
Загрузить музыку / рингтон Replace the Display Panel Assembly | HP 15-f000 Notebook PC series | HP в формате MP3:
Если кнопки скачивания не
загрузились
НАЖМИТЕ ЗДЕСЬ или обновите страницу
Если возникают проблемы со скачиванием, пожалуйста напишите в поддержку по адресу внизу
страницы.
Спасибо за использование сервиса savevideohd.ru
Replace the Display Panel Assembly | HP 15-f000 Notebook PC series | HP
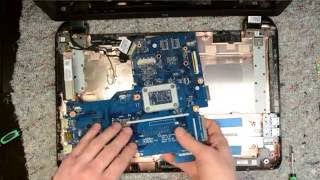
Learn how to replace the display panel assembly for HP 15-f000 Notebook PC series. Chapters: 00:00 Introduction 00:10 Removal of components before replacement 00:27 Removing display panel 02:54 Replacing display panel More support options for your HP device are available at http://hp.com/support. Remove the battery, optical drive(if installed), service cover, wireless module, keyboard, and top cover. Removal – 1. Using minimal force, lift the locking bar up on the optical drive connector ZIF connector and disconnect the optical drive connector ribbon cable from the system board. 2. Remove the wireless antenna cables from the cut out in the base enclosure. 3. Remove the wireless antenna cables from the routing channel on the base enclosure. 4. Disconnect the display panel cable from its connector on the system board and remove the display panel cable from the routing channel that secures it to the base enclosure. 5. Remove the 5.5 mm and 3 mm P1 Phillips-head screws that secure the power connector bracket to the base enclosure. 6. Remove the power connector bracket from the base enclosure. 7. Remove the power connector from its cradle on the base enclosure. 8. While supporting the display panel assembly, remove the 5.5 mm P1 Phillips-head screw that secures the left display panel hinge to the base enclosure. 9. Remove the two 5.5 mm P1 Phillips-head screws and 3 mm P1 Phillips broad-head screw 10. Carefully lift the display panel assembly off of its alignment pins on the base enclosure and remove. Replacement – 1. Align the display panel hinges over the screw holes and alignment pins on the base enclosure and lower the display panel assembly into position. 2. replace the 3 mm P1 Phillips broad-head screw and two 5.5 mm P1 Phillips-head screws 3. Replace the 5.5 mm P1 Phillips-head screw that secures the left display panel hinge to the base enclosure. 4. Place the power connector into its cradle on the system board. 5. Place the power connector bracket into position on the power connector. 6. Replace the 5.5 mm and 3 mm P1 Phillips-head screws that secure the power connector bracket to the base enclosure. 7. Connect the display panel cable onto its connector on the system board and route the display panel cable through the routing channel that secures it to the system board. 8. Route the wireless antenna cables through the routing channel on the base enclosure. 9. Guide the wireless antenna cables through the cut out in the base enclosure. 10. Route the wireless antenna cables through the routing channel on the base enclosure. 11. Insert the optical drive connector ribbon cable into the optical drive ZIF connector on the system board and press the locking bar down to lock the cable into place. Caution: Improperly installing or replacing parts could damage your HP device or void your warranty. Before replacing any parts, check your warranty. Continue the Conversation: http://hp.care/SupportForums http://hp.care/FacebookSupport http://hp.care/TwitterSupport #HPSupport #HPComputerService #HPhomeLaptop #HP SUBSCRIBE: / hpsupport SHOP NOW: https://www.hp.com/online-store HP PARTS STORE: https://parts.hp.com About HP: HP Inc. creates technology that makes life better for everyone everywhere – every person, every organization, and every community around the globe. Through our portfolio of printers, PCs, mobile devices, solutions, and services, we engineer experiences that amaze. Connect with HP: Visit HP WEBSITE: http://www.hp.com Like HP on FACEBOOK: / hp Follow HP on TWITTER: / hp Follow HP on INSTAGRAM: / hp Follow HP on LINKEDIN: / hp This video was produced by HP.
Comments