Скачать с ютуб How to Propagate White Jasmine from Cuttings ~ STEP-BY-STEP ~ Jasminum polyanthum в хорошем качестве
How to Propagate White Jasmine from Cuttings ~ STEP-BY-STEP ~ Jasminum polyanthum
3 года назад
Скачать бесплатно и смотреть ютуб-видео без блокировок How to Propagate White Jasmine from Cuttings ~ STEP-BY-STEP ~ Jasminum polyanthum в качестве 4к (2к / 1080p)
У нас вы можете посмотреть бесплатно How to Propagate White Jasmine from Cuttings ~ STEP-BY-STEP ~ Jasminum polyanthum или скачать в максимальном доступном качестве, которое было загружено на ютуб. Для скачивания выберите вариант из формы ниже:
Загрузить музыку / рингтон How to Propagate White Jasmine from Cuttings ~ STEP-BY-STEP ~ Jasminum polyanthum в формате MP3:
Если кнопки скачивания не
загрузились
НАЖМИТЕ ЗДЕСЬ или обновите страницу
Если возникают проблемы со скачиванием, пожалуйста напишите в поддержку по адресу внизу
страницы.
Спасибо за использование сервиса savevideohd.ru
How to Propagate White Jasmine from Cuttings ~ STEP-BY-STEP ~ Jasminum polyanthum
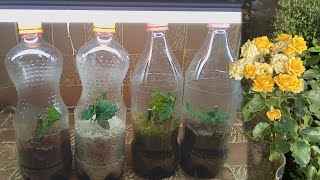
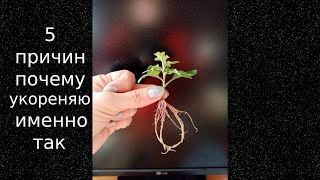
In this video, I will show you step by step how to take Jasmine cuttings. Buy Your Own Jasmine Plant Here: https://geni.us/Jasmine-polyanthum Grab your own multi-purpose Harvest Knife: UK: https://tidd.ly/3LjP4f5 USA: https://geni.us/HarvestKnife Take your cuttings in the morning if possible because the stems will be the most full of moisture at this time before the sun hits the plant and transpiration starts to dry the stems and the leaves out. Find a fresh healthy-looking stem to cut. Cut just below a leaf node, - this is where the leaves come from the steam. If you’re not planting your cuttings straight away put them into a bag to keep the moisture in. The number one reason why a cutting doesn’t successfully take is that it dries out before it has had a chance to fully root and then take on moisture on its own. So during this period while it's growing roots we need to do everything we can to keep in what moisture the cutting currently has. The first step is to keep the cuttings in a bag. The second step is to keep the cuttings covered either with a sealed clear plastic bag that you can seal with a rubber band, or like I’m using for these cuttings a glass jar that fits the plant pot nicely so you have a mini glasshouse to grow your cuttings in! For the soil I’m using a small amount of normal houseplant soil, a large amount of perlite, and some horticultural grit. The reason why is that cuttings don’t need any food to grow initially, they can’t take on nutrients until their root system is fully developed so you could just use 100% perlite, or even 100% sand, what is important is good drainage during this initial period because while we need to retain moisture for the cutting we don’t want the growing media too wet because the stem can rot and quickly die, so as usual, we want moist but not wet. When planting the cutting you can use root hormone powder to help it root more easily and stop potential root rot. Always use a dibber to make a little hold for your cutting, don’t push it into the soil because they are very thin stems and you can easily damage the stem on the way in and then it will have no chance. It doesn’t matter what you use to make the hole. Now once you’re done and your cutting is eased in a bag or jar like this be sure to keep it out of the sun to begin with, the sum will overheat it and dry it out too quickly so find some shade or a place with some indirect light and even temperature. Every week you can open the bag or just lift the jar to check on it and let the old air out and some fresh air in, if it’s still nice and moist then leave it and seal it back up, if it looks like it’s drying out a bit you can spray the soil with a plant mister to add some moisture back in, but don’t forget we don’t want it soggy wet or it will rot but we don’t want it dry either so somewhere in the middle. It will take a good few months for new roots to develop so be patient, if you see new growth Dan In West Yorkshire was interested in this cultivar and I promised I would send you a cutting. If you’re watching I haven’t forgotten about you! It’s just taken a while to get these guys growing. It’s actually taken 5 months for these to get to this stage! They were really quite slow to get growing. I’m sure there was some root growth after a few months but I wanted them to get stronger before I sent them in the post.
Comments