Скачать с ютуб How to set up AOV's to render passes with Arnold in Maya + Compositing in Photoshop в хорошем качестве
How to set up AOV's to render passes with Arnold in Maya + Compositing in Photoshop
3 года назад
Скачать бесплатно и смотреть ютуб-видео без блокировок How to set up AOV's to render passes with Arnold in Maya + Compositing in Photoshop в качестве 4к (2к / 1080p)
У нас вы можете посмотреть бесплатно How to set up AOV's to render passes with Arnold in Maya + Compositing in Photoshop или скачать в максимальном доступном качестве, которое было загружено на ютуб. Для скачивания выберите вариант из формы ниже:
Загрузить музыку / рингтон How to set up AOV's to render passes with Arnold in Maya + Compositing in Photoshop в формате MP3:
Если кнопки скачивания не
загрузились
НАЖМИТЕ ЗДЕСЬ или обновите страницу
Если возникают проблемы со скачиванием, пожалуйста напишите в поддержку по адресу внизу
страницы.
Спасибо за использование сервиса savevideohd.ru
How to set up AOV's to render passes with Arnold in Maya + Compositing in Photoshop
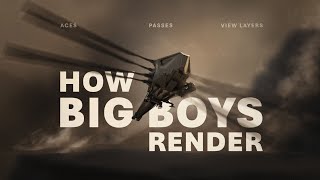
In this video, I show how to set up AOV’s like Z depth and ambient occlusion passes, as well as how to create light groups to create useful render passes with Arnold in Maya. After that, I show how you can combine these render passes in Photoshop and use some filters and adjustment layers to make your 3d renders shine, as they should! Timestamps: 0:00 Light setup 0:25 adding AOVs 1:33 adding custom AOVs 3:32 Creating light groups 5:14 How to make Z depth visible 7:30 adding AOV’s for individual lights using the light groups 8:19 export options for the z pass 8:25 Blending the render passes in Photoshop 10:50 Using the HDR toning feature to adjust z pass 11:45 adding Depth of field 13:27 Using Camera Raw filter 21:50 final result Render passes used: - Z depth - AmbientOcclusion (using Arnold’s AiAmbient Occlusion material) - Mask (using AiFlat) - ID -Beauty (one for each light) - Diffuse (direct/indirect) - Specular (direct/indirect) Creating these render passes gives you a lot of control in Photoshop and allows you to get the most out of your 3d models. Especially the Camera Raw filter is a fantastic tool to experiment with. There are a ton of cool presets to try out for inspiration and then there is a ton of other settings to experiment with. There are a lot of basic functions like level and HSV adjustments, as well as sharpen, texture, and vibrance to name a few. I find especially the Split-toning super fun to experiment with different color schemes. If you watch Transformers or the Island (2007) you will see this effect and I think if used properly it makes for stunning, very cinematic visuals. I hope this video was helpful and you create some awesome renders. Feel free to reach out on my artstation (artstation.com/lukaskut/) or youtube if you would like to share results or leave a comment if you have a question, as I usually try to get back to every question. I appreciate a like, comment, and subscription as this is good feedback to see what content you guys like.
Comments