Скачать с ютуб 💎 How To Reset And Scan Quality Advanced S2 Satellite Decoder в хорошем качестве
💎 How To Reset And Scan Quality Advanced S2 Satellite Decoder
1 год назад
Скачать бесплатно и смотреть ютуб-видео без блокировок 💎 How To Reset And Scan Quality Advanced S2 Satellite Decoder в качестве 4к (2к / 1080p)
У нас вы можете посмотреть бесплатно 💎 How To Reset And Scan Quality Advanced S2 Satellite Decoder или скачать в максимальном доступном качестве, которое было загружено на ютуб. Для скачивания выберите вариант из формы ниже:
Загрузить музыку / рингтон 💎 How To Reset And Scan Quality Advanced S2 Satellite Decoder в формате MP3:
Если кнопки скачивания не
загрузились
НАЖМИТЕ ЗДЕСЬ или обновите страницу
Если возникают проблемы со скачиванием, пожалуйста напишите в поддержку по адресу внизу
страницы.
Спасибо за использование сервиса savevideohd.ru
💎 How To Reset And Scan Quality Advanced S2 Satellite Decoder
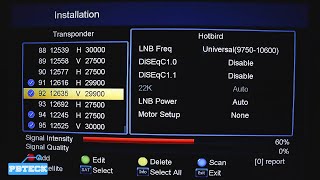
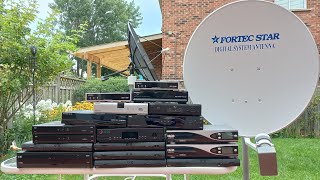
How To Reset And Scan Quality Advanced S2 Satellite Decoder Installing a satellite dish involves several steps, and it's important to follow the instructions provided by the satellite provider and the dish manufacturer. Below are the general steps involved in installing a satellite dish: Before you begin: Choose an appropriate location: Ensure that you have a clear line of sight to the satellite in the sky. There should be no obstructions like trees, buildings, or other structures blocking the signal path. Get the right equipment: Purchase a satellite dish kit that includes the dish, mounting brackets, coaxial cables, a satellite receiver, and a satellite dish signal meter (optional but helpful). Installation Steps: Assemble the Dish: Assemble the satellite dish and its mounting brackets according to the manufacturer's instructions. Find the Best Location: Use a compass to determine the direction of the satellite you want to receive signals from. Use a satellite finder app or a satellite dish signal meter to help you locate the satellite accurately. Mount the Dish: Securely mount the satellite dish on a stable surface, such as a wall, roof, or a dedicated pole. Ensure that it is level and firmly attached. Run the Coaxial Cable: Run the coaxial cable from the satellite dish to the inside of your home. Choose the shortest and most direct route possible to minimize signal loss. Connect the Receiver: Connect the coaxial cable to the LNB (Low-Noise Block Downconverter) on the satellite dish and the satellite input on your satellite receiver. Set Up the Satellite Receiver: Connect the satellite receiver to your TV using an HDMI or RCA cable. Connect the satellite receiver to a power source. Power On and Configure: Turn on the satellite receiver and follow the on-screen prompts to configure the setup. This may include selecting your language, scanning for channels, and activating your subscription if required. Fine-Tune the Signal: Use the satellite dish signal meter or the signal strength meter in the receiver's setup menu to fine-tune the alignment of the dish. Adjust the position slightly until you achieve the best signal strength. Secure and Weatherproof: Once you have a strong signal and everything is working correctly, secure all the connections and weatherproof any exposed cables with appropriate materials like cable clips and outdoor-rated tape. Remember, satellite dish installation can be complex, and if you are not comfortable doing it yourself, it's best to seek professional help from a qualified satellite installation technician. Improper installation can lead to poor signal quality or damage to the equipment. Additionally, be aware of any local regulations or restrictions related to satellite dish installations in your area. __ LINKS WEBSITE: https://www.pbteck.com INSTAGRAM; / pbtecknology FACEBOOK; / pbtecknology TWITTER : / pbtecknology TELEGRAM: https://t.me/pbtecknology #satellite #tv #pbteck #pbteckinfo #lnb #multitv #dishtv #directtv #dstv #satellitetv #dish #satellitedish #satellitereceiver #pbteckgh #pbtecknology #canalsat #canal+ #free
Comments