Скачать с ютуб Sequence diagram tutorial: ATM withdrawal (example) в хорошем качестве
Sequence diagram tutorial: ATM withdrawal (example)
3 года назад
Скачать бесплатно и смотреть ютуб-видео без блокировок Sequence diagram tutorial: ATM withdrawal (example) в качестве 4к (2к / 1080p)
У нас вы можете посмотреть бесплатно Sequence diagram tutorial: ATM withdrawal (example) или скачать в максимальном доступном качестве, которое было загружено на ютуб. Для скачивания выберите вариант из формы ниже:
Загрузить музыку / рингтон Sequence diagram tutorial: ATM withdrawal (example) в формате MP3:
Если кнопки скачивания не
загрузились
НАЖМИТЕ ЗДЕСЬ или обновите страницу
Если возникают проблемы со скачиванием, пожалуйста напишите в поддержку по адресу внизу
страницы.
Спасибо за использование сервиса savevideohd.ru
Sequence diagram tutorial: ATM withdrawal (example)
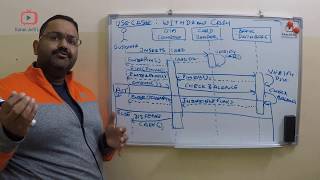
This time we’re going to create a sequence diagram showing how a client interacts with an ATM. Open up the Gleek.io app https://app.gleek.io and select “sequence diagram” from the dropdown. We can start by considering the actors we’ll use. In our example, we need to represent the user, the ATM, and the database. The first interaction is simple. The user inserts the bank card into the ATM. Type “user” and then create an arrow labeled “insert card” to explain the message that is going from the user to the ATM. Next, the ATM needs to check the bank database to make sure that the card number is valid. So we type the syntax to create a message between ATM and database labeled “card number”. This time, we need to hit the plus key to add an activation bar to the diagram. This is a reply message, as the database will send a response back to the ATM. To represent this, just add a hyphen after that arrow in the “card OK” message. The hyphen acts as a minus sign, in this case, to terminate the activation bar so that the message will be sent back at the end of the activation bar. The ATM now needs the user to enter their PIN. This is a simple case of messages from the ATM to the user and from the user to the ATM. Again, we’ll add a plus at the end to show activation bars and indicate which object is instantiated. The user enters the PIN and the information is transmitted to the ATM. Now the ATM again has to check the database to make sure that the PIN is correct. Don’t forget the plus sign! The database checks that the PIN is correct and sends a message back to the ATM. At this point, the user needs to decide what they want to do, so the ATM presents the user with an option menu. The user sends a request to withdraw cash. Then there is some back and forth with the ATM asking and the user selecting the amount to withdraw. Note that the activation bar stays with the user throughout this interaction. Once the amount has been selected, the ATM needs to send a message to the database to check that there’s enough money in the customer’s account. Note that the activation bar is also terminated. There are two possible responses to this message. In one, the user has enough funds and can withdraw the money. In the other, the user does not have enough funds and the request is denied. We represent this by using an alt operator. Just hit the forward slash key and type alt. It’s important that you hit the TAB key after each line. The database’s response to the ATM in the case that there are sufficient funds is a response message. You can show this by using an arrow with a dotted line. If the user has enough money in their account, the ATM will dispense the cash, the user will take the cash, and finally, the ATM will return the card. Our sequence diagram doesn’t end there. Sadly, the user might not have enough money. In this case, we continue the alt fragment and follow through to the user getting a rejection message and receiving their card, but no cash. So our imaginary user might leave the ATM empty-handed, but we hope that you leave this example with a clear understanding of how to create a simple sequence diagram. If you enjoyed this video, then make sure to like, share, and subscribe. Happy diagramming!
Comments