Скачать с ютуб Lesson 3 - Detailing the Eyes - How to Carve A Wood Spirit | Woodcarving Tutorial for Beginners в хорошем качестве
Lesson 3 - Detailing the Eyes - How to Carve A Wood Spirit | Woodcarving Tutorial for Beginners
2 года назад
Скачать бесплатно и смотреть ютуб-видео без блокировок Lesson 3 - Detailing the Eyes - How to Carve A Wood Spirit | Woodcarving Tutorial for Beginners в качестве 4к (2к / 1080p)
У нас вы можете посмотреть бесплатно Lesson 3 - Detailing the Eyes - How to Carve A Wood Spirit | Woodcarving Tutorial for Beginners или скачать в максимальном доступном качестве, которое было загружено на ютуб. Для скачивания выберите вариант из формы ниже:
Загрузить музыку / рингтон Lesson 3 - Detailing the Eyes - How to Carve A Wood Spirit | Woodcarving Tutorial for Beginners в формате MP3:
Если кнопки скачивания не
загрузились
НАЖМИТЕ ЗДЕСЬ или обновите страницу
Если возникают проблемы со скачиванием, пожалуйста напишите в поддержку по адресу внизу
страницы.
Спасибо за использование сервиса savevideohd.ru
Lesson 3 - Detailing the Eyes - How to Carve A Wood Spirit | Woodcarving Tutorial for Beginners
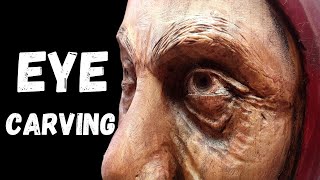
Lesson 3 of 5 The eyes may be small, but they're important. They will make your wood spirit come alive! In this third lesson, you'll add the details that will complete your wood spirit's eyes. This Schaaf Tools Video Series with woodcarver Lucas Kost takes beginner carvers through the process of carving a wood spirit from start to finish. If you haven't seen lessons 1-2, you can find them here: Lesson 1: • Lesson 1 - Prep and Roughout Stage - ... Lesson 2: • Lesson 2 - Nose and Eye Mounds - How ... The 3 gouges we'll be using today: From the 12-Piece Foundation Set https://www.schaaftools.com/products/... #11-3mm #8-4mm From the 7-Piece Expansion Set https://www.schaaftools.com/products/... #3-20mm From the 4-Piece Fishtail Set https://www.schaaftools.com/products/... #3F - 6mm Carving the Hooded Eye - Meaning there's a hood that will cover up the top eyelid. - Draw in the eye-hoods on both sides - Make a stop cut along the line with your #3F-6mm fishtail gouge - You can hold the gouge like you hold a pencil Timestamp [2:26] - Remove some material from below the stop cut, about 2mm to create the hood that's covering the eyelid - draw in the rounded shape of the lower eyelid, and then use the fishtail tool to do the same thing on bottom - Define the corner of the eye on each side REMEMBER: Be careful to not cut past the stop cut. Again, don't carve away the lower eyelid! Timestamp [5:28] The Bags Underneath the eyes - Draw in the one main bag (the mallard bag) - Using the #11-3mm gouge, carve along the drawn line - Remove the material on the low side of the cut to create the impression that the bad is sticking forward, elevated from the cheek. Use your #3-20mm chisel - Round our the bags with the #3F-6mm - You can define the lower eyelid a little more by tracing along the lower eyelid Timestamp [7:50] Eye Wrinkles - Using the #11-3mm, do a series of small cuts to create wrinkles - Give your wood spirit's eyes crows-feet by doing a series of stop cuts with your fishtail gouge Timestamp [10:05] The Pupils - Decide which direction you want your wood spirit carving looking - Draw in the pupils - Use the #8-4mm to do a subtle cut that will scoop up and out. It can be helpful to wiggle the tool ever so slightly. Then clean up the loose material with the edge of your chisel. - Be careful not to effect the upper eyelid And the eyes are done! Stay tuned for Lesson 4: Carving Hair. For more beginner wood carving projects and tutorials, make sure you subscribe to our channel.
Comments


![[우드카빙]나무정령 조각하기 Woodcarving-Carve a wood spirit](https://i.ytimg.com/vi/aIatv_GUH0M/mqdefault.jpg)

![[우드카빙]목각인형 조각하기-양초인형 Woodcarving- carve a Candle man](https://i.ytimg.com/vi/RXcZ2DahCK0/mqdefault.jpg)