Скачать с ютуб Custom Grip Tape Job - THE EASY WAY в хорошем качестве
Custom Grip Tape Job - THE EASY WAY
12 лет назад
Скачать бесплатно и смотреть ютуб-видео без блокировок Custom Grip Tape Job - THE EASY WAY в качестве 4к (2к / 1080p)
У нас вы можете посмотреть бесплатно Custom Grip Tape Job - THE EASY WAY или скачать в максимальном доступном качестве, которое было загружено на ютуб. Для скачивания выберите вариант из формы ниже:
Загрузить музыку / рингтон Custom Grip Tape Job - THE EASY WAY в формате MP3:
Если кнопки скачивания не
загрузились
НАЖМИТЕ ЗДЕСЬ или обновите страницу
Если возникают проблемы со скачиванием, пожалуйста напишите в поддержку по адресу внизу
страницы.
Спасибо за использование сервиса savevideohd.ru
Custom Grip Tape Job - THE EASY WAY
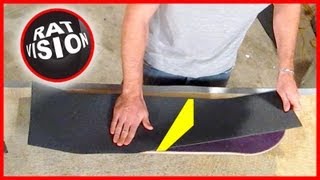
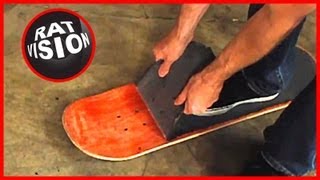
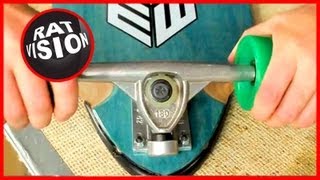
This is the easiest way to to do a customized Grip Tape Job. Learn how to apply @ • Put On Skateboard & Longboard Grip Ta... Go to http://ratvision.com/ for more info. For great prices on Longboard and Skateboard equipment we recommend http://stokedskateboards.com/ This video shows how to cut out griptape to reveal a sticker or graphic on a any deck. You can do this to a street deck, longboard deck, Penny board, and scooter. Steps for cutting out a sticker: 1. For a vertical line place the sticker face down and turned the right way (bottom of the graphic is toward the tail). Mark on the paper side of the grip tape where you'd like your line. Draw a line end to end. 2. Cut along the line. It does not need to be perfect because this line won't represent the line that goes thru the grip tape. We'll use the existing outside edges. 3. Take the small skinny piece, turn it around and line up the existing edges face to face. Then tape the 2 pieces together. 4. Place sticker face up on the deck where u like(don't stick). Measure the distance from bottom edge of the sticker to the tail of the deck. Add 1/2 inch (10mm) to that length. Use this new measurement and mark it on the paper side of the grip. You add 1/2 inch because the griptape is longer than the deck. 5. Place sticker face down in your spot, tape the ends down in a couple spots. Start tracing around sticker. 6. Does your sticker have a clear or colored boarder around the image? On the small skinny piece of grip tape move the sticker over toward the center the same distance as the boarder on the sticker and retrace. When u move the skinny piece over to create your line on the deck the boarder would be too big on the skinny side. 7. Cut out the grip tape along line you drew. Careful around corners. 8. Take off the paper backing of the sticker and stick it to the deck where you marked it. Avoid air bubbles or creases in the sticker by lying it down on the deck from one side to the other. 9. Take off the tape. 10. Tear off the paper backing on the grip tape about 1 inch around the cut out. It's easier to handle the grip tape to get it in place. 11. Place the grip tape over the deck around the sticker. 12. Peal off the paper backing on both sides and apply the griptape to the deck. 13. Repeat steps 11 and 12 for the skinny piece. 14. Score it, cut it, and roughen up the edges. Go over the line area a couple times to ensure it doesn't peal up. For graphics on a deck or stickers that are not cut out and are shapes, like a rectangle, use a piece of see-through tissue paper to trace out. Stores that sell shoes would be happy to give you a piece. 1. Stick the sticker anywhere you like on the deck. For the rest of these steps I will refer to sticker as the graphic. 2. Cut a piece of tissue paper that will cover the graphic and then some, and then tape it down. Be sure to stretch out the paper as much as it can before it tears. It's OK if there are a ton of little wrinkles in the paper. So long as it's flat and won't move you're good. 3. Trace over the graphic. Use a ballpoint pen for this. 4. Take off the paper and fold over the tape onto the paper. 5. Measure the distance from the tail of the deck to the bottom edge of the graphic, and then add about 1/2 inch (10mm. Grip is longer. 6. Place the tissue paper face down turned the right way. The traced graphic should be in the right spot so when u cut it out it will line up perfectly on the deck. Tape it down. 7. Trace over the traced graphic on the tissue paper using a pen that will bleed or go through the tissue paper. This will mark the paper on the grip tape. For a vertical line move the tissue paper over. See step 6 in beginning. 8. Peal back one side to see if thee are any spots that didn't show up. 9. Go over the lines with pen, kind of connecting the dots. 10. Tear off the paper backing on the grip tape about 1 inch around the cut out. This makes it easier to handle the grip tape as u get it in place over the graphic. Follow steps 11-14 above since it does not allow (by youtube) enough room to add the rest. Have fun getting creative with your own custom grip tape job!
Comments