Скачать с ютуб How to Rust Proof your Vehicle at Home like a Professional в хорошем качестве
How to Rust Proof your Vehicle at Home like a Professional
3 года назад
Скачать бесплатно и смотреть ютуб-видео без блокировок How to Rust Proof your Vehicle at Home like a Professional в качестве 4к (2к / 1080p)
У нас вы можете посмотреть бесплатно How to Rust Proof your Vehicle at Home like a Professional или скачать в максимальном доступном качестве, которое было загружено на ютуб. Для скачивания выберите вариант из формы ниже:
Загрузить музыку / рингтон How to Rust Proof your Vehicle at Home like a Professional в формате MP3:
Если кнопки скачивания не
загрузились
НАЖМИТЕ ЗДЕСЬ или обновите страницу
Если возникают проблемы со скачиванием, пожалуйста напишите в поддержку по адресу внизу
страницы.
Спасибо за использование сервиса savevideohd.ru
How to Rust Proof your Vehicle at Home like a Professional
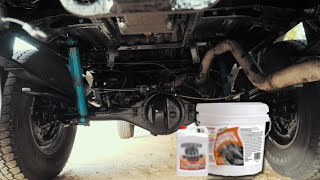
How to apply an oil or wax spray to your vehicle like a professional, but at home. For this, I’m using my 2006 Dodge Ram as an example. Considering that I live in Canada where my truck is exposed to salt, I want to make this truck last as long as possible. Applying some form of an oil or wax spray is a great way of protecting your vehicle, this will help reduce the chance of components rotting out such as brake lines, fuel lines, floors, frames, rockers, etc. This also maintains the value of your vehicle when you decide to sell it. #rustproofing #autobody #dodgeram Amazon links for rustproofing gun shown in video: USA: https://amzn.to/3sYAT3i Canada: https://amzn.to/2YiBWNC Website: http://4diyers.com Patreon: / 4diyers Facebook: / 4diyers Twitter: / 4diyers Instagram: / 4diyers Tumblr: / 4diyers Pintrest: / 4diyers Tools/Supplies Needed: -pressurized oil/wax spray applicator gun -wax/oil spray rust proofing solution -mask -gloves -safety glasses -tarp -air compressor with pressure regulator -bucket of hot water Chapters: 00:00 Intro 00:36 Application Gun 01:48 Preparation 02:41 Cleaning up any Rust 03:10 Applicator Gun Setup 04:13 Applying the Coating 10:41 Coating when Done Procedure: Before applying the oil, I took my truck to the local carwash which heats their water, making the removal of any previous spray or dirt easily wash off. I also used my multi-purpose cleaner to spray the underside of the truck to help cut into the build-up. Let it dry for a couple of days. I'm using an oil and wax hybrid mixed coating. I wanted something which would creep and penetrate seams like oil but has a thick self-healing non-drip coating like wax. I have a 3.8L can of coating, the container for the gun holds one liter, I used about 3L or 3.2 quarts in total on the truck. Ideally, it’s best to do this when it’s warm so the coating flows better. The day of the application was about 10C or 50F, to help the flow of the material, after filling the container, I placed it in a bucket of hot water. For the air compressor setup, this is a 6 gallon compressor. I used the moisture separator on another regulator to remove any washer which may cause application issues. I found the pressure is best between 90 to 100 psi, however, this may vary depending on the fluid thickness. Park your vehicle in an area where it doesn’t matter if you get any oil spray on the ground. Using the cavity style wand, you’ll find various slots or holes created from when the frame was manufactured, insert the wand fully inside. Then squeeze the trigger, applying spray inside the frame while pulling the wand out at the same time. The speed at which you pull the wand out will depend on your pressure and fluid settings. Using the same hole, you can work ahead of the hole and to the back of the hole. Based on the wand length, this will depend on how far of an application it can apply. Continue doing this for the whole frame. If you’re working with a unibody vehicle, the same process can be applied to the vehicle's structure. While a unibody doesn’t have a frame such as this truck, you’ll still have subframes and enclosed structural components along the floor with possible rubber body plugs that can be removed to access the inner surfaces. Areas, where you do not want any coating applied, are the brakes, exhaust, and drive belts. On body, starting with the front and working my way back. Remove the headlights, this allows for better access behind the front fenders going through factory holes in the body. Do this for any hidden structural components and behind any body panels. This application is done to the doors, hood, fenders, bedsides, tailgate, trunk, etc. Other lights can trim components that can also be removed to assist in the process. Spray the exposed visible areas as the final step. This would be the underside of the floor, frame, cross members, brackets, springs, axles, the backside of steel bumpers, etc. The coating will appear to have a wet finish once done, products will vary, some may drip, others won’t. For this particular product, do not drive the vehicle or let the coating get wet for 4hrs. Depending on how much your vehicle is driven, the thickness of the coating, product used, and environment, an application maybe required once a year, every other year, or it may last longer. Thank you to all those who watch my videos and support my content. Don't forget to subscribe to my channel for future tutorial videos and like my video if you found it helpful. New videos are always being uploaded every week! © 4DIYers 2013 All Rights Reserved No part of this video or any of its contents may be reproduced, copied, modified or adapted, without the prior written consent of the author.
Comments