Скачать с ютуб Part I | COMPLETE Setup Guide for Sky-Watcher Star Adventurer 2i Pro Package (Wi-Fi Enabled) в хорошем качестве
Part I | COMPLETE Setup Guide for Sky-Watcher Star Adventurer 2i Pro Package (Wi-Fi Enabled)
3 года назад
Скачать бесплатно и смотреть ютуб-видео без блокировок Part I | COMPLETE Setup Guide for Sky-Watcher Star Adventurer 2i Pro Package (Wi-Fi Enabled) в качестве 4к (2к / 1080p)
У нас вы можете посмотреть бесплатно Part I | COMPLETE Setup Guide for Sky-Watcher Star Adventurer 2i Pro Package (Wi-Fi Enabled) или скачать в максимальном доступном качестве, которое было загружено на ютуб. Для скачивания выберите вариант из формы ниже:
Загрузить музыку / рингтон Part I | COMPLETE Setup Guide for Sky-Watcher Star Adventurer 2i Pro Package (Wi-Fi Enabled) в формате MP3:
Если кнопки скачивания не
загрузились
НАЖМИТЕ ЗДЕСЬ или обновите страницу
Если возникают проблемы со скачиванием, пожалуйста напишите в поддержку по адресу внизу
страницы.
Спасибо за использование сервиса savevideohd.ru
Part I | COMPLETE Setup Guide for Sky-Watcher Star Adventurer 2i Pro Package (Wi-Fi Enabled)
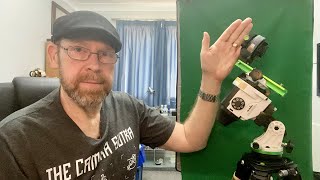
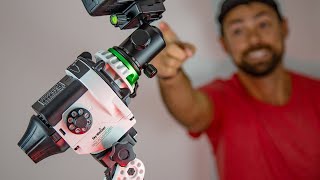
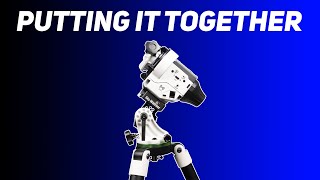
Companion Tutorial | ULTIMATE Guide to SA Console App: • Part II | ULTIMATE Guide to SA Consol... http://www.thelightexplorer.com/ In this Star Adventurer 2i tutorial video, I walk you through the complete setup process for your Wi-Fi enabled, Sky-Watcher Star Adventurer 2i, which will allow you to take sharply tracked photos of the Milky Way and deep-sky objects (DSOs). This v2i model, is the latest version of Sky-Watcher's very popular star tracker - the Star Adventurer. The new and upgraded version now has Wi-Fi built in, which allows you to control the mount and your camera's shutter, over Wi-Fi. Come with me as I show you how to mount the tracker to your tripod, polar align your mount, mount your gear on the tracker, balance heavy gear on the tracker, in both the RA and Declination axis, and finally, use the built in Wi-Fi feature, to control the tracking and your camera's shutter. *********************************************************************** My Info ------------- Website: http://www.thelightexplorer.com/ Instagram: / thelightexplorer Facebook: / thelightexplorer *********************************************************************** Timestamps --------------------- 00:00 Intro 01:42 Star Adventurer 2i Pro Package Contents 02:54 Mode Dial Settings 04:23 Mounting the Equatorial Wedge 04:43 Mounting the Tracking Mount onto the Wedge 06:43 Polar Alignment - Locating Polaris & Positioning on the Reticle 10:51 Polar Alignment - Leveling the Tripod 12:34 Polar Alignment - Using Rear Dials to get 0 & 6 on Polar Clock vertical 16:01 Polar Alignment - Checking to ensure Tripod Level 16:43 Polar Alignment - Locating Polaris on the Reticle at Night 18:08 Polar Alignment - Installing the Polar Scope Illuminator 19:38 Polar Alignment - Placing Polaris in Precise Location on Polar Clock 21:53 Mounting Camera Gear Using Ball-head Adapter 23:35 Pointing Camera and Lens towards DSO using Ball-head Adapter 24:28 Mounting Camera Gear Using Fine Tuning Mounting Assembly 28:08 Balancing the Load Using Counterweight Kit in RA Axis 30:11 Pointing Camera and Lens towards DSO using Fine Tuning Assembly 32:34 The Need to Balance in the Declination Axis 36:46 Polar Aligning With a Rotated Reticle 38:20 Using the 'Polar Scope Align Pro' App for a Rotated Reticle 42:08 Tracking Options 42:53 Shutter Release Options 44:46 Using Wi-Fi and the SAM Console App 48:23 Conclusion *********************************************************************** Music Credit --------------------- 'Great Days' by: Joakim Karud / joakimkarud Music by Joakim Karud / joakimkarud *********************************************************************** Links to Items Mentioned in Video (Affiliate Links) --------------------------------------------------------------------------------- 01) Star Adventurer 2i: https://amzn.to/3s524bB 02) Counterweight Kit: https://amzn.to/3ara1Sp 03) Tripod (no ball-head): https://amzn.to/3vVqK9E 04) Tripod (with ball-head): https://amzn.to/3nAdmE7 05) Tripod Leveling Base: https://amzn.to/3bMXPef 06) Laser Pointer: https://amzn.to/3aop13p 07) Hot-shoe adapter for Laser: https://amzn.to/3aeBwOl 08) Arca Swiss Clamp: https://amzn.to/3rYezWe Dovetail Plates ------------------------- Please get a long enough dovetail plate for your lens foot. Don't get too short a plate, as the plate needs to be able to slide along the clamp, far enough to balance your lens. At the same time, you don't really need too long a plate either. If you plan to eventually get a guide camera to auto-guide, then I suggest you get the 200mm plate - you can then connect the auto-guider to the bottom of the plate. Three suggestions below - you can also get any other brand's plate that you might prefer. 09) Lens Dovetail Plate (100mm): https://amzn.to/3k33DnC 10) Lens Dovetail Plate (140mm): https://amzn.to/3scXlnO 11) Lens Dovetail Plate (200mm): https://amzn.to/2RKKr3R Cases ----------- 12) Pelican Case (Model 1450): https://amzn.to/3pyvk92 13) Pelican Case (Model 1520): https://amzn.to/3uWg0pE 14) Harbor Freight Apache Case: https://amzn.to/2NyLcuR *********************************************************************** #staradventurer2i #staradventurer #startracker #staradventurertutorial #staradventurerwifi #skywatcher #skywatcherstaradventurer #skywatcherstaradventurer2i #skywatcherstaradventurerwifi #startrackersetup #startrackertutorial #settingupstartracker #staradventurersetup #staradventurer2isetup #nikhilshahi #astrophotographytools #astrophotographytutorial #moveshootmovetracker #ioptronskyguiderpro
Comments