Скачать с ютуб Vizio 60" TV LED Strip Replacement - E60-C3 TV Model - No Backlights & Blank Screen в хорошем качестве
Vizio 60" TV LED Strip Replacement - E60-C3 TV Model - No Backlights & Blank Screen
7 лет назад
Скачать бесплатно и смотреть ютуб-видео без блокировок Vizio 60" TV LED Strip Replacement - E60-C3 TV Model - No Backlights & Blank Screen в качестве 4к (2к / 1080p)
У нас вы можете посмотреть бесплатно Vizio 60" TV LED Strip Replacement - E60-C3 TV Model - No Backlights & Blank Screen или скачать в максимальном доступном качестве, которое было загружено на ютуб. Для скачивания выберите вариант из формы ниже:
Загрузить музыку / рингтон Vizio 60" TV LED Strip Replacement - E60-C3 TV Model - No Backlights & Blank Screen в формате MP3:
Если кнопки скачивания не
загрузились
НАЖМИТЕ ЗДЕСЬ или обновите страницу
Если возникают проблемы со скачиванием, пожалуйста напишите в поддержку по адресу внизу
страницы.
Спасибо за использование сервиса savevideohd.ru
Vizio 60" TV LED Strip Replacement - E60-C3 TV Model - No Backlights & Blank Screen
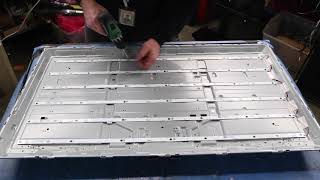
Vizio LED Strip Replacement for 60" TV CLICK HERE for TV PARTS: http://www.shopjimmy.com/vizioe600dlb... SKU: sj-E600DLB030-007 Part Type: LED Strips Part Number: E600DLB030-007 Part Usage: LED/LCD Board Number(s): E600DLB030-007, E60DLBE605F, YFD01 94V-0E350839, SVG600A14, S600DLBE605F Panel Sticker Number: 10253090231 Brands: Vizio Important Message: These strips are compatible with all Vizio model E60-C3 TVs. Includes 12 strips TV Part Types: LED Light Strip Vizio TV Models: E60-C3 LFTRRZAR E60-C3 LFTRRZAS In this video we will show how to replace the LED strips in a Vizio TV, model number E60-C3. It is recommended to take pictures during the repair process to use as a reference point. Be sure your TV is unplugged. Begin by unplugging the TV and removing the screws and back cover off the TV. Disconnect the ribbon cables on the t-con board and address buffer boards. Find the small clips and release them form the chassis. They will be completely removed from the TV in a later step. Disconnect the necessary cables on the main board and power supply board and remove them to gain access to be able to release the small clips that are under them. Re-attach the boards when done. Remove the IR sensor to access a hidden screw. Remove all of the bezel screws around the TV. Tape the speakers to the chassis and then flip the TV over. Disconnect and remove the bezel from the chassis. Remove the screws and panel brackets around the TV. Remove the larger panel frame on the bottom of the TV. Very carefully and gently, release the address buffer boards from the chassis. Flip up the address buffer boards and tape them to the panel. Check the IC ribbon cables on the panel. Be sure that they are not stuck or connected to anything on the chassis that will damage them. Lift the panel with suction cups and remove the panel from the TV. Remove the screws and the filter frame around the TV. In order to remove the filter frame, you may need to remove some panel padding, that rests on the filter frame. Be careful as this padding will need to be reinstalled later. Tape the layers of diffusion in the corners to hold them together and then remove them from the chassis. Remove the plastic clips that we released earlier from the other side of the chassis and plastic rivets in the chassis that hold the reflector sheet down. Slowly remove the reflector sheet. Do this carefully as the reflector sheet is stuck to the chassis. Remove the tape that is holding the strips to the chassis. Disconnect the strips from the power cable and remove them from the TV. Align the replacement strips on the chassis and connect them to the power cable. The replacement strips should come with adhesive on them, if not you can use our double sided tape to hold them in place. Reinstall the reflector sheet. Reinstall the plastic rivets and clips. Reinstall the layers of diffusion. Reinstall the filter frame around the TV. Reinstall any panel padding that was removed. Reinstall the TV panel. Release the address buffers and secure them back into position. Reinstall the panel frame and screws. Reinstall the bezel and the screws. Reinstall the IR sensor. Reconnect the ribbon cables. Reinstall the back cover and screws. TV Repair Made Easy™ © 2017 ShopJimmy.com, LLC.
Comments