Скачать с ютуб How to Make a Dutch Hood for Falconry в хорошем качестве
How to Make a Dutch Hood for Falconry
9 лет назад
Скачать бесплатно и смотреть ютуб-видео без блокировок How to Make a Dutch Hood for Falconry в качестве 4к (2к / 1080p)
У нас вы можете посмотреть бесплатно How to Make a Dutch Hood for Falconry или скачать в максимальном доступном качестве, которое было загружено на ютуб. Для скачивания выберите вариант из формы ниже:
Загрузить музыку / рингтон How to Make a Dutch Hood for Falconry в формате MP3:
Если кнопки скачивания не
загрузились
НАЖМИТЕ ЗДЕСЬ или обновите страницу
Если возникают проблемы со скачиванием, пожалуйста напишите в поддержку по адресу внизу
страницы.
Спасибо за использование сервиса savevideohd.ru
How to Make a Dutch Hood for Falconry
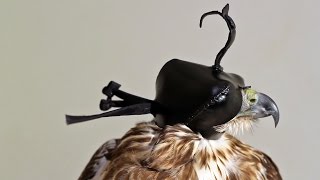
How to Make a Dutch Hood Featuring Cody H.'s two methods... Covers both glued and stitched. To learn more about how to tie the "three turks" head knot, follow this link! http://www.falconryforum.co.uk/showth... To learn more about how to install the braces on the hood, check out our video here! • Installing Braces on a Hood MESSAGE FROM THE MAKER OF THIS HOOD To all viewers of this vid, Given the video was silent it was hard to convey to much info so hopefully this will clear up any questions. On Leather: Leather should always be vegetable tanned. This leather will form better to the block and last longer than chrome tanned and brain tanned is far to floppy. Kangaroo or Kip (about a year old cow) is very good and kangaroo is probably best as it is very rip resistant. For a RT hood 3oz is probably as thin as it should get. Especially as a beginner, 4 to maybe even 5 oz would be best as it leaves room for error when punching holes. If you buy your leather natural color and plan to dye it make sure there is no oily topcoat and use a real leather dye form Fiebings of Tandy. Always test your leather before buying it. Cut a slit in it and pull. You should not be able to rip it easily. On Cutting: Keep your knife sharp and at 90 degrees to the leather. Remember only cut half way through on the beak opening!!! On Marking and Punching holes: Mark about 3/16 in from the edge with dividers or a groover. Roll a marker along it. Don't push to hard or you can go through thinner leather. You should have AT LEAST 8 stitches/inch. When punching holes leather should be lightly damp. Your awl should come out about halfway through the leather erring on the deeper side. On Sewing and Thread: Thread should be cotton coated polyester or linen (linen is best and is available from www.wmboothdraper.com get the 60/2 and use 3 strands or so) Wax it well with beeswax and lightly twist the strand together. Needles should be small tapestry needles. These are blunt so as to not puncture the thread. Sewing should be done with the leather lightly, lightly, lightly, lightly, lightly, lightly, damp. Too damp and when it dry's your seam will be gaping open & letting light in. On Blocking: This is pretty obvious from the video. On the top Knot: This is NOT obvious from the video. I should have done light colors to make it visible. Sorry. One of these days I'll make a vid on that specifically. On Braces: See Israels other video. On the Pink and Black Zebra Blow Dryer: Its not mine:) On Finishing: There are a couple options here. You can give it a coat of Super Sheen from Tandy leather. You can lightly oil it with Pure neatsfoot oil ( this may darken colors) You can spit shine it with shoe polish. And last but not least you can clean it with saddle soap. On Storing you hood: Store hoods with the braces open and stuffed with paper. Keep the top not protected and every once in a while oil your braces. Note: You should NEVER get oil on your bird feathers so the oil on the braces should be liquid (not a grease) and should be allowed to soak in over night in a warm place. I hope this clears up and questions you all might have had. Sincerely, Cody ( the guy that made the hood ) www.falconrytold.com Support Future Uploads! www.patreon.com/falconrytold Official Merch! https://www.spreadshirt.com/user/Falc... Like us on Facebook! www.facebook.com/falconrytold Follow us on Instagram! @falconrytold
Comments