Скачать с ютуб NEW SHED BUILD, KETER DARWIN 8 X 6, Installation and Time Lapse в хорошем качестве
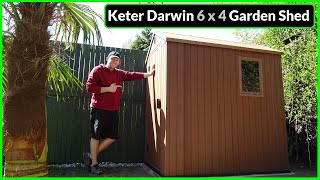
NEW SHED BUILD, KETER DARWIN 8 X 6, Installation and Time Lapse
4 месяца назад
Скачать бесплатно и смотреть ютуб-видео без блокировок NEW SHED BUILD, KETER DARWIN 8 X 6, Installation and Time Lapse в качестве 4к (2к / 1080p)
У нас вы можете посмотреть бесплатно NEW SHED BUILD, KETER DARWIN 8 X 6, Installation and Time Lapse или скачать в максимальном доступном качестве, которое было загружено на ютуб. Для скачивания выберите вариант из формы ниже:
Загрузить музыку / рингтон NEW SHED BUILD, KETER DARWIN 8 X 6, Installation and Time Lapse в формате MP3:
Если кнопки скачивания не
загрузились
НАЖМИТЕ ЗДЕСЬ или обновите страницу
Если возникают проблемы со скачиванием, пожалуйста напишите в поддержку по адресу внизу
страницы.
Спасибо за использование сервиса savevideohd.ru
NEW SHED BUILD, KETER DARWIN 8 X 6, Installation and Time Lapse
Hey! Click this link for Plastic Shed Knowledge https://www.youtube.com/channel/Uch_B... Welcome to Adi's Little Shedshop and thankyou for watching. PLEASE READ ESPECIALLY IF YOU'RE BUYING ONE Todays video is the installation of the base and build of my new KETER DARWIN 8X6 shed, I needed a shed for storage and it needed to be waterproof for the items that were going into it. So a plastic shed is what came to mind and it actually wasn't as bad as I thought it would be putting it together, until we got to the roof. Starting with base selection, I thought I needed an easy base build and Pallets are great because they are designed to last for years and go through stupid amounts of grief, plus you can normally get them really cheap or free, depending on the quality of them, we got these for £1 each as they are practically new. BONUS. Screwing the pallets together was a cinch and they levelled really easily, plus they give the shed, once attached to it, an extra 100KG roughly which is handy as the Keter Darwin 8X6 is only around 96KG on its own. The floor goes together ridiculously easily, you really cant mess that up which is nice to start, then comes the walls where you really have to make sure that the tops are completely level with each other and then only held together with ONE screw near the top, which doesn't feel anywhere near secure enough. You also have to make sure that the corners are measured correctly too because they are 11.2 inches one way and 12 inches the other, also they don't match from the front to the back which is rather annoying, so a lot of attention paying to the instructions there. Now we get to the Roof, what a pain in the A#@E that is!!!! A boat load of swearing once you get to the third and fourth panels and realise the sodding shed has moved and you actually are never getting it back to the place you had it completely level to start with, so fettling and swearing and more swearing and wondering if the neighbours are going to call the police for the expletives coming from the plastic box in your garden. Anyways a big plastic spudger comes in handy here and a good old rubber mallet, oh not forgetting to threaten the shed a few times too. If you got this far without swearing, I commend your efforts and ask "what is wrong with you?", that would be superhuman in effort. Once you have the roof on everything else is fairly straight forward, ok I had to drill some extra holes in the support bars because they were too short which was ridiculous, must have been a Friday job, finally the doors go on and there is a ruddy gap at the bottom of them and no amount of hanging them will stop the gap being there. So that'll be an ingenious fix somehow at some point soon. Would I buy another one.................probably NOT!!! and I hope I don't have to. I'm actually quite proud of the build and I hope you like the video and if you have any questions please feel to ask away I will always try to reply. Everything seen and used in the making of the video is listed below with links to it all: https://www.argos.co.uk/product/95097... https://www.wickes.co.uk/Werner-Alumi... https://www.amazon.co.uk/sourcing-map... Hey! Click this link for Wood Working Wisdom https://www.youtube.com/channel/Uch_B...
Comments