Скачать с ютуб Easy Crocheted Pot Holders: a Knittycat's Knits Project в хорошем качестве
Easy Crocheted Pot Holders: a Knittycat's Knits Project
2 года назад
Скачать бесплатно и смотреть ютуб-видео без блокировок Easy Crocheted Pot Holders: a Knittycat's Knits Project в качестве 4к (2к / 1080p)
У нас вы можете посмотреть бесплатно Easy Crocheted Pot Holders: a Knittycat's Knits Project или скачать в максимальном доступном качестве, которое было загружено на ютуб. Для скачивания выберите вариант из формы ниже:
Загрузить музыку / рингтон Easy Crocheted Pot Holders: a Knittycat's Knits Project в формате MP3:
Если кнопки скачивания не
загрузились
НАЖМИТЕ ЗДЕСЬ или обновите страницу
Если возникают проблемы со скачиванием, пожалуйста напишите в поддержку по адресу внизу
страницы.
Спасибо за использование сервиса savevideohd.ru
Easy Crocheted Pot Holders: a Knittycat's Knits Project
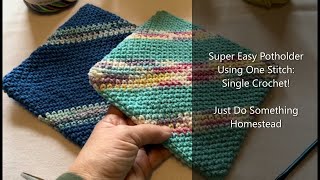
These pot holders are super easy to crochet and they make for a great weekend project. These double-thick squares can used as pot holders or trivets and a set of 2 makes for a wonderful gift idea! Easy Crocheted Pot Holders Pattern (Level: Beginner) Materials: 1. Skeins of 4-ply, 100% cotton yarn. You will need 2 skeins of 2 oz or 2.5 oz skein for each pot holder; for the pot holder shown in video, I used the Peaches and Cream brand yarn in 2 colorways: Happy Go Lucky for the lighter shade pot holder and Emerald Energy for the darker shade. 2. US size H crochet hook (5.0 mm) 3. 2 stitch markers 4. Tapestry or darning needle 5. A pair of scissors Abbreviations: Ch=chain, SC=single crochet; st=stitch. Using the size H crochet hook and any color yarn of your choice, make 37 ch. Row 1: Skip the first chain from the hook and make a SC in the back bar of next chain and mark it with a stitch marker (this will be the first chain of this row). Then continue making a SC similarly in each of the other 35 chains for a total of 36 chains. When you reach the end, do not turn your work. Instead, continue making SC in each of the chains on the other side (these chains are the ones that are at the base of the row of SCs that you just did, as shown in the video). You will now have a total of 72 SC. Place a stitch marker to mark the line between these 2 opposite rows of SC (this will help you count the rows later on). Row 2: Make a SC in the top of each of the 72 SC from Row 1, working in the round just like the first row (remember to mark the first SC in this and each row after this). Repeat Row 2 until you have a total of a 20 rows. Then, fold the piece to from a square and get a diagonal seaming edge (as shown in the video). If when you fold your work, it does not form quite form a square, you may need to do another row. The stitch marker for the rows will be in the top third of the diagonal. Continue making SC in each stitch till you get the yarn to be at the end of the diagonal; you will need about 23-24 stitches. Then, for the hanging loop, make 10 ch and join using a slip stitch into the same stitch (from where you started making the ch). Leave a long enough tail to seam the edges and cut the yarn (can leave at least twice the length of the diagonal). Using the tapestry/darning needle, first weave in the tail at the starting point. Then, seam the edge using a whip stitch (line up the edge chain, insert the needle in the outer edge of the ch on the right side and then insert it in the outer edge of the ch on the left side; keep doing this, pulling on the yarn occasionally to tighten up the seam, as shown in the video). Weave in the yarn tail and you pot holder is ready! Helpful video links: How to do SC (US term; in the video, this is called a “double crochet”, which is the UK term): • How to do double crochet (UK)/single ... How to do a slip stitch (US term; in video, this is called a “single crochet”, which is the UK term): • How to crochet slip stitch (UK/US): a... How to make a crochet chain: • How to crochet a chain: a Knittycat's... Questions or suggestions? Leave me a comment. Happy Crocheting, my lovely friends!
Comments