Скачать с ютуб How to change springs on SUZUKI SWIFT 3 [TUTORIAL AUTODOC] в хорошем качестве
How to change springs on SUZUKI SWIFT 3 [TUTORIAL AUTODOC]
5 лет назад
Скачать бесплатно и смотреть ютуб-видео без блокировок How to change springs on SUZUKI SWIFT 3 [TUTORIAL AUTODOC] в качестве 4к (2к / 1080p)
У нас вы можете посмотреть бесплатно How to change springs on SUZUKI SWIFT 3 [TUTORIAL AUTODOC] или скачать в максимальном доступном качестве, которое было загружено на ютуб. Для скачивания выберите вариант из формы ниже:
Загрузить музыку / рингтон How to change springs on SUZUKI SWIFT 3 [TUTORIAL AUTODOC] в формате MP3:
Если кнопки скачивания не
загрузились
НАЖМИТЕ ЗДЕСЬ или обновите страницу
Если возникают проблемы со скачиванием, пожалуйста напишите в поддержку по адресу внизу
страницы.
Спасибо за использование сервиса savevideohd.ru
How to change springs on SUZUKI SWIFT 3 [TUTORIAL AUTODOC]
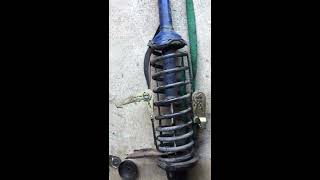
How to change springs / coil springs / suspension springs on SUZUKI SWIFT 3 (MZ, EZ) Hatchback 2005, 2006, 2007, 2008, 2009, 2010, 2011, 2012, 2013, 2014, 2015, 2016, 2017, 2018 [TUTORIAL AUTODOC] Top brands that produce springs: BLUE PRINT, KYB, MONROE, LESJÖFORS, SACHS. 📲 Buying via app is always cheaper than on the website! ❱❱ Install the AutoDoc App — https://interstitials.onelink.me/1036... On our website you will find a wide range of auto parts you are interested in: https://goo.gl/2uEHSC Springs: https://goo.gl/kxNHVS Springs for SUZUKI: https://goo.gl/kMxKVY Springs for SUZUKI SWIFT 3: https://goo.gl/aX4jGR SUZUKI Car parts: https://goo.gl/YBAhfD 🔔 Subscribe to AUTODOC's channel and don't miss new videos on car parts replacement ➜ https://www.youtube.com/c/AutodocUk?s... PDF How to replace springs on SUZUKI SWIFT 3 [TUTORIAL AUTODOC] — https://cdn.autodoc.de/uploads/man_pd... 00:21 — Use a combination spanner No.16. Use a drive socket No.15. Unscrew the stabilizer link upper fastening. 00:38 — Use a flat screwdriver. Disconnect the ABS sensor cable fastener. 00:44 — Use a drive socket No.12. Use a Ratchet wrench. Disconnect the brake hose holder from the shock absorber strut. 01:04 — Use a combination spanner No.17. Use a drive socket No.21. Unscrew the lower fastener of the shock absorber strut. 01:25 — Disconnect the steering knuckle from the shock absorber strut. 01:36 — Use a flat screwdriver. Unscrew fixing bolts of the protective cover. 01:58 — Use a combination spanner No.18. Use a HEX bit No.H6. Unscrew the top fastening of the shock strut mount. 02:27 — Use a combination spanner No.19. Use a HEX bit No.H6. Unscrew the top fastening of the shock strut mount. 03:00 — Install the spring on the shock absorber. 03:10 — Compress the spring. 03:33 — Use a combination spanner No.19. Use a HEX bit No.H6. Unscrew the top fastening of the shock strut mount. 03:58 — Tighten the shock strut top mount. Use a combination spanner No.17. Use a HEX bit No.H6. 04:33 — Install the steering knuckle on the shock strut and tighten it. Use a combination spanner No.17. Use a drive socket No.21. 05:03 — Connect the brake hose fastener to the shock absorber strut. Use a drive socket No.12. Use a ratchet wrench. 05:11 — Connect the ABS sensor cable fastener. 05:23 — Tighten the stabilizer link upper fastening. Use a combination spanner No.16 Use a drive socket No.15. The tools you need to replace springs: - combination spanner No. 16 - drive socket No. 15 - drive socket No. 12 - ratchet wrench - combination spanner No. 17 - drive socket No. 21 - flat screwdriver - combination spanner No. 18 - HEX bit No.6 - combination spanner No. 19 Was this video helpful? Give it a thumbs-up and share it with your friends! Have a look at other videos on our channel: ► SUZUKI SWIFT 3 car repair tutorial — • SUZUKI SWIFT 3 car repair tutorial | ... ► How to replace front brake discs and front brake pads set on SUZUKI SWIFT 3 — • How to change front brake discs and f... ► How to replace front anti roll bar link on SUZUKI SWIFT 3 Hatchback — • How to change front anti roll bar lin... Mobile Shop: https://m.autodoc.co.uk 📢 AutoDoc in social media: Facebook: / autodoc.co.uk Twitter: / autodoc_berlin YouTube: / autodocuk Instagram: / autodoc_autoparts #autodoc #autodoctutorial Disclaimer: This video only contains tips and recommendations that could be helpful when carrying out car repairs or replacing parts. AUTODOC is not liable for any harm, injury or property damage incurred while carrying out repairs or replacements, that are a result of incorrect use or misinterpretation of the provided information. This video is for informational purposes only and does not guarantee achievement of a specific result. The user is personally liable for incorrect use of repair equipment, tools or car parts, in particular, when this use poses the risk of injury. AUTODOC strongly recommends being careful and adhering to the safety rules when doing any repair or replacement. Keep in mind that using low quality auto parts does not guarantee the proper level of road safety. ⚡ AUTODOC CLUB — https://club.autodoc.co.uk Add your car to the AUTODOC CLUB garage and get personal recommendations on repair intervals — https://club.autodoc.co.uk/?to=/user/... ❱❱ Install the AUTODOC CLUB App — https://club.onelink.me/d2X8?pid=yout...
Comments
![How to change shock absorber on SUZUKI SWIFT 3 [TUTORIAL AUTODOC]](https://i.ytimg.com/vi/AeK3OQK4whc/mqdefault.jpg)

![Wie SUZUKI SWIFT 3 Schrägheck Stoßdämpfer wechseln [TUTORIAL AUTODOC]](https://i.ytimg.com/vi/tNytBe6BWOg/mqdefault.jpg)

![SUZUKI SWIFT 3 lengéscsillapítók csere [ÚTMUTATÓ AUTODOC]](https://i.ytimg.com/vi/8yFa4IJOs0Y/mqdefault.jpg)
![How to change front brake discs and front brake pads set on SUZUKI SWIFT 3 [TUTORIAL AUTODOC]](https://i.ytimg.com/vi/aTFOJcc11ws/mqdefault.jpg)


![Kormányösszekötőrúd axiális csukló cseréje [AUTODOC ÚTMUTATÓ]](https://i.ytimg.com/vi/kxmQMt0euTE/mqdefault.jpg)