Скачать с ютуб 2009 Town and Country Clock Spring Replacement в хорошем качестве
2009 Town and Country Clock Spring Replacement
7 лет назад
Скачать бесплатно и смотреть ютуб-видео без блокировок 2009 Town and Country Clock Spring Replacement в качестве 4к (2к / 1080p)
У нас вы можете посмотреть бесплатно 2009 Town and Country Clock Spring Replacement или скачать в максимальном доступном качестве, которое было загружено на ютуб. Для скачивания выберите вариант из формы ниже:
Загрузить музыку / рингтон 2009 Town and Country Clock Spring Replacement в формате MP3:
Если кнопки скачивания не
загрузились
НАЖМИТЕ ЗДЕСЬ или обновите страницу
Если возникают проблемы со скачиванием, пожалуйста напишите в поддержку по адресу внизу
страницы.
Спасибо за использование сервиса savevideohd.ru
2009 Town and Country Clock Spring Replacement
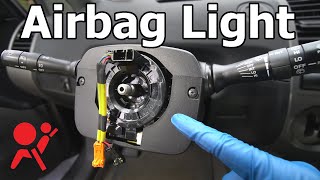
Terrible, first ever YouTube video of a relatively simple job. The Steering Position Sensor is in the Clock Spring unit, and the whole unit has to be replaced if the sensor goes bad. The replacement costs about $200. Symptom is ABS engages brakes while turning at low speeds. Here are the steps: 1. Disconnect the Battery! Take no chances with airbags. 2. Remove 3 screws from underside of the steering column cowling. One is a Torx #20, the other two are Philips head. They're hard to see. I used my phone camera like a mirror. 3. Remove central padded portion of the steering wheel. This contains the airbag. It is held on with 3 wire-clips. You access the clips from the dashboard side of the wheel with a screwdriver. There is limited room and it's a little tricky. Again, a phone or mirror is helpful. 4. Remove the central steering wheel bolt, disconnect all wires, remove steering wheel. 5. Disconnect the turn-signal unit from the Clock Spring housing. It's just a simple clip on the top. Squeeze the clip and lift the unit up. It can just remain there after it's removed. 6. Remove Clock Spring unit. Three Torx #20 screws - 2 on top, and 1 in front. (Caution: This part comes apart easily and has a good coating of white lithium grease. It's hard to get back together if you're planning to use it again, but you're probably replacing it, so just be aware that it can be messy. There are a number of wires plugged into the back of this unit, and you need to 7. Remove the pedal adjustment button. Just one little clip in the top. Careful not to break the little clip. 8. Install the new Clock Spring unit. Click the pedal adjust button to the Clock Spring housing. Set the housing in place and connect the plugs to the back. Slide the turn signal unit into its slot. Tighten the screws. [Note: The new unit should have screws already started. Leave those in, and just tighten them once you get the unit aligned.] 9. Reinstall the steering wheel. Align the splines using the flat spot as an alignment key, and press on, ensuring that the wires for the airbag are routed through the upper-central opening. Plug wires from steering wheel into Cloock Spring unit. Install and tighten main bolt. I used a drop of lock-tight. 10. Install airbag unit. ** Be sure to touch the steering wheel bolt to discharge any static electricity before handling airbag unit! ** Make sure all connections are secure, and plug in color coded wires to airbag, then press airbag unit into place, making sure all three clips engage. 11. Reinstall cowl with it's 3 screws. 12. Reconnect the battery. That's it. Should take about an hour. Important Addendum: Michael Suda 3 years ago 2008 Grand Caravan. Bad clockspring (clicking) and steering angle sensor (SAS). ESP/BA and traction control lit on dash. Replaced clock spring-SAS unit and was able to calibrate SAS and clear codes without scan tool. There is a self SAS calibration procedure from Chrysler. There is another YouTube video on it called "Steering Angle Reset-Self adjustment procedure Tech T". Here is what I did. 1. Start Engine 2. Turn wheel right until locks full right 3. Turn wheel left until locks full left 4. Turn wheel right unitil wheels are centered 5. Turn engine off 6. Turn ignition to on position but do not start 7. Turn off and then start My ESP/BA and traction control was still lit. I repeated procedure again. It was still lit. I was on my way to autozone to get a scan when I pulled out of driveway and drove down street all lights cleared. Everything is fine now. Thanks Michael.
Comments