Скачать с ютуб DIY On tap water - 12v pumped jerry can - HGT Geared Up! в хорошем качестве
DIY On tap water - 12v pumped jerry can - HGT Geared Up!
2 года назад
Скачать бесплатно и смотреть ютуб-видео без блокировок DIY On tap water - 12v pumped jerry can - HGT Geared Up! в качестве 4к (2к / 1080p)
У нас вы можете посмотреть бесплатно DIY On tap water - 12v pumped jerry can - HGT Geared Up! или скачать в максимальном доступном качестве, которое было загружено на ютуб. Для скачивания выберите вариант из формы ниже:
Загрузить музыку / рингтон DIY On tap water - 12v pumped jerry can - HGT Geared Up! в формате MP3:
Если кнопки скачивания не
загрузились
НАЖМИТЕ ЗДЕСЬ или обновите страницу
Если возникают проблемы со скачиванием, пожалуйста напишите в поддержку по адресу внизу
страницы.
Спасибо за использование сервиса savevideohd.ru
DIY On tap water - 12v pumped jerry can - HGT Geared Up!
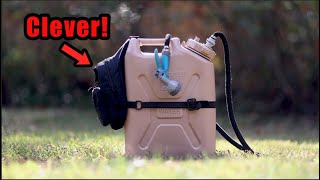
DIY 12v pump water jerry can. When I first seen these I knew I wanted one. To my shock they were over $200. Me being me I set out to see if I could make one. The first idea was to put all connections through the lid. I quickly gave up on this because of the lid design. (Now I think I could use small brass hose fittings and maybe make it work.) The second idea connections beside the lid. The first few attempts were complete failures, breaking several Poly fittings in the process. We eventually got there and it works great! Parts list Bunnings - Brass Nut, Brass fitting, Poly hose fitting Jerry can – Proquip 22L water jerry 12v shower –4wd supercentre, Companion or equivalent Waterproof electrical gland –Jaycar Process 1. Mark and drill holes in top. Ensure you leave enough room to get the jerry can lid on and off 2. Measure and cut shower hose, leave enough slack so the pump can reach the bottom of the tank. 3. Disassemble pump switch, feed through water tight gland, silicone and reassemble 4. Attach fittings to hose and feed through hole (floss makes it heaps easier) and silicone and tighten in place. That’s how easy it seems, we had a few issues along the way but got there in the end. If you can’t be stuffed doing all that check out On Tap products for the already built version.
Comments