Скачать с ютуб How to draw [Random product] design in 4 steps | Industrial Design Sketching в хорошем качестве
How to draw [Random product] design in 4 steps | Industrial Design Sketching
9 лет назад
Скачать бесплатно и смотреть ютуб-видео без блокировок How to draw [Random product] design in 4 steps | Industrial Design Sketching в качестве 4к (2к / 1080p)
У нас вы можете посмотреть бесплатно How to draw [Random product] design in 4 steps | Industrial Design Sketching или скачать в максимальном доступном качестве, которое было загружено на ютуб. Для скачивания выберите вариант из формы ниже:
Загрузить музыку / рингтон How to draw [Random product] design in 4 steps | Industrial Design Sketching в формате MP3:
Если кнопки скачивания не
загрузились
НАЖМИТЕ ЗДЕСЬ или обновите страницу
Если возникают проблемы со скачиванием, пожалуйста напишите в поддержку по адресу внизу
страницы.
Спасибо за использование сервиса savevideohd.ru
How to draw [Random product] design in 4 steps | Industrial Design Sketching
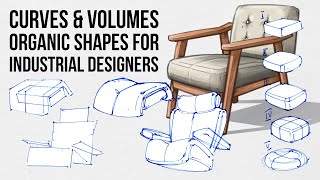
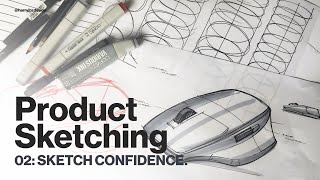
++DOWNLOAD THE FREE SKETCHING GUIDES FOR BEGINNER: https://www.thedesignsketchbook.com/s... ++Subscribe to the channel and get even more sketching tutorials at the blog http://www.thedesignsketchbook.com ++Facebook: / thedesignsketchbook Awesome music from http://www.bensound.com Today we’ll look at a 4 steps tutorial that will help you better draw in 3D. It’s perfect training for whom face the Malediction of the Blank page, where you may face these challenges: ◾Can’t visualize any shape in 3d on a 2D paper ◾Or just no inspiration ◾So you feel paralyzed. Note: I recommend you to watch the video about the Contour lines first – if you don’t know how to draw them. http://thedesignsketchbook.com/tip-10... The idea here is to create [Random products] without caring much about the real functions of the product. However, you will combine hardware details to give it a look at a product. This exercise allows you to train without complexing about the feasibility and focus on researching new shapes. Observe hardware that surrounds you, identify the details, and “Drag & Drop” these elements to your sketches: ◾Industrial: Screw, joints, cables, grooves… ◾Functional: Power cords, button, tab, icons… ◾Commercial: Logo, barcode, product specification, illustration… Random product sketches - Step by StepThe 4 steps of the [Random product] Step 1 Draw random shapes. Fill your paper of a few random shapes. Step 2 Draw the contour lines Even if these shapes are flat, play with the contour lines to give them a 3D volume appearance. Try to represent it with a minimum of lines. Step 3 Draw more contour lines To give more definition to your shapes, add more contour lines. Step 4 Add details You don’t care much about the “real” functions, you just try to assemble different details together to make your shape looks like a product. Details will bring life to your shape. Assignment of the day: Take a few objects such as phone, mp3 players, mouse, camera, kitchenware… observe them and practice the “Random product” challenge. If you can do that, the day you need to create a product from a brief, you might visualize better some shapes without putting your pen on paper yet. There will be side benefits to this training: ◾You will improve your quality of lines ◾Improve your vision in 3D ◾Get more familiar to the Happy accident (create new shapes randomly) ◾Put in practice your memory of forms ◾And let your ideas flow faster. Have fun! And let me know how it goes. :)
Comments