Скачать с ютуб Ma méthode pour mes circuits imprimés. Réalisation d'un capteur de choc ESP01. в хорошем качестве
Ma méthode pour mes circuits imprimés. Réalisation d'un capteur de choc ESP01.
1 год назад
Скачать бесплатно и смотреть ютуб-видео без блокировок Ma méthode pour mes circuits imprimés. Réalisation d'un capteur de choc ESP01. в качестве 4к (2к / 1080p)
У нас вы можете посмотреть бесплатно Ma méthode pour mes circuits imprimés. Réalisation d'un capteur de choc ESP01. или скачать в максимальном доступном качестве, которое было загружено на ютуб. Для скачивания выберите вариант из формы ниже:
Загрузить музыку / рингтон Ma méthode pour mes circuits imprimés. Réalisation d'un capteur de choc ESP01. в формате MP3:
Если кнопки скачивания не
загрузились
НАЖМИТЕ ЗДЕСЬ или обновите страницу
Если возникают проблемы со скачиванием, пожалуйста напишите в поддержку по адресу внизу
страницы.
Спасибо за использование сервиса savevideohd.ru
Ma méthode pour mes circuits imprimés. Réalisation d'un capteur de choc ESP01.
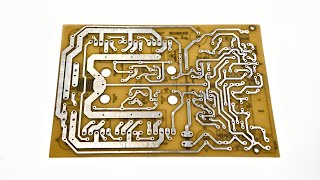
Présentation de ma méthode pour la réalisation de circuits imprimés Réalisation d'un capteur de choc + ouverture sur base ESP01 0:00 Intro 0:25 Intro en images 0:59 L'ESP 01 2:01 Réalisation du circuit imprimé 3:03 Le circuit en images 3:55 Le capteur de choc 6:12 Démonstration 6:41 Conclusion Matériel utile: _ ESP01:_ https://amzn.to/3XoP3JZ _ Adaptateur USB:_ https://amzn.to/3WlJmLA _ Capteur de choc SW520D:_ https://amzn.to/3GVjuQG _ Interrupteur reed:_ https://amzn.to/3krqBsN _ Condensateurs:_ https://amzn.to/3kgvEfp _ Résistances:_ https://amzn.to/3HdQG7E _ Régulateur de tension MCP1700-3302E:_ https://amzn.to/3GQDAeX _ Transistor 2N2222:_ https://amzn.to/3CYQI0y _ Support de batterie:_ https://amzn.to/3CXUk2V, https://amzn.to/3XBHhvK _ Cellule 18650:_ https://amzn.to/3iR94tA _ Plaques PCB:_ https://amzn.to/3J3M4lI _ Perchlorure de fer:_ https://amzn.to/3HfsLo7 _ Marqueur à mine fine:_ https://amzn.to/3kr4a6W Fichiers utiles: Schémas https://drive.google.com/drive/folder... Code du capteur https://github.com/eeBud/Capteur-de-choc
Comments