Скачать с ютуб The Rack Driven Mechanical 7 Segment Display - How To Assemble в хорошем качестве
The Rack Driven Mechanical 7 Segment Display - How To Assemble
5 месяцев назад
Скачать бесплатно и смотреть ютуб-видео без блокировок The Rack Driven Mechanical 7 Segment Display - How To Assemble в качестве 4к (2к / 1080p)
У нас вы можете посмотреть бесплатно The Rack Driven Mechanical 7 Segment Display - How To Assemble или скачать в максимальном доступном качестве, которое было загружено на ютуб. Для скачивания выберите вариант из формы ниже:
Загрузить музыку / рингтон The Rack Driven Mechanical 7 Segment Display - How To Assemble в формате MP3:
Если кнопки скачивания не
загрузились
НАЖМИТЕ ЗДЕСЬ или обновите страницу
Если возникают проблемы со скачиванием, пожалуйста напишите в поддержку по адресу внизу
страницы.
Спасибо за использование сервиса savevideohd.ru
The Rack Driven Mechanical 7 Segment Display - How To Assemble
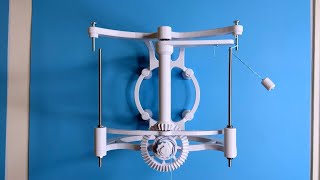
Download the STL file here: https://jbvcreative.com/products/the-... Or get it free as a JBV Creative Thangs member:https://thangs.com/designer/jbvcreative For the optional servo attachment, is uses these servos: https://geni.us/G8ArjNg Here is my main channel: / @engineezy Join my patreon to help support the creation of larger engineered projects: / jbvcreative This is my affiliate link for the Bambulab Machines (they rock) http://shrsl.com/2a5d5-2yn7-1cwx9 This is the filament I use: https://geni.us/sdT9QBj This is the laser cutter I swear by: https://www.xtool.com/?ref=rNX8YcbzlX... Is it digital, or is it analog? Well it's some combination of the two! The rack driven 7 segment display is a fully 3D printed mechanical desk piece that is equal parts satisfying and bewildering. Turn the top dial to rotate a series of 14 cams which push on a rack and pinion system to reveal a number. Operate is manually, or add a servo motor to the back and have the thing run on it's own. You could even throw 4 of them side by side to create a clock! Add another two and get the seconds. Give one a randomized number generator and it becomes a dice! Endless possibilities! The STL File: Prints on all standard 3d printers, requires no additional tools or assembly, and assembles in seconds. For servo attachment (not necessary), it used these servos: https://geni.us/G8ArjNg Recommended print settings: Layer Height: 0.2mm Nozzle: 0.4mm Infill: 15-18% Total Material: ~190g Can print on any sized 3D printer. **All the files have been pre-oriented to save you some set up time! All you need to do is drop the parts into your slicer and hit print!
Comments