Скачать с ютуб Gas Grill Repair - Replace Grill Burner - Cast Iron в хорошем качестве
Gas Grill Repair - Replace Grill Burner - Cast Iron
10 лет назад
Скачать бесплатно и смотреть ютуб-видео без блокировок Gas Grill Repair - Replace Grill Burner - Cast Iron в качестве 4к (2к / 1080p)
У нас вы можете посмотреть бесплатно Gas Grill Repair - Replace Grill Burner - Cast Iron или скачать в максимальном доступном качестве, которое было загружено на ютуб. Для скачивания выберите вариант из формы ниже:
Загрузить музыку / рингтон Gas Grill Repair - Replace Grill Burner - Cast Iron в формате MP3:
Если кнопки скачивания не
загрузились
НАЖМИТЕ ЗДЕСЬ или обновите страницу
Если возникают проблемы со скачиванием, пожалуйста напишите в поддержку по адресу внизу
страницы.
Спасибо за использование сервиса savevideohd.ru
Gas Grill Repair - Replace Grill Burner - Cast Iron
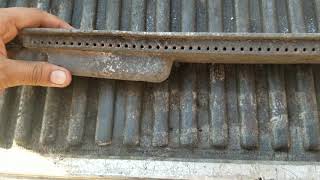
Hey Y'all!! Grill Girl here! Today, we're going to be changing the burners on a Brinkmann Pro Series 2400. The first step to replacing your old grill burners is to remove the cooking grids and heat plates covering your burners. Once you have done that, your grill should look similar to the one in the above photo. Remove the hitch pin from the burner bracket to loosen the burner itself. **The hitch pin connects the burner to the burner bracket to holds it in place. It feeds through a little knot on the underside of the burner. The easiest way to remove it is by using needle nose pliers. Now the burner is free at the back end, but still connected through the steel plates in the front of your grill. **In the case of rail-type burners, the burner is not attached to the valve, it simply fits over the valve. The valve system is right behind your knobs on the front of your grill, so if you want to make sure there's nothing else connected to your burner, you can kneel down and look under the knobs and face plate of your grill. You'll see the burner fit over the valve. Once nothing is holding onto your burner, lift up the back end and pull!!! **It's okay to use a little force. I had to!! This is a gas grill we're talking about here, not a china cabinet. With your brand new burner in hand, slide the venturi, or tube-looking, end back over the valve at the front side of your grill. **Make sure to guide the tube over the valve of your grill. You may have to kneel down again to make sure it fits over properly. This is how the gas gets into your burner. Rest the back end of the burner on the bracket and put the nub into place. **There should be a little hole on the bracket where it fits in. Place the new hitch pin into the nub under the bracket to hold the burner securely in place. http://grillpartssearch.com/blog_home... Thanks to RutgerMuller for our beats
Comments