Скачать с ютуб How to install an outlet above fireplace mantel в хорошем качестве
How to install an outlet above fireplace mantel
9 месяцев назад
Скачать бесплатно и смотреть ютуб-видео без блокировок How to install an outlet above fireplace mantel в качестве 4к (2к / 1080p)
У нас вы можете посмотреть бесплатно How to install an outlet above fireplace mantel или скачать в максимальном доступном качестве, которое было загружено на ютуб. Для скачивания выберите вариант из формы ниже:
Загрузить музыку / рингтон How to install an outlet above fireplace mantel в формате MP3:
Если кнопки скачивания не
загрузились
НАЖМИТЕ ЗДЕСЬ или обновите страницу
Если возникают проблемы со скачиванием, пожалуйста напишите в поддержку по адресу внизу
страницы.
Спасибо за использование сервиса savevideohd.ru
How to install an outlet above fireplace mantel
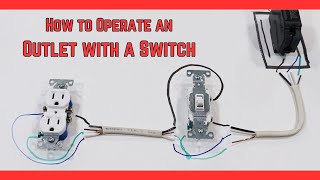
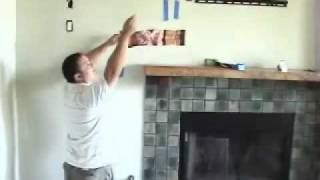
Installing an outlet above a mantel involves some electrical work, and it's crucial to follow safety guidelines and local building codes. If you're not comfortable working with electricity, it's advisable to hire a licensed electrician for the job. However, if you have the necessary skills and feel confident in doing it yourself, here is a general guide to help you install an outlet above a mantel: Materials and Tools: Electrical outlet box NM (non-metallic) electrical cable Electrical cable staples Wire nuts Electrical tape Screwdriver Drill with appropriate bits Keyhole saw or drywall saw Wire stripper Voltage tester Wall plate and outlet cover Steps: Turn Off Power: Before starting any electrical work, turn off the power to the circuit you'll be working on at the circuit breaker. Plan the Location: Determine the desired location for the outlet above the mantel. Consider the aesthetics and practicality of the placement. Locate Studs: Use a stud finder to locate the studs in the wall. This is important for securely anchoring the electrical box. Mark Outlet Location: Mark the location of the outlet on the wall. Ensure that it is centered and at a convenient height above the mantel. Cut the Hole: Use a keyhole saw or drywall saw to cut a hole in the wall for the electrical box. Make sure the hole is large enough to accommodate the box. Run Electrical Cable: Run NM electrical cable from the nearest existing outlet or junction box to the new outlet location. Secure the cable using cable staples, especially near the studs. Install Electrical Box: Mount the electrical box in the hole you cut. Ensure that it is secured to the wall studs. Follow the manufacturer's instructions for securing the box. Connect Wiring: Inside the electrical box, connect the wires from the existing circuit to the new outlet. Typically, you'll connect the black (hot) wire to the brass screw, the white (neutral) wire to the silver screw, and the bare or green wire (ground) to the green grounding screw. Secure and Ground Outlet: Secure the outlet to the electrical box using screws and attach the wall plate. Make sure the outlet is properly grounded. Test the Outlet: Turn the power back on and use a voltage tester to ensure that the outlet is receiving power. Secure Excess Wiring: Neatly fold and secure any excess wiring inside the electrical box. Avoid overloading the box with too much wiring. Finish: Once everything is connected and tested, finish by attaching the outlet cover plate. Remember to comply with local building codes and regulations, and if you have any doubts or concerns, consult with a licensed electrician. Safety should always be a top priority when working with electrical systems.
Comments