Скачать с ютуб Home Machine Shop Tool Making - Machining A Tailstock Die Holder For The Sherline Lathe - Part 1 в хорошем качестве
Home Machine Shop Tool Making - Machining A Tailstock Die Holder For The Sherline Lathe - Part 1
9 лет назад
Скачать бесплатно и смотреть ютуб-видео без блокировок Home Machine Shop Tool Making - Machining A Tailstock Die Holder For The Sherline Lathe - Part 1 в качестве 4к (2к / 1080p)
У нас вы можете посмотреть бесплатно Home Machine Shop Tool Making - Machining A Tailstock Die Holder For The Sherline Lathe - Part 1 или скачать в максимальном доступном качестве, которое было загружено на ютуб. Для скачивания выберите вариант из формы ниже:
Загрузить музыку / рингтон Home Machine Shop Tool Making - Machining A Tailstock Die Holder For The Sherline Lathe - Part 1 в формате MP3:
Если кнопки скачивания не
загрузились
НАЖМИТЕ ЗДЕСЬ или обновите страницу
Если возникают проблемы со скачиванием, пожалуйста напишите в поддержку по адресу внизу
страницы.
Спасибо за использование сервиса savevideohd.ru
Home Machine Shop Tool Making - Machining A Tailstock Die Holder For The Sherline Lathe - Part 1
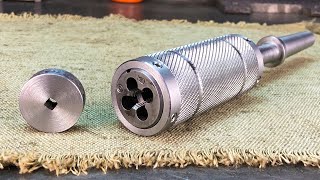
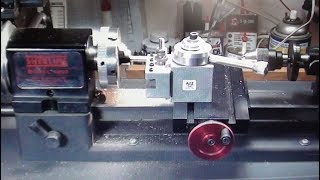
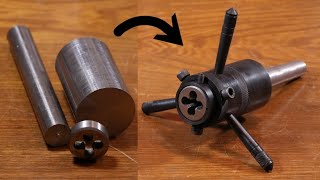
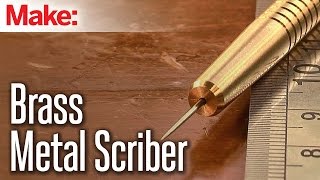
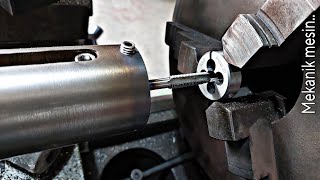
Machine Shop Tool Making, Machining A Tailstock Die Holder For The Sherline Lathe - Part 1, by Clickspring. The Sherline lathe is perfect for making clock and watch parts, particularly small screws. Sherline make plenty of tailstock accessories to make the lathe more versatile, but one accessory that I haven't seen for sale is a moving tailstock die holder. So in this 2 part series, I make one from mild steel and aluminum. This is another perfect mini lathe project, with plenty of lathe turning, drilling and tapping. Be sure to check out part 2 of the series. Thanks for watching. If you enjoyed the video please give a thumbs up, and leave me a comment. If you would like to help support the creation of these videos, then head on over to the Clickspring Patreon page: / clickspring For more info on this tool build, as well as other tool making info, visit http://www.clickspringprojects.com Project Plans available from the Clickspring Store: http://www.clickspringprojects.com/st... You can also help me make these videos by purchasing via the following Amazon Affiliate links: Cameras used in this video: Panasonic GH5 - https://amzn.to/2rEzhh2 Panasonic X920 - https://amzn.to/2wzxxdT Tools & Shop Products: "Solidworks 2013 Bible": http://amzn.to/2FObS1D Dormer A190202 Jobber Drill Set, 1.0 mm - 6.0 mm x 0.1 mm Size: https://amzn.to/2DR5fdb Dormer A190203 Jobber Drill Set, 6.0 mm - 10.0 mm x 0.1 mm Size: https://amzn.to/2ITfeTa YG1 NC Spotting Drill 8% Cobalt HSS 1/8 to 1/2" 120 Degree 5 Pc Set CNC Machine: https://amzn.to/2G7ylv6 Interapid Dial Test Indicator: http://amzn.to/2FPInwH Dykem 80300 Steel Blue Layout Fluid, Brush-in-Cap (4oz): http://amzn.to/2HGPaJJ Digital Calipers: https://amzn.to/2IkFh4O Sherline Lathe: http://amzn.to/2pnXM19 Sherline CNC Rotary Table Indexer: http://amzn.to/2FJXmfv Abbreviated Transcript: 00:22 This is what I currently use for die threading on my larger lathes, and I'm using it as a guide for the design of this one. 00:42 There are recesses at each end to accept different sized dies, and grub screws to hold them in place, and compress them if needed. The grip pattern I'm using is consistent with some other Sherline accessories, like this little tool that holds watchmaker collets. I'm going to put in a series of close milled grooves around the perimeter, to give it a similar straight knurl look. 01:01 The shaft needs a zero Morse taper to fit into the tailstock, and the tool also needs a little handle to finish it off. Now the fact that it hangs out quite a bit from the tailstock influenced my choice of material. 01:27 But with aluminium alloy, it comes in at around 150 grams which I think will be fine. I also need to consider the different dimple patterns that are found on modern split dies. 02:21 But there's a fair chance that the drill wandered a bit, while I was making it. And even if it didn't, I would lose all alignment anyway, when I flip the part to do the second recess, so I roughed out both recesses, but i've left them undersized, so that I can true them up to the bore using this stub arbor. 03:15 The part needs to be flipped, and then remounted to take care of the other end. 03:28 I wear breathing protection whenever I heat super glue. The part was then remounted on the arbor, and the other recess turned to final size. Next I marked out and cut the outside profile. 04:38 Without disturbing the part, I set up the vertical slide and dividing gear on the lathe to take care of the outside grooves. 05:13 I don't think the cutter profile is overly important, but I had this 90 degree countersink left over from another job, and it looked like it would do the trick. 05:22 So I centered the cutter on the work, and took extra care to make sure it was clear of the chuck, and that I had a temporary stop in place to stop me doing anything absent minded. The first cut is much like the wheel cutting process. I took 2 cuts side by side, to judge the right depth of cut. 06:14 But what really stood out to me at this point, was the sound of the cutter. It was making a woody "knocking" sound, and cutting on the return pass. Definitely not the behaviour of a happy cutter. Plus the surface finish was terrible. 06:33 I was fairly sure the problem was that it was just a bit blunt, so I gave it a bit of time on the sharpening stone, and from there it cut beautifully. 07:45 The spindle was put in line with the axis of the part, using an edge finder, and this time I used a bit of support, using this little machinists jack underneath the part. The downward force from the drill is significant, and I wanted to keep deflection to a minimum. I then drilled and threaded, the handle and grub screw holes. 09:45 A light touch with a countersink, and that's the part complete. Machine Shop Tool Making, Machining A Tailstock Die Holder For The Sherline Lathe - Part 1, by Clickspring.
Comments