–°–Ї–∞—З–∞—В—М —Б —О—В—Г–± Cherry Bonsai Tutorial: From Start to Finish, Including Bonsai Pottery жЭОж∞ПжЂїж°ГеЊЮ0йЦЛеІЛ –≤ —Е–Њ—А–Њ—И–µ–Љ –Ї–∞—З–µ—Б—В–≤–µ
Cherry Bonsai Tutorial: From Start to Finish, Including Bonsai Pottery жЭОж∞ПжЂїж°ГеЊЮ0йЦЛеІЛ
9 –Љ–µ—Б—П—Ж–µ–≤ –љ–∞–Ј–∞–і
–°–Ї–∞—З–∞—В—М –±–µ—Б–њ–ї–∞—В–љ–Њ –Є —Б–Љ–Њ—В—А–µ—В—М —О—В—Г–±-–≤–Є–і–µ–Њ –±–µ–Ј –±–ї–Њ–Ї–Є—А–Њ–≤–Њ–Ї Cherry Bonsai Tutorial: From Start to Finish, Including Bonsai Pottery жЭОж∞ПжЂїж°ГеЊЮ0йЦЛеІЛ –≤ –Ї–∞—З–µ—Б—В–≤–µ 4–Ї (2–Ї / 1080p)
–£ –љ–∞—Б –≤—Л –Љ–Њ–ґ–µ—В–µ –њ–Њ—Б–Љ–Њ—В—А–µ—В—М –±–µ—Б–њ–ї–∞—В–љ–Њ Cherry Bonsai Tutorial: From Start to Finish, Including Bonsai Pottery жЭОж∞ПжЂїж°ГеЊЮ0йЦЛеІЛ –Є–ї–Є —Б–Ї–∞—З–∞—В—М –≤ –Љ–∞–Ї—Б–Є–Љ–∞–ї—М–љ–Њ–Љ –і–Њ—Б—В—Г–њ–љ–Њ–Љ –Ї–∞—З–µ—Б—В–≤–µ, –Ї–Њ—В–Њ—А–Њ–µ –±—Л–ї–Њ –Ј–∞–≥—А—Г–ґ–µ–љ–Њ –љ–∞ —О—В—Г–±. –Ф–ї—П —Б–Ї–∞—З–Є–≤–∞–љ–Є—П –≤—Л–±–µ—А–Є—В–µ –≤–∞—А–Є–∞–љ—В –Є–Ј —Д–Њ—А–Љ—Л –љ–Є–ґ–µ:
–Ч–∞–≥—А—Г–Ј–Є—В—М –Љ—Г–Ј—Л–Ї—Г / —А–Є–љ–≥—В–Њ–љ Cherry Bonsai Tutorial: From Start to Finish, Including Bonsai Pottery жЭОж∞ПжЂїж°ГеЊЮ0йЦЛеІЛ –≤ —Д–Њ—А–Љ–∞—В–µ MP3:
–Х—Б–ї–Є –Ї–љ–Њ–њ–Ї–Є —Б–Ї–∞—З–Є–≤–∞–љ–Є—П –љ–µ
–Ј–∞–≥—А—Г–Ј–Є–ї–Є—Б—М
–Э–Р–Ц–Ь–Ш–Ґ–Х –Ч–Ф–Х–°–ђ –Є–ї–Є –Њ–±–љ–Њ–≤–Є—В–µ —Б—В—А–∞–љ–Є—Ж—Г
–Х—Б–ї–Є –≤–Њ–Ј–љ–Є–Ї–∞—О—В –њ—А–Њ–±–ї–µ–Љ—Л —Б–Њ —Б–Ї–∞—З–Є–≤–∞–љ–Є–µ–Љ, –њ–Њ–ґ–∞–ї—Г–є—Б—В–∞ –љ–∞–њ–Є—И–Є—В–µ –≤ –њ–Њ–і–і–µ—А–ґ–Ї—Г –њ–Њ –∞–і—А–µ—Б—Г –≤–љ–Є–Ј—Г
—Б—В—А–∞–љ–Є—Ж—Л.
–°–њ–∞—Б–Є–±–Њ –Ј–∞ –Є—Б–њ–Њ–ї—М–Ј–Њ–≤–∞–љ–Є–µ —Б–µ—А–≤–Є—Б–∞ savevideohd.ru
Cherry Bonsai Tutorial: From Start to Finish, Including Bonsai Pottery жЭОж∞ПжЂїж°ГеЊЮ0йЦЛеІЛ
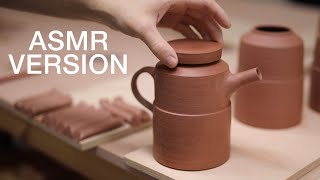
Welcome to Jack Lin Bonsai, in today's video, we blend the art of making bonsai pots with making a bonsai tree, sharing the whole journey from start to finish.¬† We'll show you every step of making a bonsai pot вАУ from shaping the clay to trimming, adding feet, and finally glazing. **Our previous Bonsai From Start to Finish video дЄКдЄАйЫЖйА£зµР:¬†¬†¬†¬†вАҐ¬†Bonsai¬†from¬†Start¬†to¬†Finish¬†-¬†Craftin...¬†¬† **Our Bonsai Wiring video tutorial е¶ВдљХељОйЛБзЈЪ:¬†¬†¬†¬†вАҐ¬†Bonsai¬†Tutorial¬†2020¬†|¬†How¬†To¬†Prepare...¬†¬† **Our website and online store жИСеАСзЪДзґ≤зЂЩеПКзЈЪдЄКеХЖеЇЧ:¬†www.jacklinbonsai.com¬† We begin with 1200 grams of pottery clay. This is wedged and pounded into a ball before throwing it on the potter's wheel.¬† After opening it up, we'll compress the bottom, creating a slope inside to prevent water from pooling. This ensures your bonsai stays healthy with good drainage. Then we pull up the walls of the pot, being careful not to make them too thin. Next, we'll trim off any excess clay and smooth the pot with a sponge. After slow drying for a few days, IвАЩll show you a trick on how to stick your pot to the potter's wheel without any clay or tools. The pot will then be trimmed to get the perfect thickness. A foot ring will also be carved out to use as feet for the bonsai pot. I will then show how I carefully measure and carve out the feet. After smoothing, we begin slip painting to create texture on the pot. It's just wet leftover clay whipped up with a hand mixer. When the pot is finally dry, Lili takes over and glazes our new bonsai pot. We're using a sandstone stoneware glaze, hoping for a look similar to a quail egg. Out of the kiln comes our fresh, handmade ceramic wheel-thrown bonsai pot, ready for a bonsai tree. Then we head to the bonsai garden, where Jack will guide us through finding the perfect match. In the garden, Jack introduces a Taiwanese Lee Cherry Bonsai, related to acerola and dwarf Barbados cherries. First, Jack inspects the roots, finding it's outgrown its training pot. After removing the weeds and moss, Jack removes the old potting soil and prunes the roots to make it fit into the pot, ensuring a healthy future for the bonsai. The pot is prepared by Jack using mesh and bonsai wires. If you want to learn more about wiring techniques, check our videos вАУ the link is in the description. The wire holds the tree firmly in place, making it stable. Placing the bonsai's front above one of the feet improves stability further. The bottom layer of Akadama soil goes in to set the height of the tree and to have soil touching the roots from every side, including the bottom. A wire wraps around the trunk, and another is used to tighten it. Now, it's time for pruning. Jack removes a third of the branches, starting with those that cover the trunk. Dead leaves and branches are also removed. Visualizing a triangle, Jack follows his plan to have the bonsai cascade downward. ¬†And there you have it вАУ our Lee Cherry Bonsai in a handmade ceramic bonsai pot, ready for an upcoming auction. Stay tuned to our Facebook, and Instagram, and subscribe to our YouTube for more bonsai tutorials and inspiration. Happy bonsai crafting! #BonsaiTutorial #Bonsaipottery #bonsai ж≠°ињОдЊЖеИ∞ Jack Lin BonsaiпЉМеЬ®дїК姩зЪДељ±зЙЗи£°еЬ®пЉМжИСеАСе∞Зи£љдљЬиК±зЫЖзЪДиЧЭи°УиИЗи£љдљЬзЫЖж†љж®єжКАеЈІзµРеРИиµЈдЊЖдЄ¶иИЗдљ†еИЖдЇЂеЊЮ0йЦЛеІЛзЪДжХіеАЛйБОз®ЛгАВ жИСеАСе∞ЗеЄґй†Шдљ†еБЪйЩґзЫЖзЪДжѓПдЄАеАЛж≠•й©ЯпЉМеЊЮжЙЛжЛЙиГЪеǯ嚥гАБжЭРеИЗдЄ¶еК†дЄКиЕ≥пЉМжЬАеЊМдЄКйЗЙгАВ жИСеАСеЊЮ1200еЕђеЕЛзЪДйЩґеЬЯйЦЛеІЛгАВе∞ЗеЃГзФ®жПЙйЇµеЬШзЪДжЦєеЉПзЈіеЬЯдЄ¶жЛНжИРзРГзЛАпЉМзДґеЊМеЬ®жЙФеИ∞жЛЙиГЪж©ЯдЄКгАВ дЄКжЛЙиГЪж©ЯеЊМпЉМе∞ЗйЩґеЬЯжЛЙйЦЛеЊМеЊЮдЄ≠йЦУеЊАдЄЛе£Уи£љйА†еЗЇдЄАеАЛеЗєжіЮйШ≤ж≠Ґз©Нж∞ігАВйАЩдљњеЊЧиК±зЫЖжОТж∞іиЙѓе•љдЄ¶зґ≠жМБзЫЖж†љж®єзЪДеБ•еЇЈгАВ жО•иСЧжЛЙиµЈиК±зЫЖзЪДзЙЖе£БпЉМж≥®жДПдЄНи¶БжЛЙзЪД姙иЦДгАВ зДґеЊМпЉМеИЗйЩ§е§ЪзЪДйЩґеЬЯдЄ¶зФ®жµЈзґњдЊЖжКєеє≥еЃГгАВ йЩ∞二庌姩дєЛеЊМпЉМжИСжЬГжХЩдљ†дЄНзФ®еЈ•еЕЈи¶БжАОйЇЉжККе°Се•љеЮЛзЪДзЫЖе≠РжФЊдЄКжЛЙиГЪж©ЯдЄКгАВ е∞ЗиК±зЫЖеИїжИРеЃМзЊОзЪДеОЪеЇ¶гАВ еИ©зФ®йЫХеИїзЪДжЦєеЉПеИїеЗЇиЕ≥гАВ е∞ПењГзњЉзњЉзЪДйЗПеЗЇиК±зЫЖиЕ≥иИЗиЕ≥дєЛйЦУзЪДиЈЭйЫҐгАВ е∞ЗзЫЖиЇЂз£®еє≥еЊМе∞±еПѓдї•е°ЧдЄКж≥•жЉњдљЬзВЇзЫЖе≠РзЪДзіЛиЈѓгАВж≥•жЉње∞±жШѓзФ®еЙ©дЄЛзЪДеЬЯеК†дЄКж∞іжЈЈеРИиµЈдЊЖзЪДгАВ еЖНжђ°жЦєйВКйЩ∞二庌姩гАВжПЫLiliдЊЖжЫњиК±зЫЖдЄКйЗЙгАВжИСеАСзФ®зЪДжШѓзЯ≥й†≠зіЛзЪДйЗЙпЉМжЬГзЬЛиµЈдЊЖеГПжШѓйµ™йґЙиЫЛзЪДиК±зіЛгАВ жИСеАСзЪДжЙЛеЈ•йЩґзУЈжЙЛжЛЙиГЪиК±зµВжЦЉзЗТеЗЇдЊЖдЇЖпЉМжЇЦеВЩе•љи¶БзХґжИРзЫЖж†љж®єзЪДдЄАеАЛжЦ∞еЃґгАВ жО•иСЧJackе∞±жЬГиСЧжИСеАСеАТиК±еЬТи£°еОїжМСйБЄжЬАйБ©еРИзЪДж®єдЊЖз®ЃгАВ еЬ®иК±еЬТи£°JackдїЛзієдЄАж£µжЭОж∞ПжЂїж°Ге±ђжЦЉйЗЭиСЙжЂїж°ГеТМзЯЃеМЦеЈіи≤Эе§ЪжЂїж°Гй°ЮгАВ й¶ЦеЕИпЉМдїЦеЕИ晥жЯ•жЬЙйХЈйБОе§ІзЪДж®єж†єгАВ жККйЫЬиНЙиЈЯйЭТиГОжЛњжОЙеЊМпЉМе∞ЗиИКзЪДзЫЖе≠РжЛњдЄЛдЊЖдЄ¶зВЇж®єдњЃж†єйАЩж®£жЙНи£ЭзЪДйА≤иК±зЫЖи£°дЄФ祯дњЭж®єжЬ®жЬ™дЊЖжЬЙжИРйХЈз©ЇйЦУгАВ Jackе∞Ззґ≤е≠РиЈЯйЛБзЈЪжФЊйА≤иК±зЫЖи£°гАВ иЛ•дљ†жГ≥е≠ЄзњТе¶ВдљХжКШйЛБзЈЪеПѓдї•зЬЛзЬЛжИСеАСеП¶дЄАжФѓељ±зЙЗпЉМйА£зµРеЬ®жХШињ∞и£°гАВ йЛБзЈЪеПѓдї•жККж®єеЫЇеЃЪе•љпЉМжККж®єзЪДж≠£йЭҐиЈЯиК±зЫЖзЪДдЄАйЪїиЕ≥е∞НеЕґеПѓдї•иЃУжХіеАЛзЫЖж†љжЫіз©©еЫЇгАВ еЬ®иК±зЫЖи£°еК†еЬЯеПѓдї•и™њжХіж®єжЬ®зЪДйЂШеЇ¶дЄ¶дљњеЊЧ殺憺襀еЬЯжЗєеМЕеЬНиСЧгАВ еЬ®иК±зЫЖи£°еК†еЬЯеПѓдї•и™њжХіж®єжЬ®зЪДйЂШеЇ¶дЄ¶дљњеЊЧ殺憺襀еЬЯжЗєеМЕеЬНиСЧгАВ дЄАжҐЭйЛБзЈЪзЪДжЙЛиЗВеПѓдї•зґБдљПж®єдЄ¶йОЦзЈКгАВ зПЊеЬ®е∞±еПѓдї•дЊЖжХізРЖж®єгАВJackе∞ЗжЬГеОїйЩ§дЄЙеИЖдєЛдЄАзЪДж®єжЮЭпЉМе∞§еЕґжШѓйВ£дЇЫеЊАдЄКйХЈзЪДйВДжЬЙжЮѓжЮЭиЈЯжЮѓиСЙгАВ еєїи±°дЄАеАЛдЄЙиІТ嚥пЉМJackиЈЯйЪ®дїЦзЪДи®ИзХЂе∞ЗзЫЖж†љж®єз®ЃжИРжЗЄеіЦеЉПгАВ йАЩж®£е∞±е•љдЇЖпЉМжИСеАСзЪДжЙЛеЈ•иК±зЫЖжЭОж∞ПжЂїж°Гж®єе∞±еЃМжИРдЇЖпЉМеПѓдї•жЇЦеВЩжЛНи≥£дЇЖпЉБ иЂЛзєЉзЇМйЧЬж≥®жИСеАСзЪДй†їйБУдЄ¶и®ВйЦ±жИСеАСзЪДYouTubeгАВз•Эе§ІеЃґзО©зЫЖж†љењЂж®ВпЉБ https://jacklinbonsai.com ¬†¬†/¬†jacklinbonsai¬†¬† ¬†¬†/¬†jacklinbonsai¬†¬† Music Credit Title: Chinese style soundtrack 001 Free license with signature This music is free for personal and commercial use, but you must provide the source in one of the following ways: Royalty Free Music from : @nocopyrightmusic-ed2qv Title: Chinese style soundtrack 022 Free license with signature This music is free for personal and commercial use, but you must provide the source in one of the following ways: Royalty Free Music from : @nocopyrightmusic-ed2qv
Comments