–°–∫–∞—á–∞—Ç—å —Å —é—Ç—É–± etrailer | Curt Trailer Hitch Installation - 2018 Toyota C-HR –≤ —Ö–æ—Ä–æ—à–µ–º –∫–∞—á–µ—Å—Ç–≤–µ
etrailer | Curt Trailer Hitch Installation - 2018 Toyota C-HR
3 –≥–æ–¥–∞ –Ω–∞–∑–∞–¥
–°–∫–∞—á–∞—Ç—å –±–µ—Å–ø–ª–∞—Ç–Ω–æ –∏ —Å–º–æ—Ç—Ä–µ—Ç—å —é—Ç—É–±-–≤–∏–¥–µ–æ –±–µ–∑ –±–ª–æ–∫–∏—Ä–æ–≤–æ–∫ etrailer | Curt Trailer Hitch Installation - 2018 Toyota C-HR –≤ –∫–∞—á–µ—Å—Ç–≤–µ 4–∫ (2–∫ / 1080p)
–£ –Ω–∞—Å –≤—ã –º–æ–∂–µ—Ç–µ –ø–æ—Å–º–æ—Ç—Ä–µ—Ç—å –±–µ—Å–ø–ª–∞—Ç–Ω–æ etrailer | Curt Trailer Hitch Installation - 2018 Toyota C-HR –∏–ª–∏ —Å–∫–∞—á–∞—Ç—å –≤ –º–∞–∫—Å–∏–º–∞–ª—å–Ω–æ–º –¥–æ—Å—Ç—É–ø–Ω–æ–º –∫–∞—á–µ—Å—Ç–≤–µ, –∫–æ—Ç–æ—Ä–æ–µ –±—ã–ª–æ –∑–∞–≥—Ä—É–∂–µ–Ω–æ –Ω–∞ —é—Ç—É–±. –î–ª—è —Å–∫–∞—á–∏–≤–∞–Ω–∏—è –≤—ã–±–µ—Ä–∏—Ç–µ –≤–∞—Ä–∏–∞–Ω—Ç –∏–∑ —Ñ–æ—Ä–º—ã –Ω–∏–∂–µ:
–ó–∞–≥—Ä—É–∑–∏—Ç—å –º—É–∑—ã–∫—É / —Ä–∏–Ω–≥—Ç–æ–Ω etrailer | Curt Trailer Hitch Installation - 2018 Toyota C-HR –≤ —Ñ–æ—Ä–º–∞—Ç–µ MP3:
–ï—Å–ª–∏ –∫–Ω–æ–ø–∫–∏ —Å–∫–∞—á–∏–≤–∞–Ω–∏—è –Ω–µ
–∑–∞–≥—Ä—É–∑–∏–ª–∏—Å—å
–ù–ê–ñ–ú–ò–¢–ï –ó–î–ï–°–¨ –∏–ª–∏ –æ–±–Ω–æ–≤–∏—Ç–µ —Å—Ç—Ä–∞–Ω–∏—Ü—É
–ï—Å–ª–∏ –≤–æ–∑–Ω–∏–∫–∞—é—Ç –ø—Ä–æ–±–ª–µ–º—ã —Å–æ —Å–∫–∞—á–∏–≤–∞–Ω–∏–µ–º, –ø–æ–∂–∞–ª—É–π—Å—Ç–∞ –Ω–∞–ø–∏—à–∏—Ç–µ –≤ –ø–æ–¥–¥–µ—Ä–∂–∫—É –ø–æ –∞–¥—Ä–µ—Å—É –≤–Ω–∏–∑—É
—Å—Ç—Ä–∞–Ω–∏—Ü—ã.
–°–ø–∞—Å–∏–±–æ –∑–∞ –∏—Å–ø–æ–ª—å–∑–æ–≤–∞–Ω–∏–µ —Å–µ—Ä–≤–∏—Å–∞ savevideohd.ru
etrailer | Curt Trailer Hitch Installation - 2018 Toyota C-HR
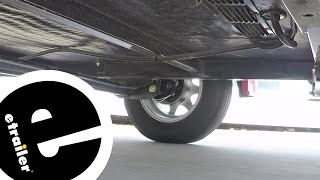
Click for more info and reviews of this CURT Trailer Hitch: https://www.etrailer.com/Trailer-Hitc... https://www.etrailer.com Don‚Äôt forget to subscribe! ¬Ý¬Ý¬Ý/¬Ýetrailertv¬Ý¬Ý Full transcript: https://www.etrailer.com/tv-install-c... Rob: Hey everybody, Rob here at etrailer.com. Today we're going to be taking a look at the Curt Class One Custom Fit Trailer Hitch Receiver on our 2018 Toyota CHR. Here's what our hitch is going to look like once we have it installed. I think it has a really nice, clean look because the cross tube's going to be completely hidden behind the rear bumper and all we're going to see is that receiver tube sticking out. As you can see, it's almost flush with the bumper, which is going to help out with those accessories, but it's also going to prevent us from hitting our leg when we're walking by.Now, it is a class one hitch, which means it gives us an inch and a quarter by inch and a quarter receiver tube opening. This would be great for light duty towing, a bike rack or even some small cargo carriers. But regardless of how we're going to be using our hitch, all of our accessories are going to mount to the hitch pin hole here on the side and it is going to accept a standard half inch pin and clip. These don't come with the hitch but you can find them here at etrailer.com along with some locking devices and anti-rattle devices to cut down on that annoying rattling sound coming from the receiver tube.Now, if you are going to be towing a trailer, maybe you have to go to the hardware store, pick up something, or maybe move a jet ski, something like that, you do need some safety chains to hook up. Here we've got a loop style on the bottom of the receiver tube. You can see with most normal sized hooks we have plenty of room to get them hooked on and take them off and not have to worry about any kind of interference or hitting the bottom of our Toyota. Even if you have the really large oversized hooks, there's still plenty of room to get them hooked on and again not have to worry about any kind of interference.As far as the weight capacity goes, our hitch is going to have a 200 pound tongue weight with a maximum downward pressure at the end of the receiver tube. That's going to be great to carry a couple bikes with you or if you have a small cargo carrier, we can put it back here and load it up. Now, at the same time our hitch is going to have a 2,000 pound gross trailer rating. That's how much it can pull, but that does include the trailer and the load we have on it. Now, if you do plan on doing some towing, our hitch does require the use of a specific ball mount, and again, that is sold separately but you can find it here at etrailer.com. And with all those numbers in mind, I do urge you to double check your Toyota owner's manual, because those are the ratings for our hitch and we don't want to exceed the manufacturer's rating for our car.Now I'd like to give you a few measurements and these are going to help you when you're looking for accessories for your new hitch. From the center of the hitch pin hole to the outermost edge of the bumper is going to be right about four inches. That measurement helps out when you're looking at folding accessories to make sure you have enough room to put them in the upright stored position and not make contact with the rear bumper. From the ground to the inside top edge of the receiver tube opening is right about 13 inches. At that height, I definitely recommend a bike rack or a cargo carrier with a raised shank, that way we get a little bit more ground clearance out of it.Now that we've gone over some features and seen what our hitch looks like, let's go ahead and go through the installation process together so you can have the confidence to do it at home. To begin the installation, we want to come to the very back of our Toyota and we want to move over to the side. We're going to have these plastic panels on the bottom that are going to have to be removed and if we look around the edges of them, we're going to have several of these pushpin fasteners and a few other fasteners that are holding it in place. So we want to grab a flat blade screwdriver and you'll see there's little notches in there. You're going to take your flat blade screwdriver and pop the center section out first. That's going to take the tension off the clip, and then we can come underneath the base and pull the rest of it out. So we want to work our way around pulling all of these pushpins out.At the very corner of the mud flap, we're going to have a Phillips screw. It's actually going into that plastic panel as well. Let's grab a Phillips screwdriver or Phillips bit. I'll pull that out. Then if we move into the wheel well, right in front of here, we're going to have another Phillips screw that's holding the panel in right at the corner here.
Comments