–°–Ї–∞—З–∞—В—М —Б —О—В—Г–± DIY Thermal Imaging Camera using AMG8833 Temperature Sensor with ESP8266 & LCD Display –≤ —Е–Њ—А–Њ—И–µ–Љ –Ї–∞—З–µ—Б—В–≤–µ
DIY Thermal Imaging Camera using AMG8833 Temperature Sensor with ESP8266 & LCD Display
1 –≥–Њ–і –љ–∞–Ј–∞–і
–°–Ї–∞—З–∞—В—М –±–µ—Б–њ–ї–∞—В–љ–Њ –Є —Б–Љ–Њ—В—А–µ—В—М —О—В—Г–±-–≤–Є–і–µ–Њ –±–µ–Ј –±–ї–Њ–Ї–Є—А–Њ–≤–Њ–Ї DIY Thermal Imaging Camera using AMG8833 Temperature Sensor with ESP8266 & LCD Display –≤ –Ї–∞—З–µ—Б—В–≤–µ 4–Ї (2–Ї / 1080p)
–£ –љ–∞—Б –≤—Л –Љ–Њ–ґ–µ—В–µ –њ–Њ—Б–Љ–Њ—В—А–µ—В—М –±–µ—Б–њ–ї–∞—В–љ–Њ DIY Thermal Imaging Camera using AMG8833 Temperature Sensor with ESP8266 & LCD Display –Є–ї–Є —Б–Ї–∞—З–∞—В—М –≤ –Љ–∞–Ї—Б–Є–Љ–∞–ї—М–љ–Њ–Љ –і–Њ—Б—В—Г–њ–љ–Њ–Љ –Ї–∞—З–µ—Б—В–≤–µ, –Ї–Њ—В–Њ—А–Њ–µ –±—Л–ї–Њ –Ј–∞–≥—А—Г–ґ–µ–љ–Њ –љ–∞ —О—В—Г–±. –Ф–ї—П —Б–Ї–∞—З–Є–≤–∞–љ–Є—П –≤—Л–±–µ—А–Є—В–µ –≤–∞—А–Є–∞–љ—В –Є–Ј —Д–Њ—А–Љ—Л –љ–Є–ґ–µ:
–Ч–∞–≥—А—Г–Ј–Є—В—М –Љ—Г–Ј—Л–Ї—Г / —А–Є–љ–≥—В–Њ–љ DIY Thermal Imaging Camera using AMG8833 Temperature Sensor with ESP8266 & LCD Display –≤ —Д–Њ—А–Љ–∞—В–µ MP3:
–Х—Б–ї–Є –Ї–љ–Њ–њ–Ї–Є —Б–Ї–∞—З–Є–≤–∞–љ–Є—П –љ–µ
–Ј–∞–≥—А—Г–Ј–Є–ї–Є—Б—М
–Э–Р–Ц–Ь–Ш–Ґ–Х –Ч–Ф–Х–°–ђ –Є–ї–Є –Њ–±–љ–Њ–≤–Є—В–µ —Б—В—А–∞–љ–Є—Ж—Г
–Х—Б–ї–Є –≤–Њ–Ј–љ–Є–Ї–∞—О—В –њ—А–Њ–±–ї–µ–Љ—Л —Б–Њ —Б–Ї–∞—З–Є–≤–∞–љ–Є–µ–Љ, –њ–Њ–ґ–∞–ї—Г–є—Б—В–∞ –љ–∞–њ–Є—И–Є—В–µ –≤ –њ–Њ–і–і–µ—А–ґ–Ї—Г –њ–Њ –∞–і—А–µ—Б—Г –≤–љ–Є–Ј—Г
—Б—В—А–∞–љ–Є—Ж—Л.
–°–њ–∞—Б–Є–±–Њ –Ј–∞ –Є—Б–њ–Њ–ї—М–Ј–Њ–≤–∞–љ–Є–µ —Б–µ—А–≤–Є—Б–∞ savevideohd.ru
DIY Thermal Imaging Camera using AMG8833 Temperature Sensor with ESP8266 & LCD Display
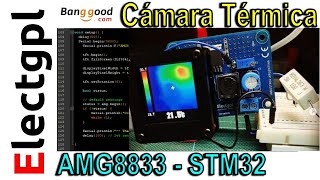
Register and get $100 from NextPCB: https://www.nextpcb.com/register?code... Online Components Store: https://www.hqonline.com/?code=Htoele... рЭЧ£рЭЧњрЭЧЉрЭЧЈрЭЧ≤рЭЧ∞рЭШБ рЭЧЧрЭЧ≤рЭШАрЭЧ∞рЭЧњрЭЧґрЭЧљрЭШБрЭЧґрЭЧЉрЭЧї: Almost a month ago, I built a thermal camera using the AMG8833 8x8 thermal image array temperature sensor. I used a Raspberry Pi 4 as the processor and a 7-inch LCD display for visualization. However, the project turned out to be too expensive, costing more than $200 due to the current scarcity of Raspberry Pi. Therefore, I decided to create a more affordable version of this thermal camera project. I utilized a NodeMCU ESP8266 as the controller and an ILI9341 2.8вАЭ TFT LCD display for visualization. In this project, we'll create our own thermal camera using the ESP8266 and the AMG8833 thermal temperature sensor. We'll visualize the thermal image on an ILI9341 screen. This homemade DIY thermal camera is portable since it works with a 3.7V lithium-ion battery. You can recharge the battery with a 5V micro-USB cable, as it has a special battery charging module called TP4056. The TFT display can also show the battery voltage level. When an object is introduced near the sensor, it displays visual images in the form of changing colors. The sensor is 8x8 based, but due to the interpolation algorithm, it appears as 24x24. We have also designed a small, low-power PCB that can be powered by a battery. This PCB can fit easily inside a casing. You can use a casing for this project. This 3D case consists of multiple parts and a handle. When the display and board are placed inside the case, it looks awesome and professional. So, let's dive deep and see how we can build our own thermal camera. рЭЧ¶рЭЧЉрЭШВрЭЧњрЭЧ∞рЭЧ≤ рЭЧЦрЭЧЉрЭЧ±рЭЧ≤ & рЭЧ™рЭЧњрЭЧґрЭШБрЭШБрЭЧ≤рЭЧї рЭЧІрЭШВрЭШБрЭЧЉрЭЧњрЭЧґрЭЧЃрЭЧє: https://how2electronics.com/diy-amg88... .................................................................................................................................................................................................................................... Drop a like if you liked this video. Don't forget to subscribe to our channel for more Electronics projects and tutorials. Website: https://www.how2electronics.com Facebook: ¬†¬†/¬†howtoelectronics¬†¬† Instagram: ¬†¬†/¬†howtoelectronics¬†¬† Twitter: ¬†¬†/¬†how2electronics¬†¬†
Comments