Скачать с ютуб Installation Video | ETS Colibri Electric Expansion Valve | Danfoss Cool в хорошем качестве
Installation Video | ETS Colibri Electric Expansion Valve | Danfoss Cool
9 лет назад
Скачать бесплатно и смотреть ютуб-видео без блокировок Installation Video | ETS Colibri Electric Expansion Valve | Danfoss Cool в качестве 4к (2к / 1080p)
У нас вы можете посмотреть бесплатно Installation Video | ETS Colibri Electric Expansion Valve | Danfoss Cool или скачать в максимальном доступном качестве, которое было загружено на ютуб. Для скачивания выберите вариант из формы ниже:
Загрузить музыку / рингтон Installation Video | ETS Colibri Electric Expansion Valve | Danfoss Cool в формате MP3:
Если кнопки скачивания не
загрузились
НАЖМИТЕ ЗДЕСЬ или обновите страницу
Если возникают проблемы со скачиванием, пожалуйста напишите в поддержку по адресу внизу
страницы.
Спасибо за использование сервиса savevideohd.ru
Installation Video | ETS Colibri Electric Expansion Valve | Danfoss Cool
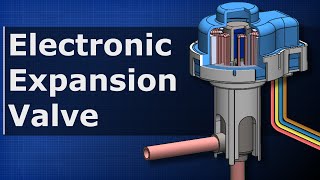
http://colibri.danfoss.com?utm_source=Social&utm_medium=YouTube&utm_campaign=Colibri Congratulations on choosing an ETS Colibri, which is a very high-performance electric expansion valve. In this video, we are going to show you how quick and easy installation is. As you probably already know, the ETS Colibri is an electric expansion valve with a unique design that makes it much smaller and lighter. Mounting the ETS Colibri is easy and flexible. Mount the ETS Colibri with the electrical connection facing generally upwards. That means the mounting position can be between the 9 and 3 o'clock orientations. The ideal position is at 12 o'clock. Avoid mounting the ETS Colibri with the electrical connector facing downwards, to prevent dirt accumulating in the connector and disturbing the electrical signals. The ETS Colibri is very versatile and works with flows in either direction. The normal flow direction is indicated with an arrow on the product. You can use the sight glass to determine the flow direction. The indicators in the sight glass give you a direct indication of the system's moisture status. Note that the ETS Colibri valve provides the function of a solenoid at closed position. There is probably no valve on the market as flexible as the ETS Colibri. Now let's see how to braze the product. As you will see, there are some small yet vital differences between the ETS Colibri and traditional electric expansion valves. These features make brazing easier, faster and more economical. As you may know, the ETS Colibri has a bimetal connection, with stainless steel outside and copper material inside. This makes the brazing process much faster, thanks to the low heat conductivity of bimetal compared with pure copper connectors. This is a major advantage because there is no need for wet wrapping during the brazing procedure. Having a bimetal connection saves a significant amount of brazing time – around 30% – compared with a valve with a copper-to-copper connector. It also increases brazing quality and reliability. Traditional valves use copper connectors to copper pipes. The ETS Colibri's bimetal connection enables you to use the same type of cost-effective materials. We recommend Silfos 5-15% for reliability and cost-effectiveness. When you braze the valve, we strongly recommend that you use a protection/shield gas such as nitrogen. This will give you clean brazing without any formation of oxides inside the pipe. Make sure you use a correctly sized torch nozzle for brazing the ETS Colibri valve. For smaller valves such as the ETS 12C and ETS 24C, we recommend a single nozzle brazing torch. For bigger valves such as the ETS 50C-100C, multi-flame heating nozzles are your best choice. For the bigger Colibri ETS 50 and 100 sizes, we recommend a 6-9 mm solder nozzle, or 3-4 mm for single solder nozzle torch. Make sure the ETS Colibri is positioned safely. The valve should be open at least 50%, and ideally fully open. ETS Colibri valves shipped directly from Danfoss are always fully open and ready for brazing. In single-flow applications, make sure the valve is positioned in the normal flow direction. The three important parameters in brazing are the time, the temperature and the gas flow rate in the torch. Use the reduced flame for brazing the valve. Overheating may affect the product's functionality. You must keep the temperature of the valve as low as possible, and always below 150°C or 302°F at the joints as shown on the picture. Make sure the flame is always pointing away from the valve. The flow of protection gas should always be from the side opposite the brazing point. This is easy to understand, because we want to remove heat from the valve. To maintain a uniform temperature, keep the torch moving. Remove the cap and the access cap if there is one. We recommend that you charge the tube with nitrogen before brazing. De-pressurize the system before brazing. When you start brazing, heat the copper pipe for 20 to a maximum of 30 seconds. Then move the torch to the valve's bi-metal connection and heat it for about 10 to a maximum of 15 seconds. Always point the torch away from the valve and keep it moving to ensure uniform heating. However, if you want to apply cooling water at the joint between the copper and the bimetal connector of the valve, wait at least 10 seconds to allow the materials to adapt to the new temperature. Then simply cool with water. Connect with us: Danfoss Cooling: http://refrigerationandairconditionin... Twitter: / danfosscool LinkedIn: / danf. . Instagram: / danfosscool Subscribe to our channel: / danfosscool
Comments