Скачать с ютуб etrailer | All About the Loctite Rearview Mirror Adhesive в хорошем качестве
etrailer | All About the Loctite Rearview Mirror Adhesive
13 лет назад
Скачать бесплатно и смотреть ютуб-видео без блокировок etrailer | All About the Loctite Rearview Mirror Adhesive в качестве 4к (2к / 1080p)
У нас вы можете посмотреть бесплатно etrailer | All About the Loctite Rearview Mirror Adhesive или скачать в максимальном доступном качестве, которое было загружено на ютуб. Для скачивания выберите вариант из формы ниже:
Загрузить музыку / рингтон etrailer | All About the Loctite Rearview Mirror Adhesive в формате MP3:
Если кнопки скачивания не
загрузились
НАЖМИТЕ ЗДЕСЬ или обновите страницу
Если возникают проблемы со скачиванием, пожалуйста напишите в поддержку по адресу внизу
страницы.
Спасибо за использование сервиса savevideohd.ru
etrailer | All About the Loctite Rearview Mirror Adhesive
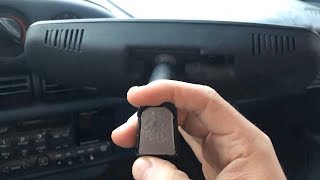
Click for more info and reviews of this Loctite Rear View Mirrors: https://www.etrailer.com/Accessories-... Check out some similar Rear View Mirrors options: https://www.etrailer.com/dept-pg-Acce... https://www.etrailer.com Don’t forget to subscribe! / etrailertv Full transcript: https://www.etrailer.com/tv-Rearview-... Today we are going to show you how to install the Rearview Mirror Adhesive from Loctite part number LT37438. The first thing you want to do is locate the mounting area where the mirror was and then take a marker or a crayon and circle that area on the windshield so we know where to readhere the mirror once we get the adhesive on. With that marked we can go back in and we want to clean the remaining adhesive off the inside of the window. We just want to make sure we wipe that clean with an alcohol cloth or paper towel. We not only want to do this on the windshield but we also want to do it to the button of the rearview mirror itself. 00:35 Next we will move on to our rearview mirror and what we want to do is locate the button that was adhered to the windshield and we need to get this removed from the rearview mirror. On this particular one there is a set screw on the inside here and loosen that up and the button will slide out the back side. Next take the components of the Loctite kit and remove them from the package. We have got the adhesive here and then we have got our activator ampule here. We are going to start by applying the activator onto not only the button but the windshield. You can see this has got a paper sleeve on it, if you remove that you can see there is a tip and the activator itself is inside a vile inside this plastic tube. I am going to put the paper cover back on and we are going to squeeze the vile until it breaks. 01:32 Once it is broken we can remove the paper cover and you can apply the activator. You want to thoroughly apply this to not only the button but also to the area on the windshield where the rearview mirror is going to reapplied. After the activator has cured for five minutes we can take the adhesive and cut the cap off right at the indentation here. If you flip the cap over there is that tip inside there that if we take and put that over the tube of the adhesive that will help to puncture the hole. When you go to apply the adhesive you need to do it quickly as soon as it gets you want to adhere it to the windshield. Hold that in place for about a minute to make sure it is secure then we need to let it sit and pure for about another 15 minutes before we come back and reinstall the rearview mirror. Now that we have let the adhesive fully cure we can reinstall our rearview mirror. What I am going to do is take the rearview mirror and slide the button inside the track where it was previously and then we will retighten the set screw. With that back on all you need to do is on this particular model we are going to plug the electronics back in. With the electronic port plugged back in our installation is complete. With that, that will conclude the review of part number LT37438 the Rearview Mirror Adhesive from Loctite.
Comments