Скачать с ютуб BO PAN PASTELS - Polymer clay tutorial : PanPastel earrings, ceramic effect. в хорошем качестве
BO PAN PASTELS - Polymer clay tutorial : PanPastel earrings, ceramic effect.
2 года назад
Скачать бесплатно и смотреть ютуб-видео без блокировок BO PAN PASTELS - Polymer clay tutorial : PanPastel earrings, ceramic effect. в качестве 4к (2к / 1080p)
У нас вы можете посмотреть бесплатно BO PAN PASTELS - Polymer clay tutorial : PanPastel earrings, ceramic effect. или скачать в максимальном доступном качестве, которое было загружено на ютуб. Для скачивания выберите вариант из формы ниже:
Загрузить музыку / рингтон BO PAN PASTELS - Polymer clay tutorial : PanPastel earrings, ceramic effect. в формате MP3:
Если кнопки скачивания не
загрузились
НАЖМИТЕ ЗДЕСЬ или обновите страницу
Если возникают проблемы со скачиванием, пожалуйста напишите в поддержку по адресу внизу
страницы.
Спасибо за использование сервиса savevideohd.ru
BO PAN PASTELS - Polymer clay tutorial : PanPastel earrings, ceramic effect.
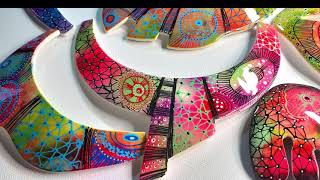
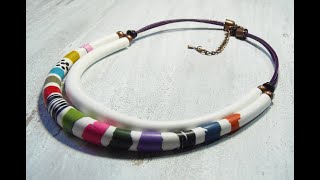
Tutoriel sans prétention et grandes nouveautés mais avec quelques astuces qui pourront toujours servir. Consultez les conseils ci-dessous. Unpretentious tutorial and great news but with some tips that can always be used. Check out the tips below. Boutique : https://helenejeanclaude.wixsite.com/... Blog : http://lesethiopiques.over-blog.com/ Source d’inspiration pour formes fortuites chez Debbie Crothers : https://www.debbiecrothers.com/free-t... Technique facile mais qui nécessite un travail de traitement de surface (pour protéger le pastel sec) un peu fastidieux. Conseils pour le traitement de surface et finitions : Après cuisson, plusieurs étapes à respecter : - 1) appliquer une couche de vernis (mat ou brillant) et gratter immédiatement un peu de poudre de pastels secs sur la pièce (si vous faites cette opération AVANT cuisson, la poudre de pastel ne tiendra pas au moment de l’application du vernis ou d’un autre traitement de surface ). Laisser sécher. Concernant les vernis : chacun à sa préférence (marques, brillant, mat...), mais dans tous les cas, pas de vernis vinylique sur pâte polymère (qui finit par dégrader la polymère). Toujours utiliser un vernis nettoyable à l’eau. Pas de vernis aérosol non plus. - 2) appliquer un vernis au dos de la pièce. Laisser sécher. Ici j’ai utilisé un vernis mat. Ce n’est qu’une proposition. - 3) percer votre pièce dès cette étape si vous avez décidé d’y mettre de la résine. - 4) sur les contours : si les contours sont imparfaits, les poncer. Puis, y appliquer une cire à dorer du type Inka Gold (attention, mettre une cire qui se nettoie à l’eau sinon risque de réaction avec la pâte polymère ; Inka Gold est parfaite pour cet usage). - 5) appliquer une résine (UV ou bi composants) ou bien 1 ou 2 couches supplémentaires de vernis. Remarque : Les pastels secs en bâtonnets feront le même travail que les PanPastels. Easy technique but which requires surface treatment work (to protect the dry pastel) which is a bit tedious. Tips for surface treatment and finishes: After cooking, several steps to follow: - 1) apply a coat of varnish (matte or glossy) and immediately scrape a little dry pastel powder on the piece (if you do this operation BEFORE firing, the pastel powder will not hold when applying the varnish or other surface treatment). Let dry. Concerning varnishes: everyone has their own preference (marks, gloss, matte...), but in any case, no vinyl varnish on polymer clay (which ends up degrading the polymer). Always use a water-cleanable varnish. No aerosol varnish either. - 2) apply a varnish to the back of the piece. Let dry. Here I used a matte varnish. It's just a proposal. - 3) drill your piece at this stage if you have decided to put resin in it. - 4) on the contours: if the contours are imperfect, sand them. Then, apply an Inka Gold-type gilding wax (be careful, use a wax that can be cleaned with water, otherwise there is a risk of reaction with the polymer clay; Inka Gold is perfect for this use). - 5) apply a resin (UV or bi-component) or 1 or 2 additional coats of varnish. Note: Stick pastels will do the same job as PanPastels. FREE Music for Stream - No Copyright - Musique Libre de Droits - Jazz Blues – Chill • FREE Music for Stream - No Copyright ...
Comments