Скачать с ютуб Timing Belt, Water Pump, Pulley & Seals Replacement - Honda Civic (2002-2005)-GMB Belt Kit в хорошем качестве
Timing Belt, Water Pump, Pulley & Seals Replacement - Honda Civic (2002-2005)-GMB Belt Kit
4 года назад
Скачать бесплатно и смотреть ютуб-видео без блокировок Timing Belt, Water Pump, Pulley & Seals Replacement - Honda Civic (2002-2005)-GMB Belt Kit в качестве 4к (2к / 1080p)
У нас вы можете посмотреть бесплатно Timing Belt, Water Pump, Pulley & Seals Replacement - Honda Civic (2002-2005)-GMB Belt Kit или скачать в максимальном доступном качестве, которое было загружено на ютуб. Для скачивания выберите вариант из формы ниже:
Загрузить музыку / рингтон Timing Belt, Water Pump, Pulley & Seals Replacement - Honda Civic (2002-2005)-GMB Belt Kit в формате MP3:
Если кнопки скачивания не
загрузились
НАЖМИТЕ ЗДЕСЬ или обновите страницу
Если возникают проблемы со скачиванием, пожалуйста напишите в поддержку по адресу внизу
страницы.
Спасибо за использование сервиса savevideohd.ru
Timing Belt, Water Pump, Pulley & Seals Replacement - Honda Civic (2002-2005)-GMB Belt Kit
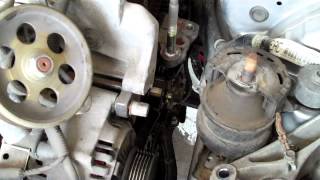
This timing belt and water pump replacement video was made possible by GMB Corporation who was kind enough to provide OE (Original Equipment) quality replacement parts to perform this service. GMB is a Japanese auto parts manufacturer established in 1943 and maintains a global presence in the auto parts industry. Thank You GMB! In this video, we'll be replacing the valve cover gasket, timing belt, water pump, tensioner pulley, tensioner pulley bolt, tensioner spring, and the camshaft and crankshaft seals. What makes this service tedious is that the valve cover must be removed in order to remove the upper timing belt cover. This is due to the end of the valve cover having a lip that sits over the upper belt cover. In addition, the power steering pump bracket along with the alternator / side motor mount bracket must be removed to obtain access to the timing belt area. If you'd like to make a donation to the channel, please follow the link below: https://paypal.me/HardlyMoving?locale... Parts & Specialty Tools: Haynes Honda Civic 2001 thru 2011 & CR-V 2002 thur 2011 Repair Manual (Haynes Automotive) https://amzn.to/310M165 GMB 3435-0312 Timing Belt Component Kit (Mitsuboshi Belt, GMB Water Pump, Tensioner Bearing, Tensioner Spring, Camshaft Seal & Crankshaft Seal) https://amzn.to/2Y4Bd30 GMB Timing Belt Component Kit Info • GMB Timing Belt Kit with Water Pump GMB Parts Look Up https://www.gmb.net/ Always use silicone based grease on rubber to prevent it from swelling. Permatex 22058 Dielectric Tune-Up Grease: https://amzn.to/2Y06stU Use this to hold the camshaft sprocket when removing the bolt IRWIN VISE-GRIP Original Chain Clamp, Locking, 9-Inch (27ZR) https://amzn.to/2MWikZX Great tool for removing those plastic push pins and electrical connectors: Lisle 41250 Push Pin Pliers https://amzn.to/2UJjA71 Use these to remove stubborn hoses, springs and electrical fittings ATD Tools (813 11'' 3-Piece Ring Nose Pliers Set https://amzn.to/2MYdhYR Easy way to add new coolant to the cooling system Lisle 24680 Spill-Free Funnel https://amzn.to/3hxgkVM To replace missing or broken plastic push pins: SunplusTrade 240 Pcs Push Type Retainer Clips for Toyota GM Ford Honda Acura Chrysler with Plastic Storage Case https://amzn.to/2Y12bZi You can use this too to remove seals 5 Pack Paint Can Opener, Bottle Opener, Metal Paint Can Opening Tool, 5 Pack Steel Paint Can Tool https://amzn.to/37xYptJ One of the easiest ways of removing those stubborn camshaft seals. Camshaft Seal Removal Tool: https://amzn.to/2u0rWZV Similar to the seal installation tool set that I used. Private Brand Tools PBT70961 Crankshaft and Camshaft Seal Tool Kit: https://amzn.to/2Y01T54 This high mass socket, I guarantee, will get that stubborn 19 mm crankshaft pulley bolt off with an electric impact driver! Lisle 77080 19 mm Harmonic Balancer Socket for Honda: https://amzn.to/2UKIYcq Here's a set of high mass sockets if dealing with other engines outside of Toyota. OEMTOOLS High Mass 6 Piece Crank Bolt Socket Set, 6 Pack https://amzn.to/2G9ZNpF These long handle, flex head, reverse direction, index box wrench is what I and the pros use on a daily basis. Once you have these, you'll be wondering why you never had these to begin with. Mountain RM6 Chrome Metric Box Wrench Set https://amzn.to/2MLzVWf Mountain MTNRM1214 Ratcheting Double Box Flex Wrench, 12x14mm https://amzn.to/327YtwL Powered Impact Tool (not the one I used, but less expensive quality corded version): https://amzn.to/2F57ldk Battery Electric - Milwaukee M18 FUEL 1/2" Compact Impact Wrench (Tool Only) https://amzn.to/2IrfqvR Battery Electric - Milwaukee M18 FUEL 1/2" Compact Impact Wrench with battery & charger https://amzn.to/2VScjQF Electric Ratchet Wrench - M12 Fuel 3/8" Ratchet (Bare Tool) https://amzn.to/2VWXsEE 1400 lbs Electric Impact Wrench - Milwaukee M18 Fuel High Torque 1/2-Inch Impact Wrench with Friction Ring https://amzn.to/2ZlsA2B As an Amazon associate, I earn from qualifying purchases. Thank you for your support! Please Subscribe: https://goo.gl/x6fySQ #timingbelt 0:00 Introduction 1:40 Loosen the intake hose bracket bolt 4:50 Loosen this adjustment wing nut. 5:17 Be careful not to lose the woodruff key when removing the crank pulley. 6:19 Remove these two bolts. 7:25 Check crankshaft alignment 7:30 Add paint to the belt and alignment marks to ease installation 11:24 Remember the woodruff key! 18:03 Temporarily install the crank shaft bolt 19:35 Install the side motor mount and 5 bolts. 19:41 Install the lower timing belt cover. 22:28 Keep the bracket bolt loose until alternator moves freely, then tighten. 22:47 Tighten the bracket and locking bolts.
Comments