Скачать с ютуб Install: Replacement PowerGear RV Above Floor Slide-Out Motor on a 2007 Fleetwood Bounder Motorhome в хорошем качестве
Install: Replacement PowerGear RV Above Floor Slide-Out Motor on a 2007 Fleetwood Bounder Motorhome
2 года назад
Скачать бесплатно и смотреть ютуб-видео без блокировок Install: Replacement PowerGear RV Above Floor Slide-Out Motor on a 2007 Fleetwood Bounder Motorhome в качестве 4к (2к / 1080p)
У нас вы можете посмотреть бесплатно Install: Replacement PowerGear RV Above Floor Slide-Out Motor on a 2007 Fleetwood Bounder Motorhome или скачать в максимальном доступном качестве, которое было загружено на ютуб. Для скачивания выберите вариант из формы ниже:
Загрузить музыку / рингтон Install: Replacement PowerGear RV Above Floor Slide-Out Motor on a 2007 Fleetwood Bounder Motorhome в формате MP3:
Если кнопки скачивания не
загрузились
НАЖМИТЕ ЗДЕСЬ или обновите страницу
Если возникают проблемы со скачиванием, пожалуйста напишите в поддержку по адресу внизу
страницы.
Спасибо за использование сервиса savevideohd.ru
Install: Replacement PowerGear RV Above Floor Slide-Out Motor on a 2007 Fleetwood Bounder Motorhome
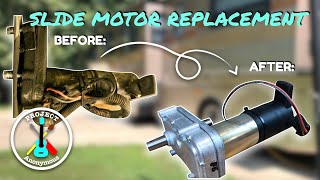
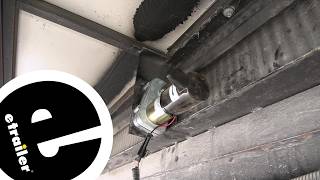
Click for more info and reviews of this Lippert RV Slide Out Parts: https://www.etrailer.com/RV-Slide-Out... Check out some similar RV Slide Out Parts options: https://www.etrailer.com/dept-pg-RV_S... Search for other popular Fleetwood Bounder Motorhome parts and accessories: https://www.etrailer.com/vehicle/2007... https://www.etrailer.com Don’t forget to subscribe! / etrailertv Full transcript: https://www.etrailer.com/tv-install-l... Hey guys, coming here with etrailer and today I'll be showing you how to replace your worn out slide out motor, here on your 2007 Fleetwood Bounder motor home. So over the years, your slide out motor can start to lose power or just have some shoot up gears on the internal portion of the housing here, and because of that, your slide-out's not gonna want to actually come in or out. And the solution to that is to find the correct replacement motor, based on the serial numbers that are on your actual motor for the motor side and for the gear housing side and then cross referencing that to find the correct replacement. So when we look at our slide out motor, there are a few different variations. This one, as you can see, is a double shaft. There are some types where it only will have a single shaft. There's different variations in what kind of connection. There are a lot of hard wire versions. This specific one comes with a connector, and there's a few different types of connectors. So you're gonna wanna make sure, when you're verifying with all of the information that's on your slide out motor, that your new one's actually gonna match up the same way. So a slide out motor is a fairly simple design. It is just a motor and then some gears, and what those gears do is spin and spin our double shafts up on the outside of our motor here. And what those shafts do is they connect to your room bar and your room bar goes over to your gear packs. And that's what it actually slides, on a track, to move your slide out in and out. So one other thing is, depending on the type of room bar you have, that's also gonna gonna determine the type of motor. So with ours, we don't have a shear pin. A shear pin is just the small piece of metal that has been rolled and push through your shaft. And what that does is it sticks inside of the raw room bar and then that actually turns it. So on our specific model, our room bar slides over and then we have a pin that goes through and secures with a nut. On other models, you may see that sheer pin, which would stick inside and then connect with some nearing that's inside of the room bar, and that's what actually would spin the room bar as needed. As far as installation goes, it is just gonna bolt right up to your factory bracket on your frame and then you're just gonna have to connect your shafts to your room bars. So all in all, it is fairly simple. You can easily do this yourself but you may need someone else to kind of sit there and work the controls when you're trying to line up the hole in your shaft to your room bar. So the first step is gonna be determining what is the correct replacement motor, whenever you're dealing with your slide outs. So the motor itself is gonna have some item numbers, part numbers, BO numbers on them, depending on what kind of motor you have and then also the housing itself is gonna have some item numbers on it already. So I had already taken out most of these bolts. I'm gonna take this other one off. So our mounting bolts removed will allow us to see what our item number is on our actual gear housing. So then I can go and cross reference that and find the correct fit. Now that we have the correct fit, we can fully take this off the rest of the way. And before we do anything else, we wanna make sure that we remove the power. So we are going to unhook this from our setup, just so that we don't have any kind of issues. There we go. So next we're gonna have to disconnect our motor from our room bars. So to do that, we're just gonna take off this nut right here. Mine was only hand tight, but you may end up needing a wrench just to take it off on yours. We'll go ahead and we'll just kind of work this up and push our bolt out. That slides out of place, you can see that you can kind of the slide motor out. And we're gonna do that same thing over on this other side, so we can fully remove it. With the motor removed, now you can fully see the part numbers and serial numbers that are on the actual gear housing and then also on the motor itself. As you can see, this is pretty dirty, starting to kind of fall apart. So it is really important to kind of keep these nice and protected. If you can just stick over some clear tape over that, whenever you're replacing it, that way if you ever had to replace it again, or for the next person tha
Comments