Скачать с ютуб 2004 TOYOTA AVALON REAR SUBWOOFER - SPEAKER REPLACEMENT / REPAIR - DIY в хорошем качестве
2004 TOYOTA AVALON REAR SUBWOOFER - SPEAKER REPLACEMENT / REPAIR - DIY
5 лет назад
Скачать бесплатно и смотреть ютуб-видео без блокировок 2004 TOYOTA AVALON REAR SUBWOOFER - SPEAKER REPLACEMENT / REPAIR - DIY в качестве 4к (2к / 1080p)
У нас вы можете посмотреть бесплатно 2004 TOYOTA AVALON REAR SUBWOOFER - SPEAKER REPLACEMENT / REPAIR - DIY или скачать в максимальном доступном качестве, которое было загружено на ютуб. Для скачивания выберите вариант из формы ниже:
Загрузить музыку / рингтон 2004 TOYOTA AVALON REAR SUBWOOFER - SPEAKER REPLACEMENT / REPAIR - DIY в формате MP3:
Если кнопки скачивания не
загрузились
НАЖМИТЕ ЗДЕСЬ или обновите страницу
Если возникают проблемы со скачиванием, пожалуйста напишите в поддержку по адресу внизу
страницы.
Спасибо за использование сервиса savevideohd.ru
2004 TOYOTA AVALON REAR SUBWOOFER - SPEAKER REPLACEMENT / REPAIR - DIY
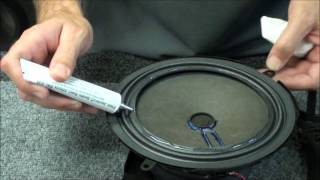
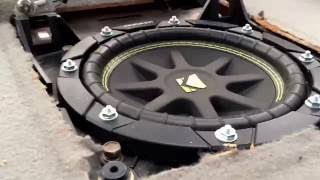
https://amzn.to/2m2on55 - 8" Sound Storm SS8 (reviews mention that it works in an avalon too, and is a cheaper option.) https://amzn.to/2llPaJn - 8" Pyle 8" sub (reviews mention that this also works in the avalon) https://amzn.to/34r47LO - Speaker Repair kit by Simply Speakers https://amzn.to/2ZLiQh5 - This is the speaker used in the video. https://amzn.to/2mMPOAc Dan the Fix it Man's Amazon storefront Just a quick video showing how I replaced the rear Subwoofer in my daughter's 2004 Toyota Avalon. This would be the same for years 2000-2004. The stock JBL speaker was making a very annoying rattling noise. The foam was completely torn and crumbling away from the speaker cone. I have used the foam speaker repair kit on a different vehicle in the past, and it worked great, but this speaker was a little cheaper, so I thought it was worth a try. I am happy with how it turned out. It sounds good, and no more rattling or bad noises. It's a little tricky getting the speaker mounting frame out from under the rear deck lid cover, but just be patient and try several different angles until it comes out. I have heard that you can remove the rear seat to take out the deck lid, but I thought that would be too much work so I did it this way. You will just need a screwdriver and/or drill and some small screws (I used small self-tapping screws), and a 10mm socket wrench to remove the plastic speaker frame or housing. I did not solder the wires to the new speaker. You may want to solder it, or you may do like I did in the video and use some wire clips to connect it to the factory wiring harness. Thanks for watching! Please Subscribe! - Dan the Fix it Man Song used in the video: "Realism" by Text Me Records / Grandbankss As an Amazon Associate I earn from qualifying purchases.
Comments