Скачать с ютуб How to Replace Struts for a Nissan Frontier/Xterra (2008-2014) в хорошем качестве
How to Replace Struts for a Nissan Frontier/Xterra (2008-2014)
2 года назад
Скачать бесплатно и смотреть ютуб-видео без блокировок How to Replace Struts for a Nissan Frontier/Xterra (2008-2014) в качестве 4к (2к / 1080p)
У нас вы можете посмотреть бесплатно How to Replace Struts for a Nissan Frontier/Xterra (2008-2014) или скачать в максимальном доступном качестве, которое было загружено на ютуб. Для скачивания выберите вариант из формы ниже:
Загрузить музыку / рингтон How to Replace Struts for a Nissan Frontier/Xterra (2008-2014) в формате MP3:
Если кнопки скачивания не
загрузились
НАЖМИТЕ ЗДЕСЬ или обновите страницу
Если возникают проблемы со скачиванием, пожалуйста напишите в поддержку по адресу внизу
страницы.
Спасибо за использование сервиса savevideohd.ru
How to Replace Struts for a Nissan Frontier/Xterra (2008-2014)
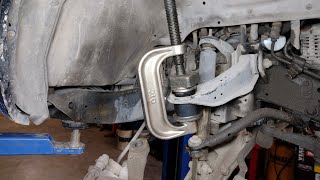
We are going over the steps to swap out the complete strut assembly for a 2009 Nissan Frontier. Errata (12-30-21): Step 24 is suppose to be 67 ft-lb, NOT 14 ft-lb (Bad Copy/Paste Error) 1. Tools - 0:08 2. Step 1 (Mark Lower Control Arm Level) - 0:46 3. Step 2 (Loosen Lug Nuts) - 1:12 4. Step 3 (Lift Vehicle) - 1:24 5. Step 4 (Remove Wheels) - 1:53 6. Step 5 (Lubricate Nuts and Bolts) - 2:08 7. Step 6 (Support Control Arm) - 2:28 8. Step 7 (Remove Stabilizer Bar Link - DS) - 2:36 9. Step 8 (Remove Stabilizer Bar Link - PS) - 4:07 10. Step 9 (Rotate Stabilizer Bar) - 4:20 11. Step 10 (Remove Lower Mounting Bolt) - 4:26 12. Step 11 (Remove Upper Mounting Nuts) - 5:22 13. Step 12 (Remove Strut Assembly - DS) - 5:47 14. Step 13 (Lubricate Strut Bushing - DS) - 6:10 15. Step 14 (Install Strut Assembly - DS) - 6:30 16. Step 15 (Install Lower Mounting Bolt) - 6:44 17. Step 16 (Install Upper Mounting Nuts) - 7:06 18. Step 17 (Install Lower Mounting Nut) - 7:40 19. Step 18 (Torque Upper Mounting Nuts) - 8:02 20. Step 19 (Mark Upper Mounting Nuts) - 8:30 21. Step 20 (Replace PS Strut Assembly) - 8:43 22. Step 21 (Install Stabilizer Bar Links) - 11:06 23. Step 22 (Return Stabilizer Bar Position) - 11:25 24. Step 23 (Torque Upper Stabilizer Bar Link Nuts) - 11:46 25. Step 24 (Torque Lower Stabilizer Bar Link Nuts) - 11:57 26. Step 25 (Mark Stabilizer Bar Link Nuts) - 12:01 27. Step 26 (Level Lower Control Arm - DS) - 12:15 28. Step 27 (Torque Lower Mounting Bolt - DS) - 12:29 29. Step 28 (Mark Lower Mounting Bolt - DS) - 12:47 30. Step 29 (Level Lower Control Arm - PS) - 12:50 31. Step 30 (Torque Lower Mounting Bolt - PS) - 12:55 32. Step 31 (Mark Lower Mounting Bolt - PS) - 13:09 33. Step 32 (Install Wheels) - 13:14 34. Step 33 (Lower Vehicle) - 13:28 35. Step 34 (Torque Lug Nuts) - 13:34 DS = Driver Side PS = Passenger Side Products Used: This video contains affiliate links for which I may receive compensation. MonroeRoadMatic Complete Strut Assembly - https://shop.advanceautoparts.com/p/m... Synthetic Grease - https://amzn.to/3HzwZnx Semi-Permanent Threadlock - https://www.harborfreight.com/02-oz-r... Penetrant Spray - https://www.harborfreight.com/11-oz-s... Paint Marker Pens - https://amzn.to/345kuTd Tools: 1/2" Torque Wrench (14-155 ft-lb) 1/2" Breaker Bar 1/4" Socket Wrench 1/2" Socket Wrench 14mm Socket 17mm Socket 19mm Socket 21mm Socket 14mm Wrench 17mm Wrench 19mm Wrench 1/2" Extensions Semi-Permanent Threadlock Grease Penetrating Oil Paint Marker Pen (Optional) Service Jacks & Jack Stands Disclaimer: Content produced from Mcgurr Entertainment is for entertainment purposes only. This information is not endorsed by any agency/company (such as Ford) and is intended as an entertainment. Mcgurr Entertainment assumes no liability for property damage or injury incurred as a result of any of the information contained in this video. All content on YouTube is provided in good faith, however we make no representation or warranty of any kind, express or implied, regarding the accuracy, adequacy, validity, reliability, availability or completeness of any information on YouTube. Use this information at your own risk. #StrutAssembly #FrontierStruts
Comments