Скачать с ютуб etrailer | Set up: Draw-Tite Max-Frame Trailer Hitch Receiver on a 2012 BMW X5 в хорошем качестве
etrailer | Set up: Draw-Tite Max-Frame Trailer Hitch Receiver on a 2012 BMW X5
8 лет назад
Скачать бесплатно и смотреть ютуб-видео без блокировок etrailer | Set up: Draw-Tite Max-Frame Trailer Hitch Receiver on a 2012 BMW X5 в качестве 4к (2к / 1080p)
У нас вы можете посмотреть бесплатно etrailer | Set up: Draw-Tite Max-Frame Trailer Hitch Receiver on a 2012 BMW X5 или скачать в максимальном доступном качестве, которое было загружено на ютуб. Для скачивания выберите вариант из формы ниже:
Загрузить музыку / рингтон etrailer | Set up: Draw-Tite Max-Frame Trailer Hitch Receiver on a 2012 BMW X5 в формате MP3:
Если кнопки скачивания не
загрузились
НАЖМИТЕ ЗДЕСЬ или обновите страницу
Если возникают проблемы со скачиванием, пожалуйста напишите в поддержку по адресу внизу
страницы.
Спасибо за использование сервиса savevideohd.ru
etrailer | Set up: Draw-Tite Max-Frame Trailer Hitch Receiver on a 2012 BMW X5
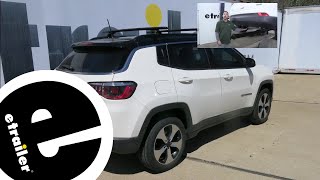
Click for more info and reviews of this Draw-Tite Trailer Hitch: https://www.etrailer.com/Trailer-Hitc... https://www.etrailer.com Don’t forget to subscribe! / etrailertv Full transcript: https://www.etrailer.com/tv-install-t... Today on our 2012 BMW X5 we're going to take a look at and show you how to install the Draw-Tite Max-Frame custom fit class three trailer hitch receiver. This is part number 75600. Here's what our hitch is going to look like installed on the vehicle. We've got our receiver tube opening that sticks down there. That's really all we can see. The rest of our crosstube and everything has been hidden up behind the rear fascia. This is a 2" class three hitch so it's going to be really versatile. You got the 2" by 2" receiver tube opening, the collar that comes around the end to give it some reinforcement, cleans up that look. The safety chain connection points are that rolled steel stock. Should allow just about any safety chain connections that you want there be attached pretty easily. Going to have a double hole setup on our hitch. The larger hole closest to the front of the vehicle is going to be the one that we're going to use for securing any of our items. Any class three accessories should work out fine. Looks like we've got good room on either side. The whole in front is for use in conjunction with the j-pin stabilization system. That part number is 63201. Now as far as towing goes, we're going to have a 600 pound tongue weight. That's the maximum downward force we can put here at the receiver tube opening. We're going to have a gross trailer weight rating of 6,000 pounds. That's going to be our trailer and then everything that we've got loaded up on it. Now if we move into a weight distribution setup, those numbers are going to stay the same, so we will want to look into the owners manual of the X5, make sure it can take those loads. If not, we'll go off of whichever of those numbers are the lowest. Now a couple measurements that are going to be helpful in selecting your ball mount, bike rack, or hitch cargo carrier would be from the ground to the inside top edge of the reciever tube opening we've got about 13-3/4" then from the center of our hitch pinhole to the outermost edge of our bumper it's about 2-1/2. Now to begin our installation won't come into our wheel wells right behind the rear tire. We're going to have three rivets. We've got one, two, and then right up here is a third that we need to remove. What we're going to do is choose a little drill bit here and drill the center of that out. These things should come right off. We'll do that for all three locations. Now we'll head over to the driver side and do the exact same thing. Now what we're going to do is come right behind that wheel well right above the seam here. We want to pull out on the trim panel. There will be just a couple little pressure clips in there that hold it in place. We want to get to that screw that's right there. Just use an 8mm socket. Let's go ahead and back that out. We'll set it aside so we can put it back in later. Now just under our exhaust pipe here we're going to have three fasteners around the bottom of the fascia. We've got one here right behind the tire and then where the black meets the gray there's going to be one and two more. Now they're going to be in the same spot on both sides. We're going to take all six of them out. Now we've got our reflector to take out. It's going to be right above the tailpipe there's just a little push tab. We're going to push over on that and then push out, try to get that reflector to come right on out. Now to do it you can either try to push the tab over with your finger, or I'm just going to use a little small, flat screwdriver here. Now we'll open the hatch here. As we lower it you'll see we see the end of the reflector there. We just want to hold onto that and pull straight out and it will be detached. We'll just set these aside so we can put them back in later. We'll take out the bolt located right behind them. We're going to do that on both sides of the vehicle. Now what we can do is open that tailgate or raise it up just slightly. We want to pull out on each side there where it holds our retaining tab into place. Now once we have the four of those separated across there we'll come back in behind our side trim panel and just start gently pulling outward from the vehicle. As we pull out we may need to just take a small screwdriver in there and release the little tabs that hold it in place. There will be little slots in there. Just press down on them. There we go. Continue to work that around the taillight housing. We'll just let that side rest while we go do the same thing over on our driver side. Now as we pull out it's a good idea to get an extra set of hands. That way we won't have to worry about trying to support it and work our edge off. There goes tha
Comments